


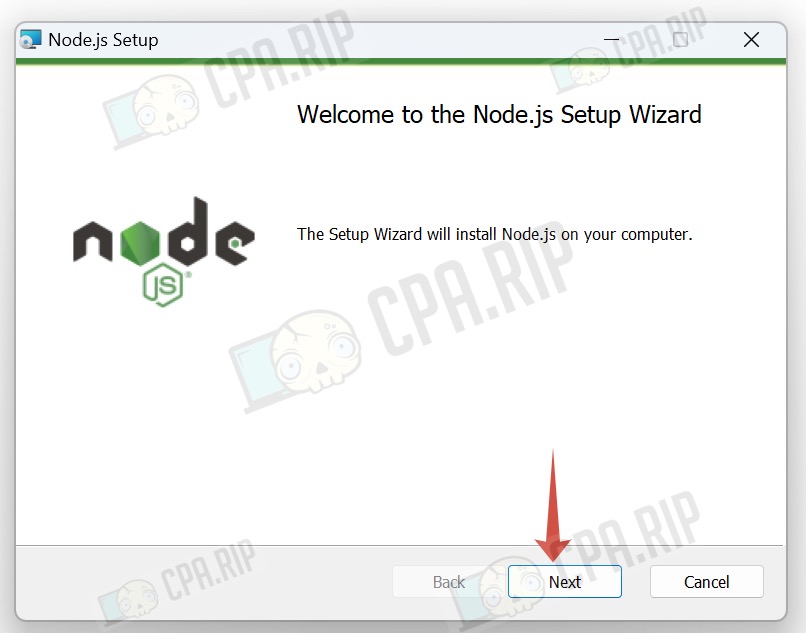
We will take a detailed look at how to access the n8n automation service, what cloud solutions are available, and provide step-by-step instructions for installing the open-source version of n8n for free on your own server and locally on your computer. We will show you how to get a free n8n licence and put together your first test project.
n8n.io automation service
- Website: https://n8n.io/
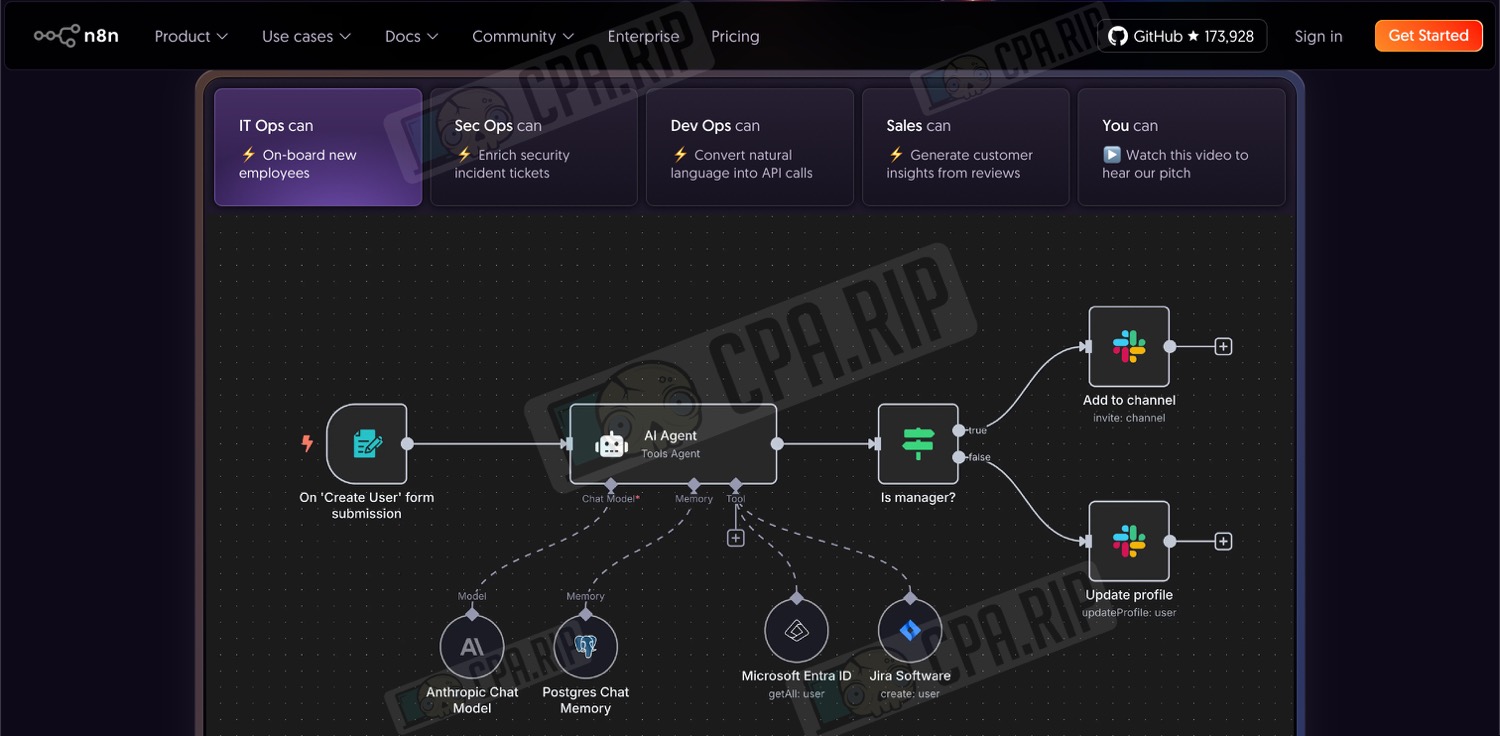
n8n is a workflow automation platform that allows you to create your own tools and scenarios for work without any programming knowledge or coding. The service is based on a visual constructor that can be used to assemble chains of actions, work with APIs, connect different services and systems, process data, and automate routine tasks that are performed manually.
At the time of writing, n8n provides over 1,000 ready-made integrations, including official nodes, community clients, and the ability to connect to any API via HTTP/REST. The platform supports messengers and teamwork tools, including Telegram, Slack, and Discord, AI services and language models (ChatGPT, Gemini, DeepSeek), Google and GitHub ecosystem services, and other external systems.
The tool is also suitable for automating technical processes in affiliate marketing: processing leads and applications, auto-replies in chats and bots, synchronising data between advertising platforms, trackers, and CRM, as well as connecting neural networks for automated content and creative generation, including building a full-fledged content factory for User-Generated Content-based traffic.
Next, we will look at how to access n8n.io, how to deploy it on your server or computer, and how to use it for free.
Official cloud solution n8n.io
The n8n cloud solution allows you to get started without installing and configuring a server. Users get access to the web interface immediately after registration, while infrastructure maintenance, updates, and technical support are provided by n8n.
Registering with n8n
- Go tohttps://n8n.io/
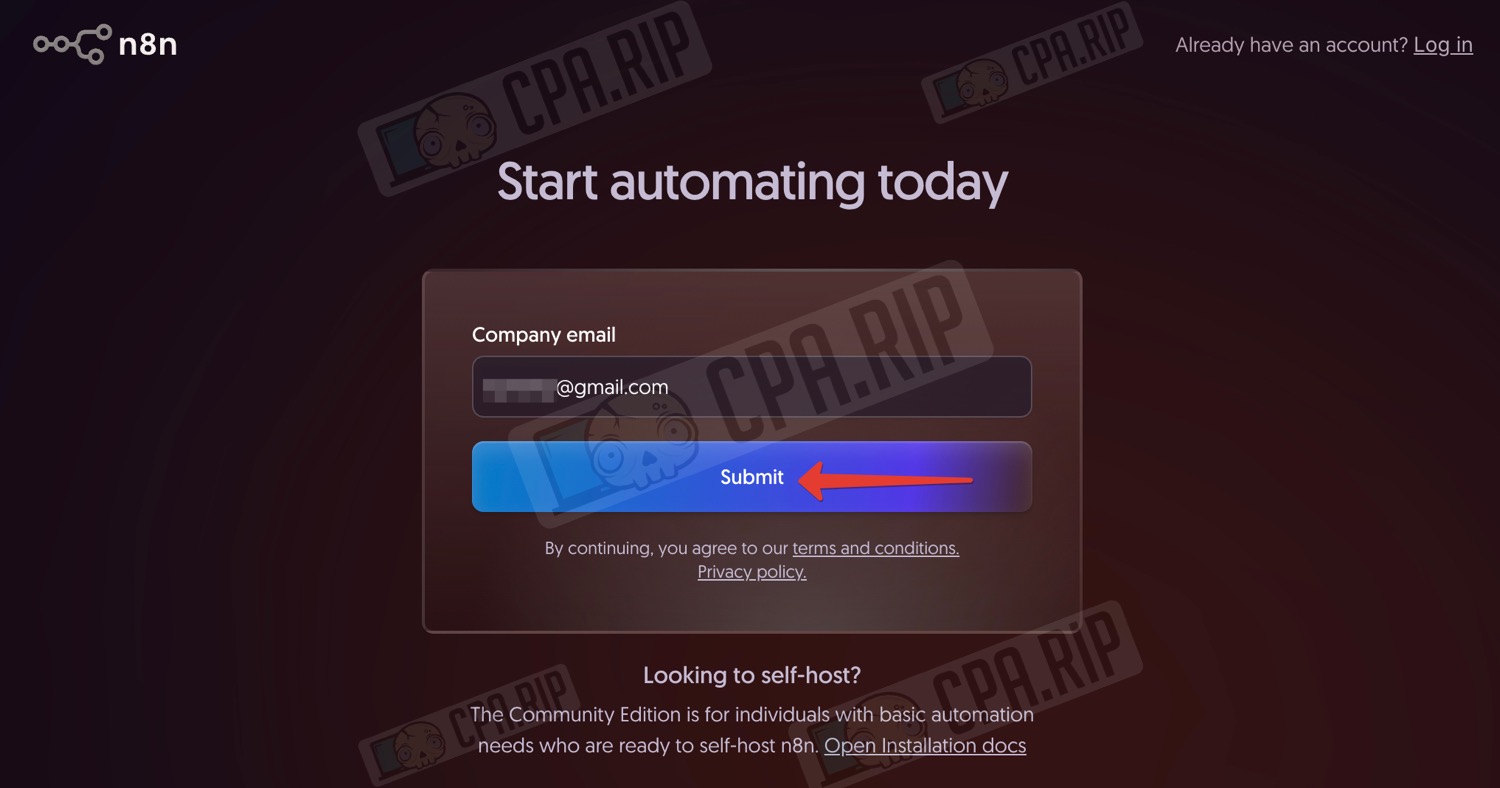
- In the top right corner, click ‘Get Started’

- Enter your email address and click ‘Submit’
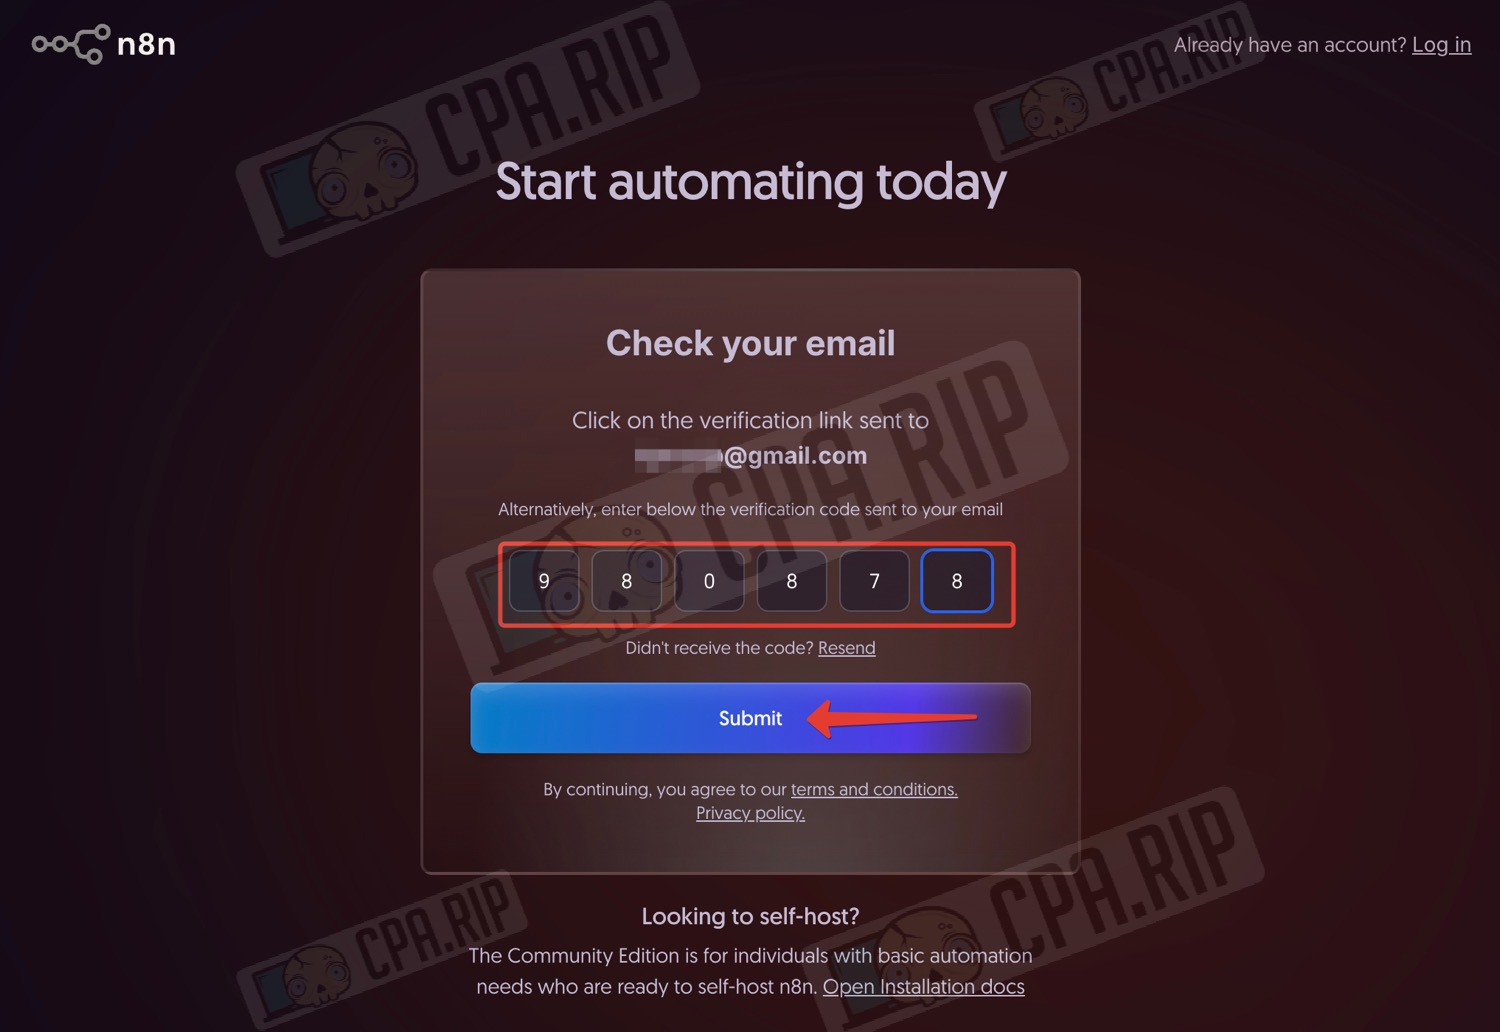
- Enter the verification code received in your email
- And click ‘Submit’
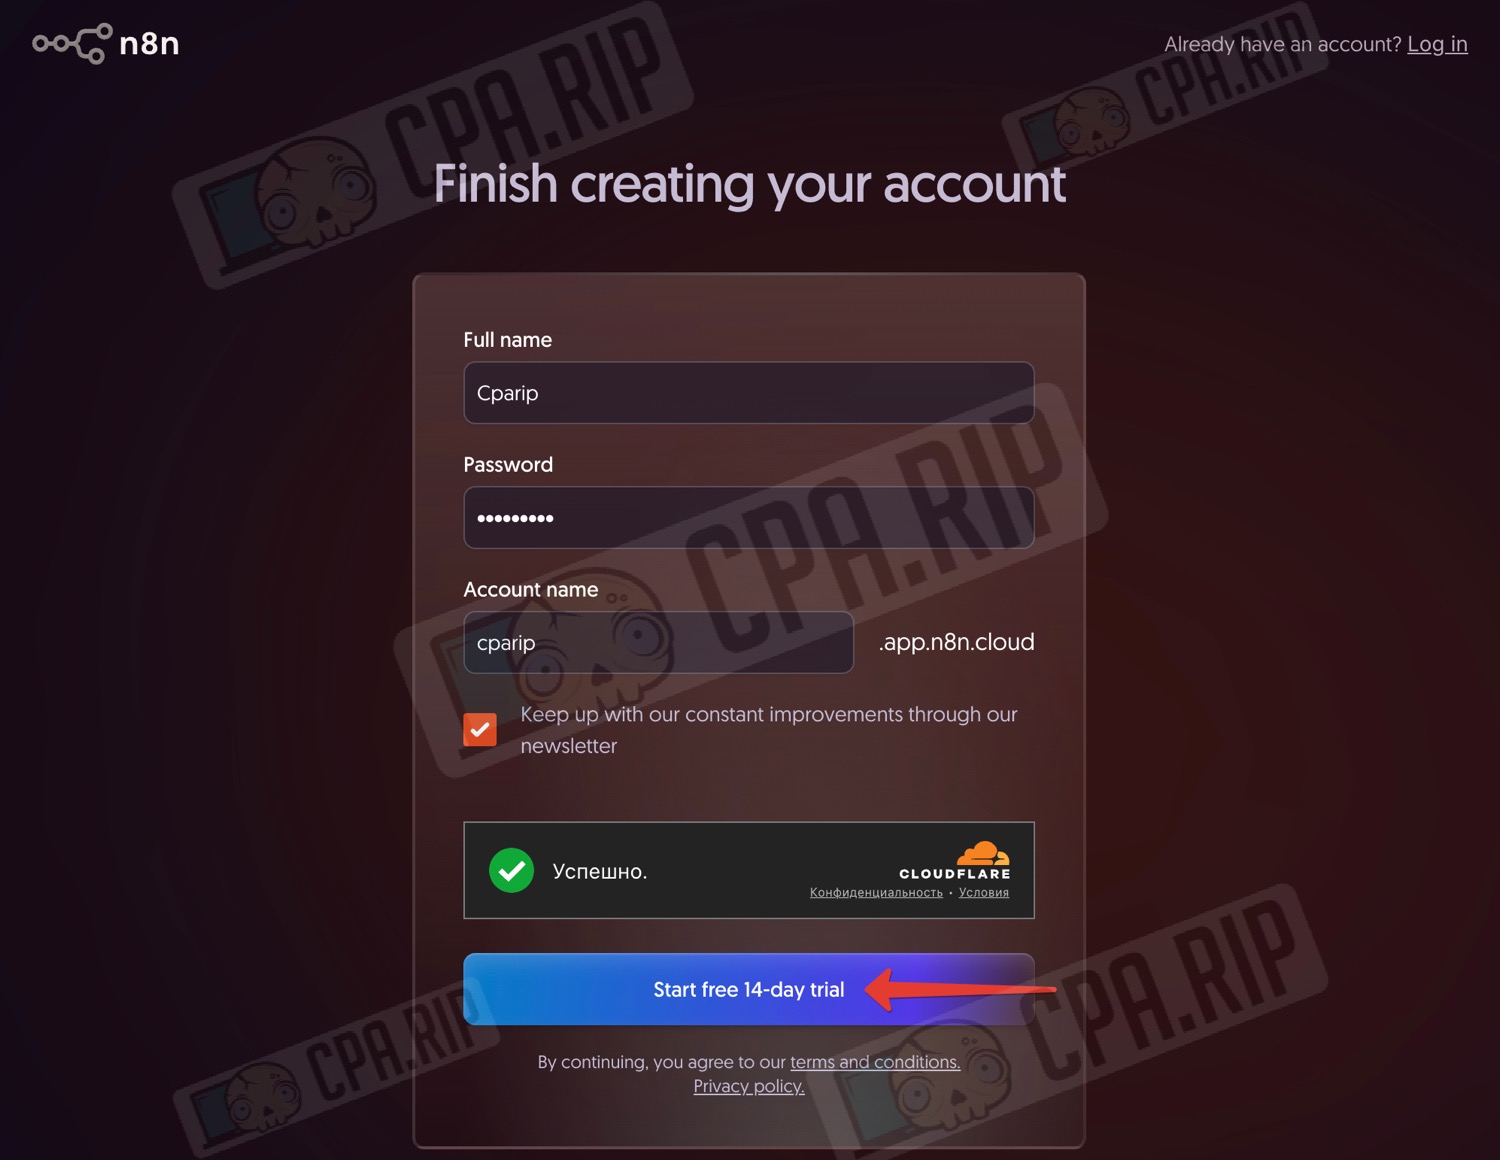
- In the next step, fill in all the fields and pass the captcha
- Click ‘Start free 14-day trial’
- Answer the questions in the questionnaire
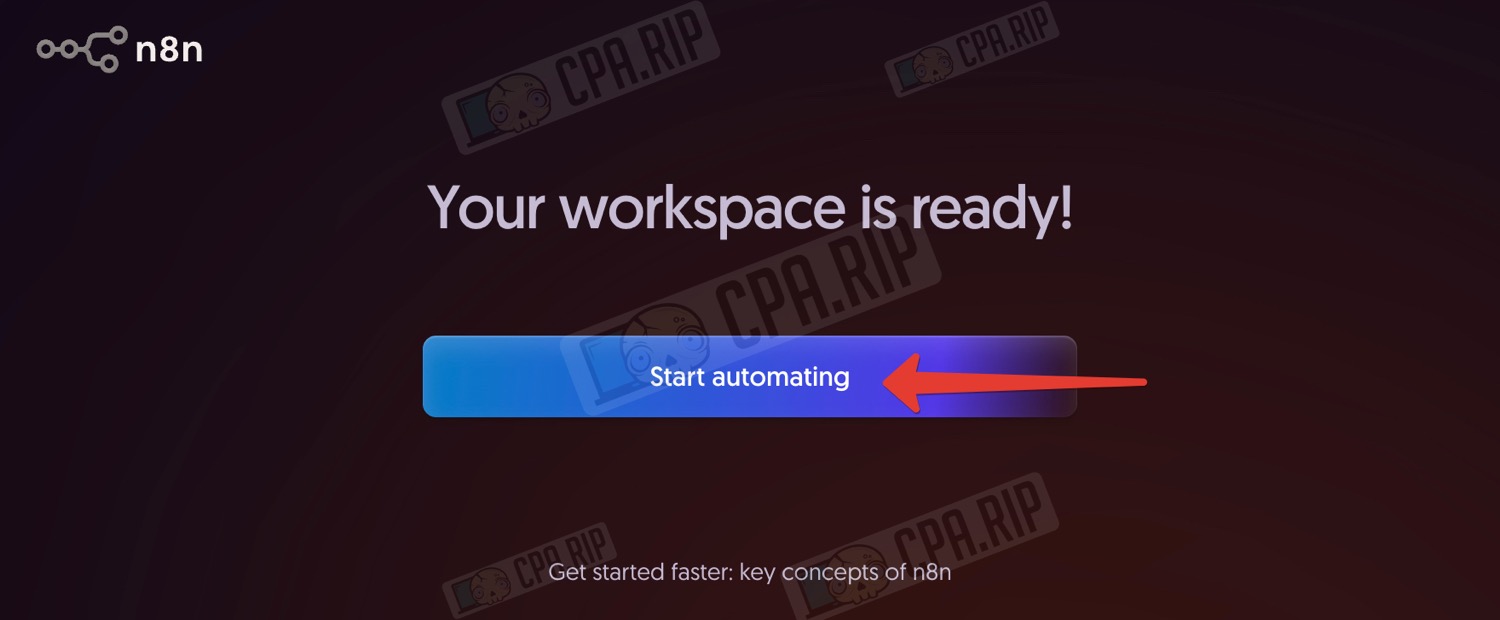
- And at the end, click ‘Start automating’
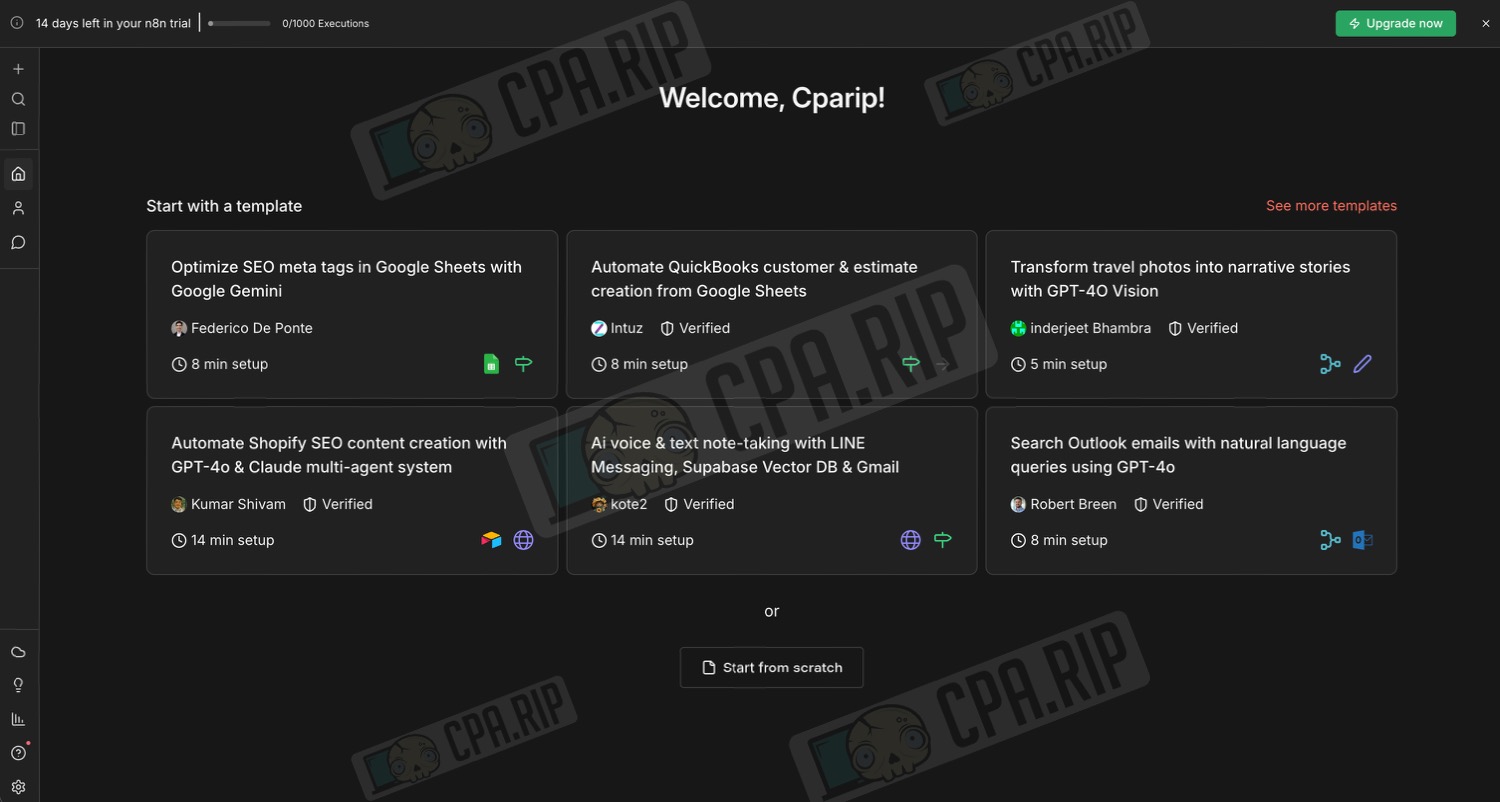
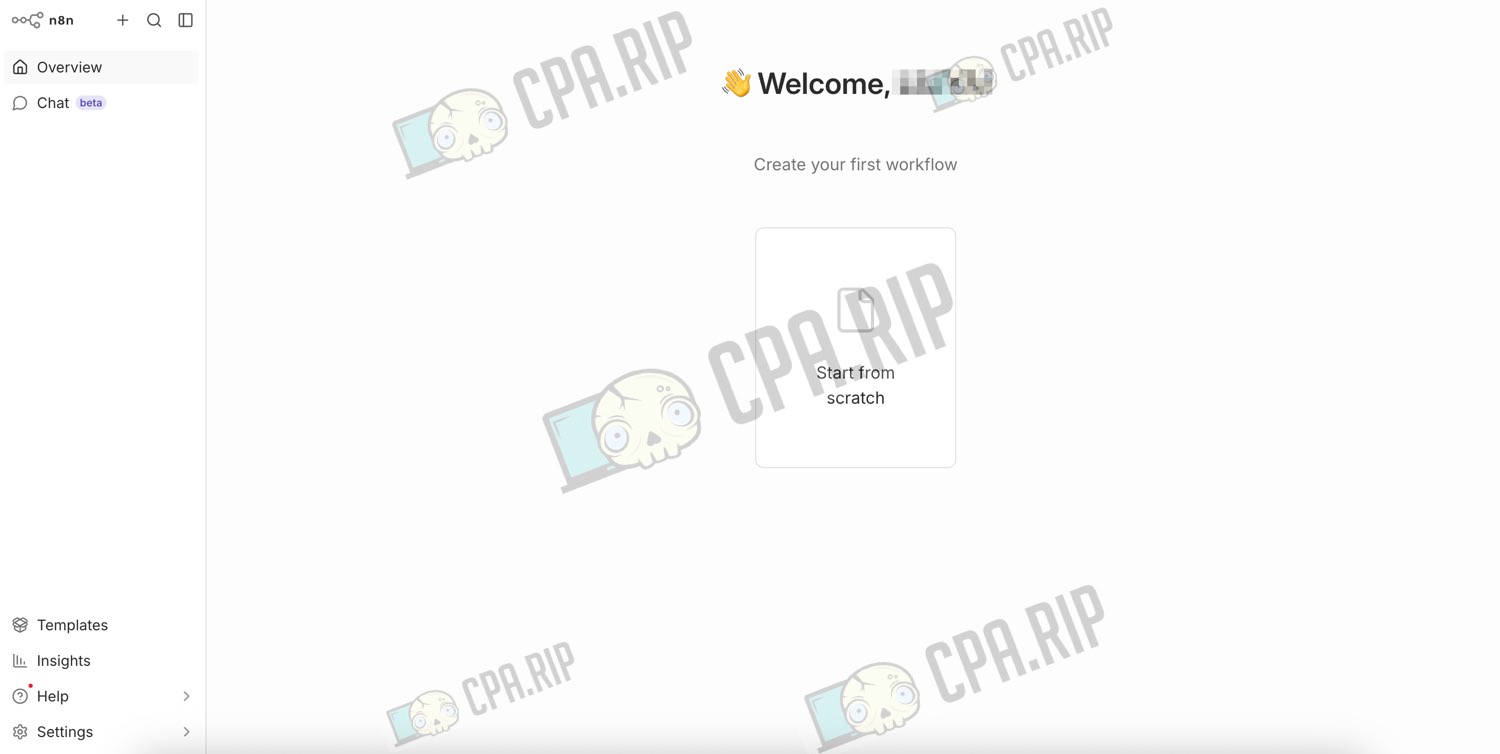
You will then be taken to the n8n web interface, where you can start your first project using ready-made templates or from scratch by clicking ‘Start from scratch’:
n8n tariff plans
On the n8n website, the basic Starter cloud plan costs $24 per month with monthly billing. It includes:
- 2,500 workflow launches (automation scenarios) per month (no limit on the number of steps within a single scenario)
- 1 shared project
- 5 concurrent executions
- Unlimited number of users
- 50 AI Workflow Builder credits
- Hosting on the n8n side (no server required)
- Support via forum
This is a fully cloud-based version, but with restrictions on the number of launches and concurrent processes.
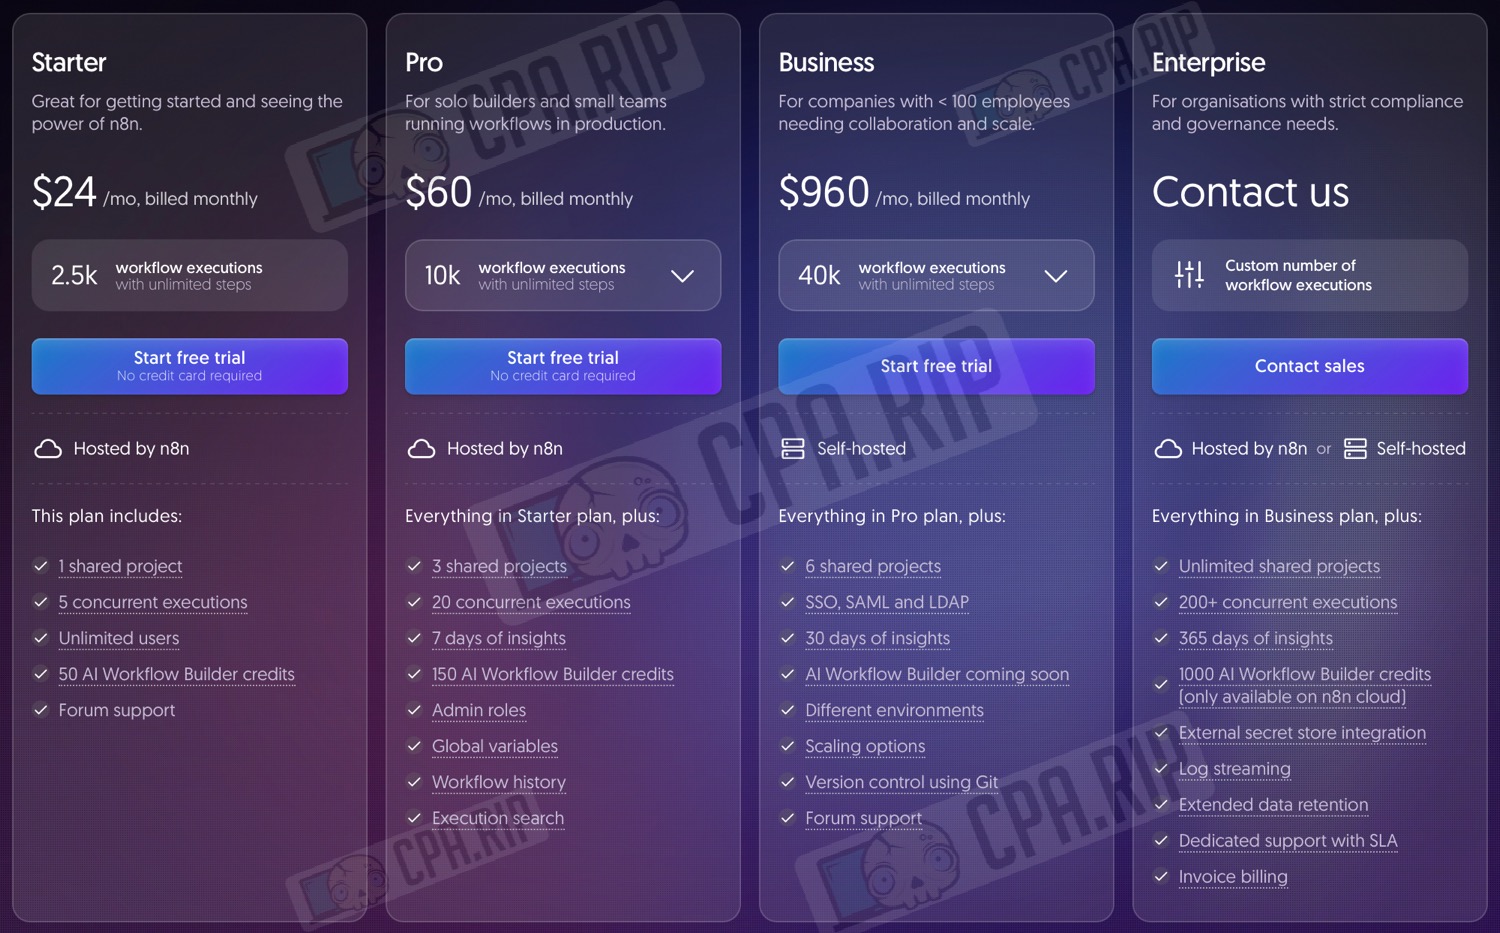
After registration, you get a free 14-day trial. Not a bad option for getting acquainted with the service for the first time.
Installing n8n on your VDS server
A key feature of n8n is the ability to install it completely independently: the self-hosted version can be deployed for free either on your own server or locally on your computer, while retaining full control over data and workflow logic.
Advantages of deploying on your own server:
- Always available — unlike a local installation, n8n runs 24/7 and does not depend on a computer being turned on or a user session.
- Full control over your data — all logs, tokens, API keys, and workflow data are stored with you, without being transferred to third parties.
- No pricing restrictions — there are no limits on the number of workflows, steps, launches, and integrations, which are usually found in cloud versions.
- Free to use — self-hosted installations use the open-source version without a monthly subscription.
- Flexible configuration — you can configure the environment, versions, backups, access, authorisation, and security to suit your tasks.
- Integration with internal services — direct access to local and closed APIs, databases, and systems that cannot be connected from the cloud.
- Scalability — you can independently manage server resources and scale the load to suit your scenarios.
- Independence from external services — n8n will continue to work even if the cloud platform’s pricing or policies change.
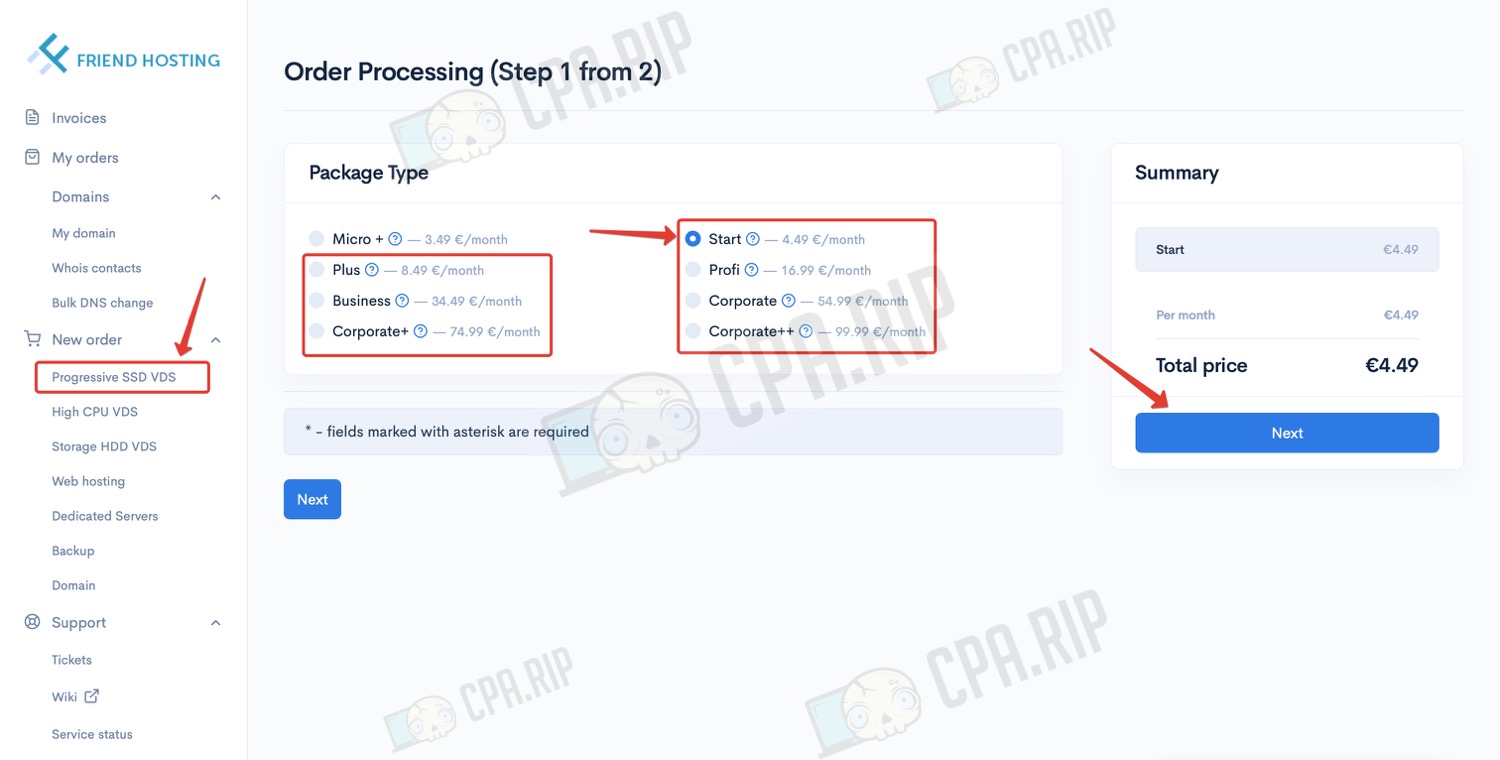
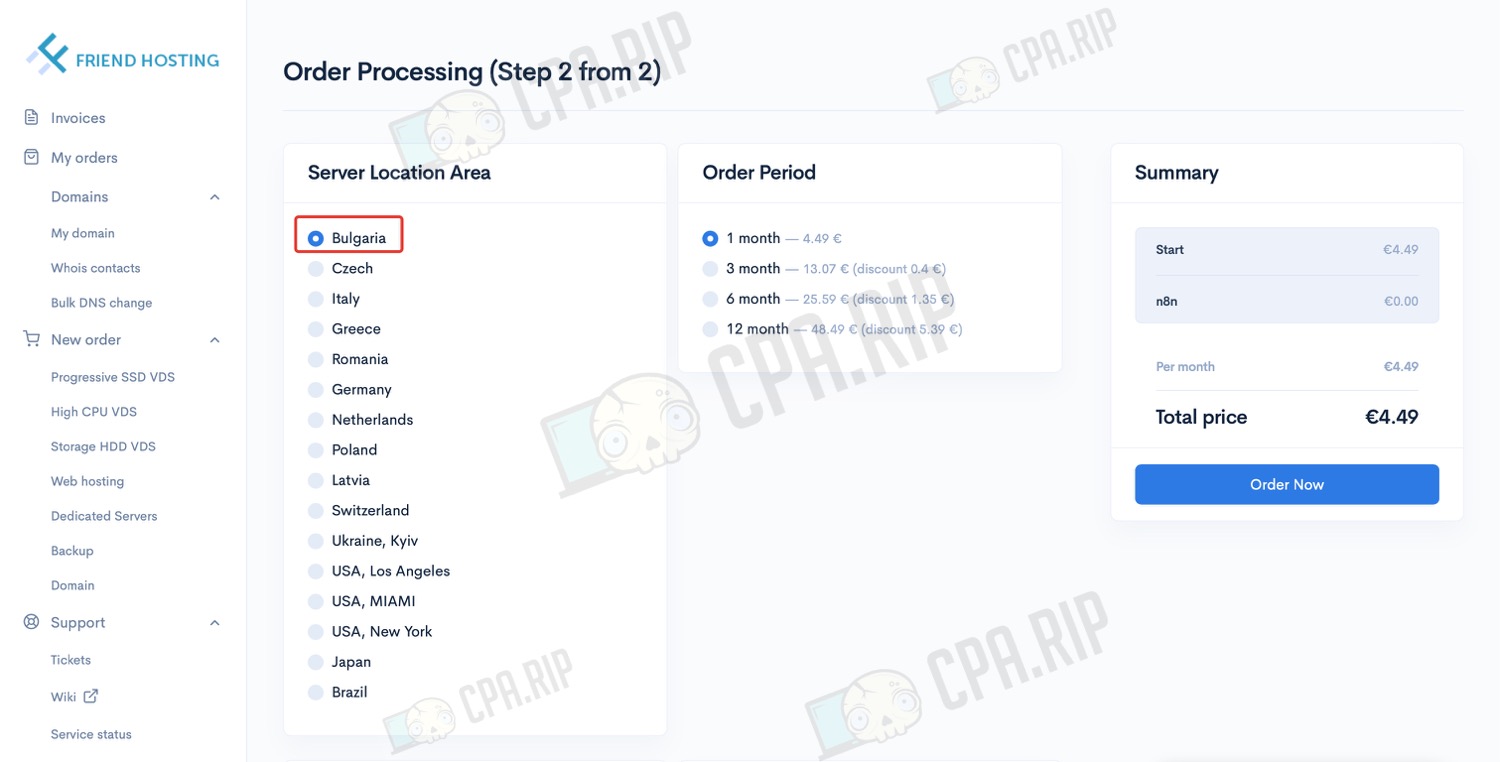
n8n can be installed on any suitable server completely manually, but now let’s look at the simplest and most inexpensive option — a VDS with n8n pre-installed. We recommend getting a server at https://friendhosting.net/. Starting with the Start pricing plan, you can choose pre-installed n8n when purchasing a server. Next, let’s break it down step by step:
- Register and log in on the website https://friendhosting.net/
- Go to the Progressive SSD VDS page.
- Select a plan that suits your budget and requirements (except Micro+).
VDS plans with n8n:
- Start — €4.49/month
- Plus — €8.49/month
- Profi — €16.99/month
- Business — €34.49/month
- Corporate — €54.99/month
- etc.
- and click ‘Next’
- Select the country where the server will be located and the payment period
- Scroll down the page to select the operating system
- Select one of the supported systems: Debian 11/12, Ubuntu 22/24
- In the ‘Pre-installed software’ block, select n8n
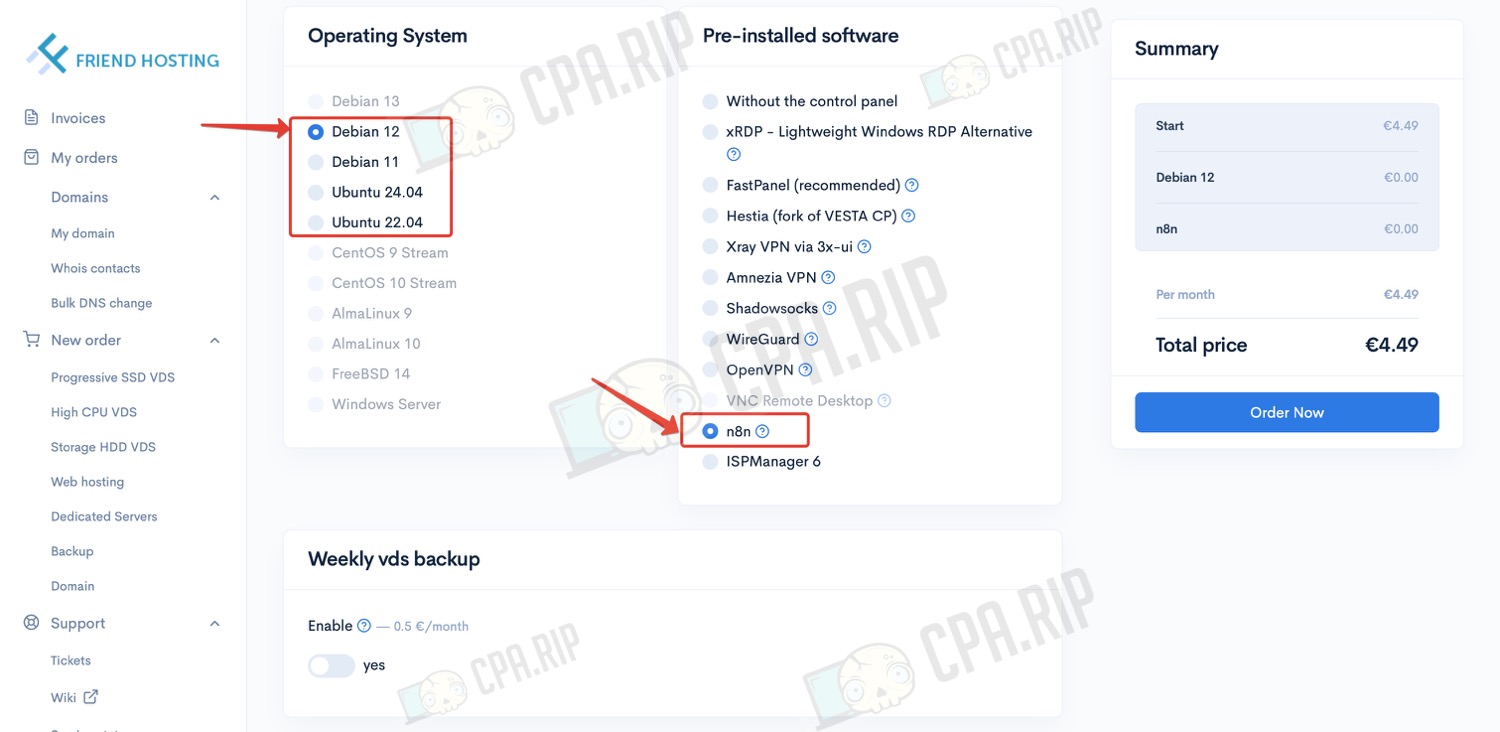
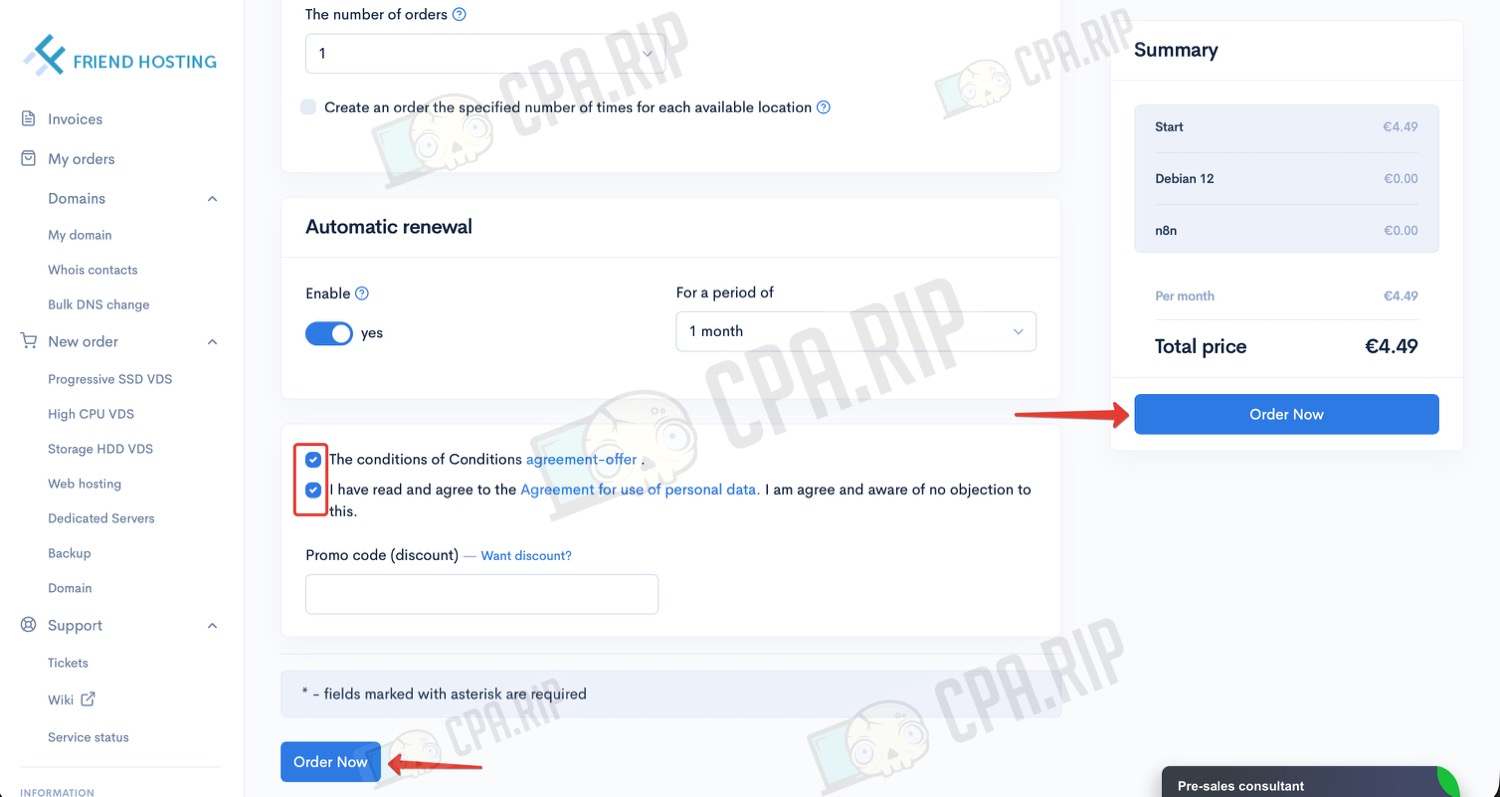
- Scroll down the page further
- Tick the user agreement boxes
- Click ‘Order Now’
Depending on the country of your https://friendhosting.net account, you will be offered different payment options and instructions on how to proceed.
After completing the payment, it takes about 30 minutes to deploy the server. Once the installation is complete, you will receive an email with the server access details and a link to the n8n web interface.
- Open the n8n web interface by following the link you received:
- Next, you need to obtain a free licence by following the instructions at the end of this article.
Local installation of n8n for free
Local installation has the same advantages as server installation, except for a number of limitations:
- No constant availability — n8n only works while the computer is turned on and the runtime environment is active.
- Dependence on the user session — when you log out, reboot, or experience a failure, automation stops.
- Complications with webhooks and incoming requests — without port forwarding, tunnels, or an external IP, some scripts will not work.
However, it is completely free and is ideal for testing, experimenting, and performing simple tasks that do not require constant uptime.
Installing n8n on macOS
- Go to the official n8n project on GitHub: https://github.com/n8n-io/n8n
- Scroll down to the ‘Quick Start’ section — here you will always find the latest installation information.
The fastest option for local installation is to use npx. This requires installing Node.js.
- Install nvm (Node.js version manager)
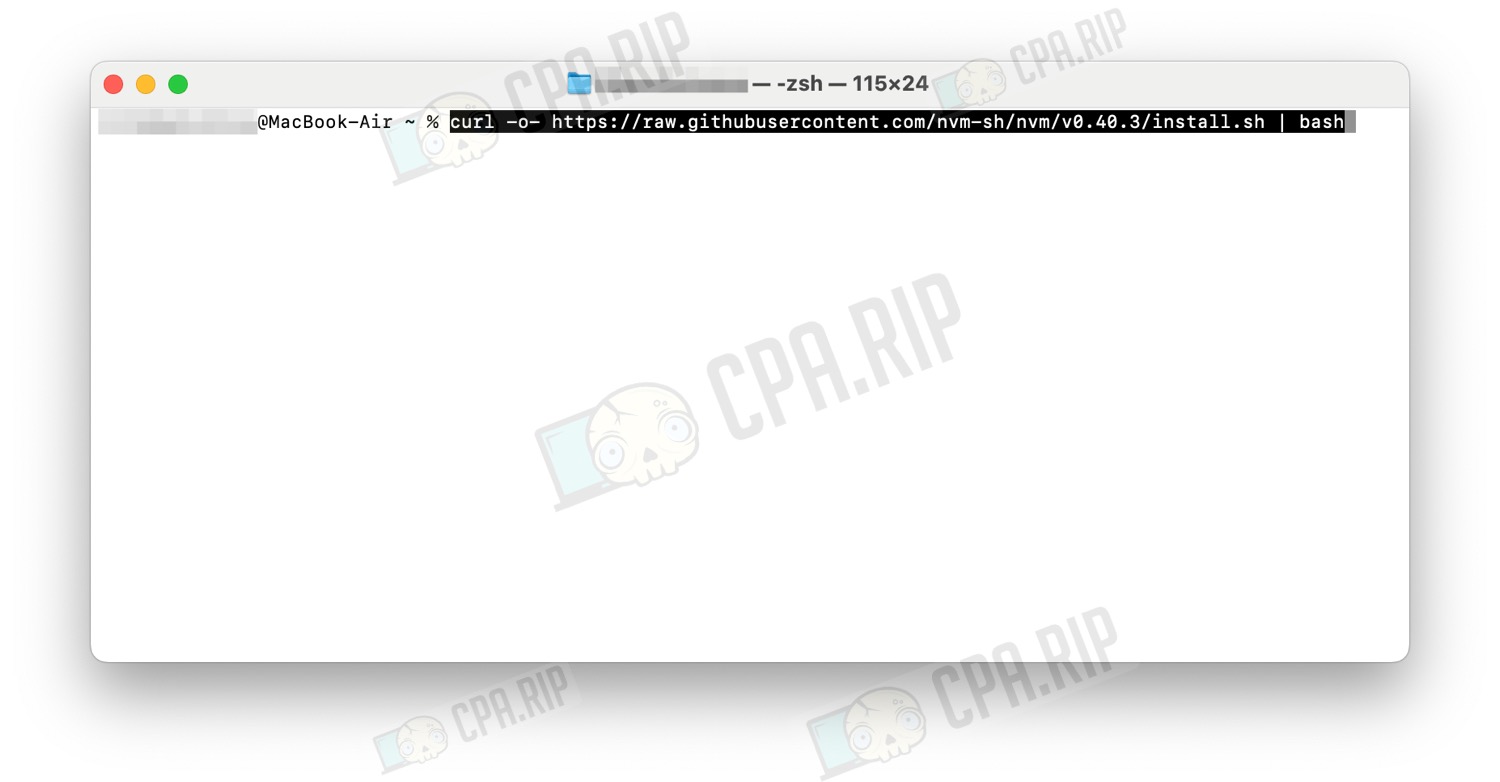
- Open the terminal and enter the command:
curl -o- https://raw.githubusercontent.com/nvm-sh/nvm/v0.40.3/install.sh | bash
Possible errors and how to resolve them are discussed in the section below.
- Connect nvm in the current terminal by running the command:
export NVM_DIR="$HOME/.nvm"
[ -s "$NVM_DIR/nvm.sh" ] && \. "$NVM_DIR/nvm.sh"
- Install Node.js (LTS) by running the command:
nvm install --lts
- Start n8n (when you start it for the first time, npx will download n8n and ask for confirmation):
npx n8n
- Confirm the installation by pressing ‘y’ and ‘Enter’.

- Wait for the installation to complete.
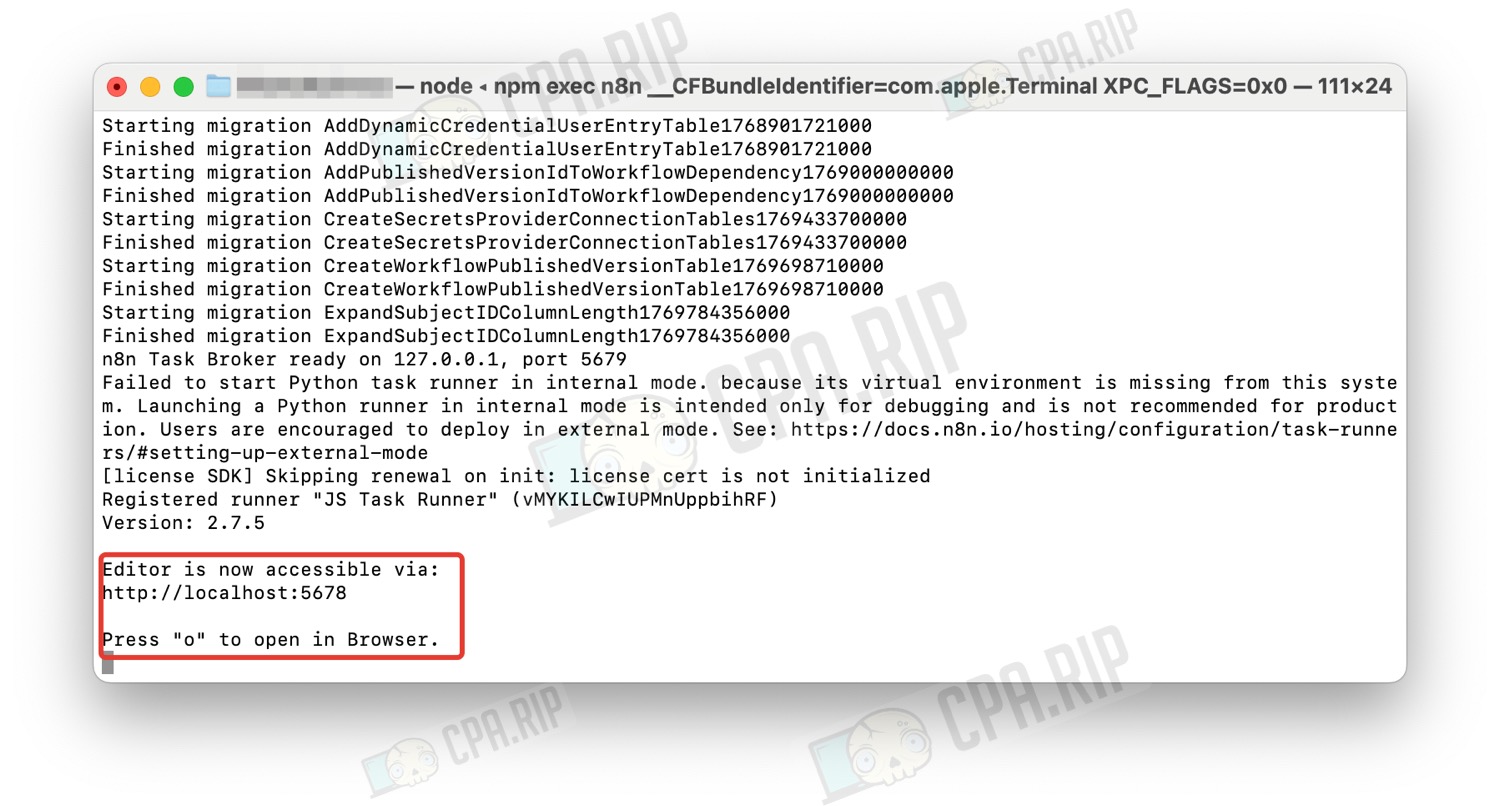
- Go to http://localhost:5678 to open the local web interface.
- When you first launch the application, create an owner account.
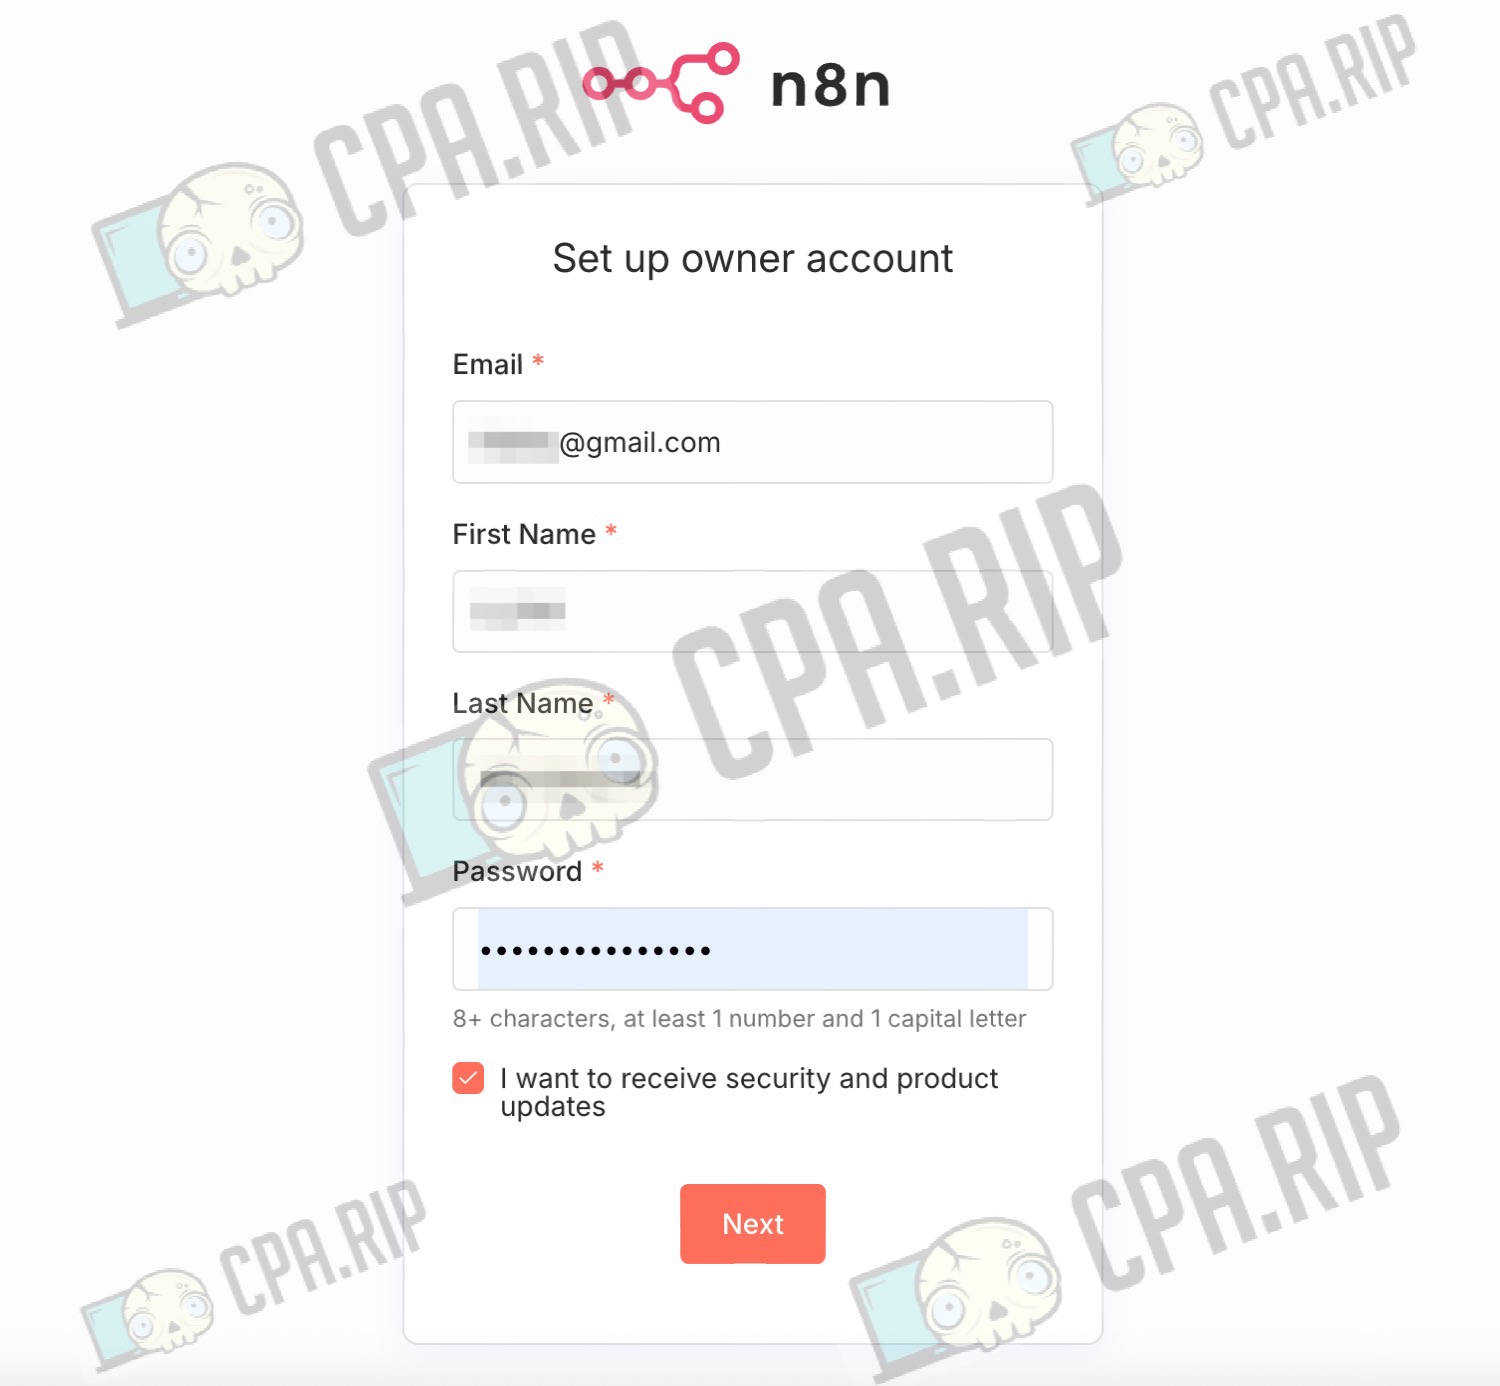
- Done:
- Next, you need to obtain a free licence by following the instructions at the end of this article.
The local version of n8n only works while it is running in the terminal. If you close the terminal window, the process will stop.
To restart, simply reopen the terminal and run the npx n8n command. No reinstallation is required — all created workflows are saved automatically and will be available after the next launch.
Resolving possible errors
Let’s take a look at how to resolve some common errors.
Error: ‘You may be on a Mac, and need to install the Xcode Command Line Developer Tools’
This message indicates that the Xcode Command Line Tools are not installed on your Mac. Without them, nvm will not be able to install correctly because it requires basic developer utilities.
- In the terminal, enter the command:
xcode-select --install
- The installation window will appear. Click Install and wait for it to finish. This usually takes 5–15 minutes.

- Wait for the installation to complete, then re-run the nvm installation (step 1) and continue with the instructions.
n8n requires HTTPS
If you get an error, make sure you are opening the interface at http://localhost:5678 (not 127.0.0.1):
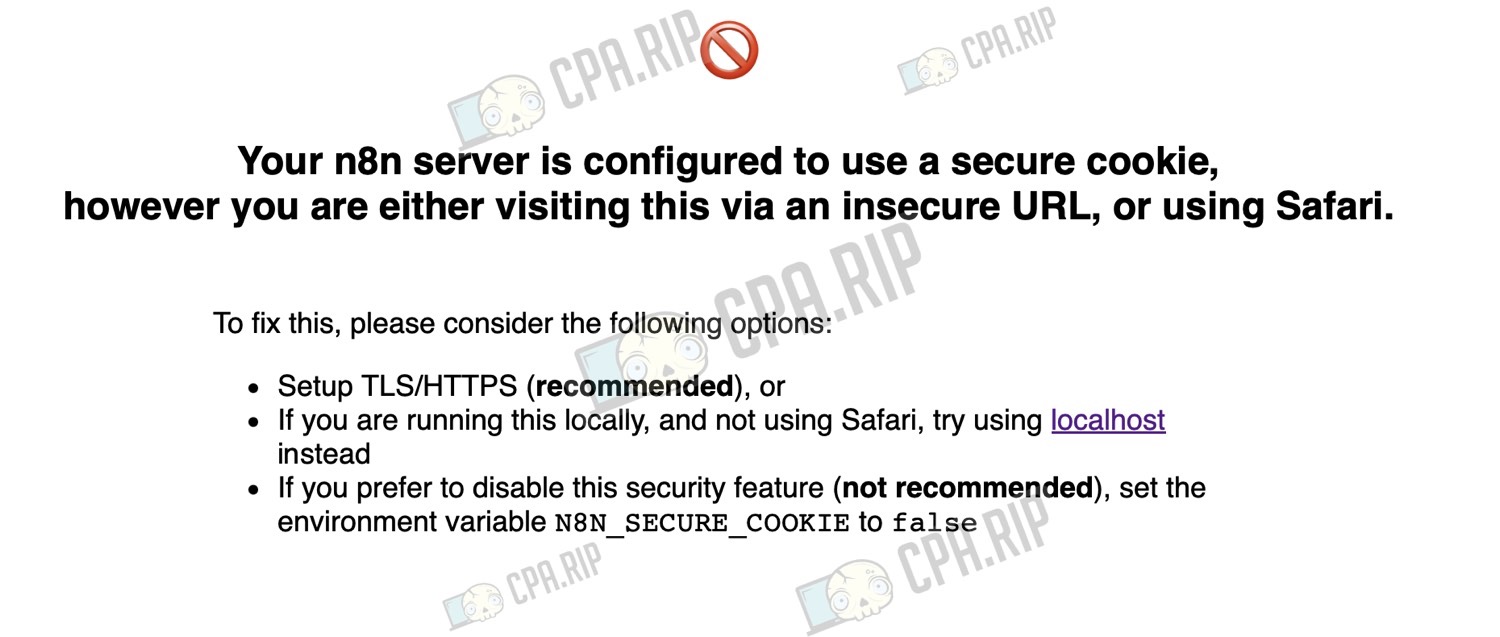
If the problem persists, try switching to Chrome — it helped us. Or run n8n with the variable:
N8N_SECURE_COOKIE=false npx n8n
Installing n8n on Windows
The basic principles of installing n8n locally on Windows are similar to those for macOS. Only some technical solutions differ. Let’s move on to the installation.
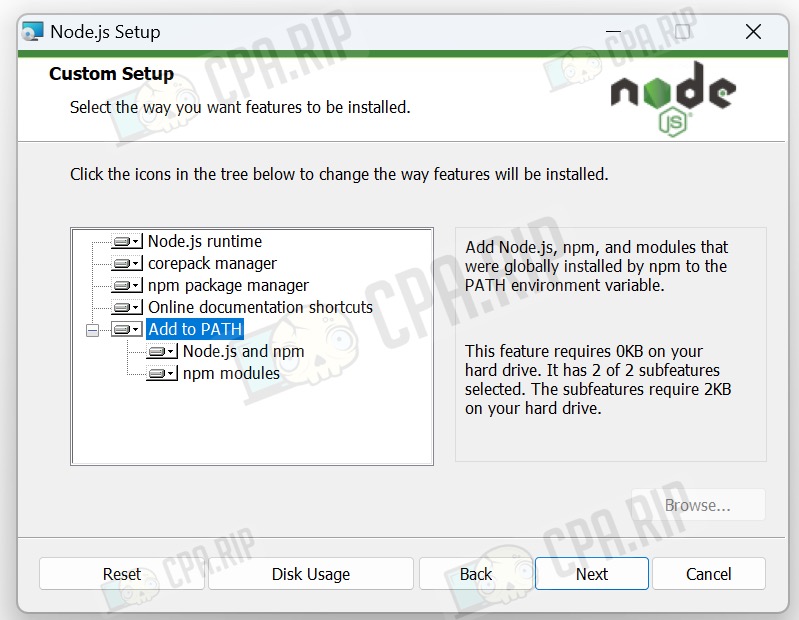
- Go to the official website https://nodejs.org and download the LTS version for Windows (.msi).
- Run the installer and follow the instructions
- Be sure to check that Add to PATH is enabled (enabled by default)
- After installation, restart your computer or close (if running) and reopen PowerShell / CMD.
- In PowerShell, run the command:
npx n8n
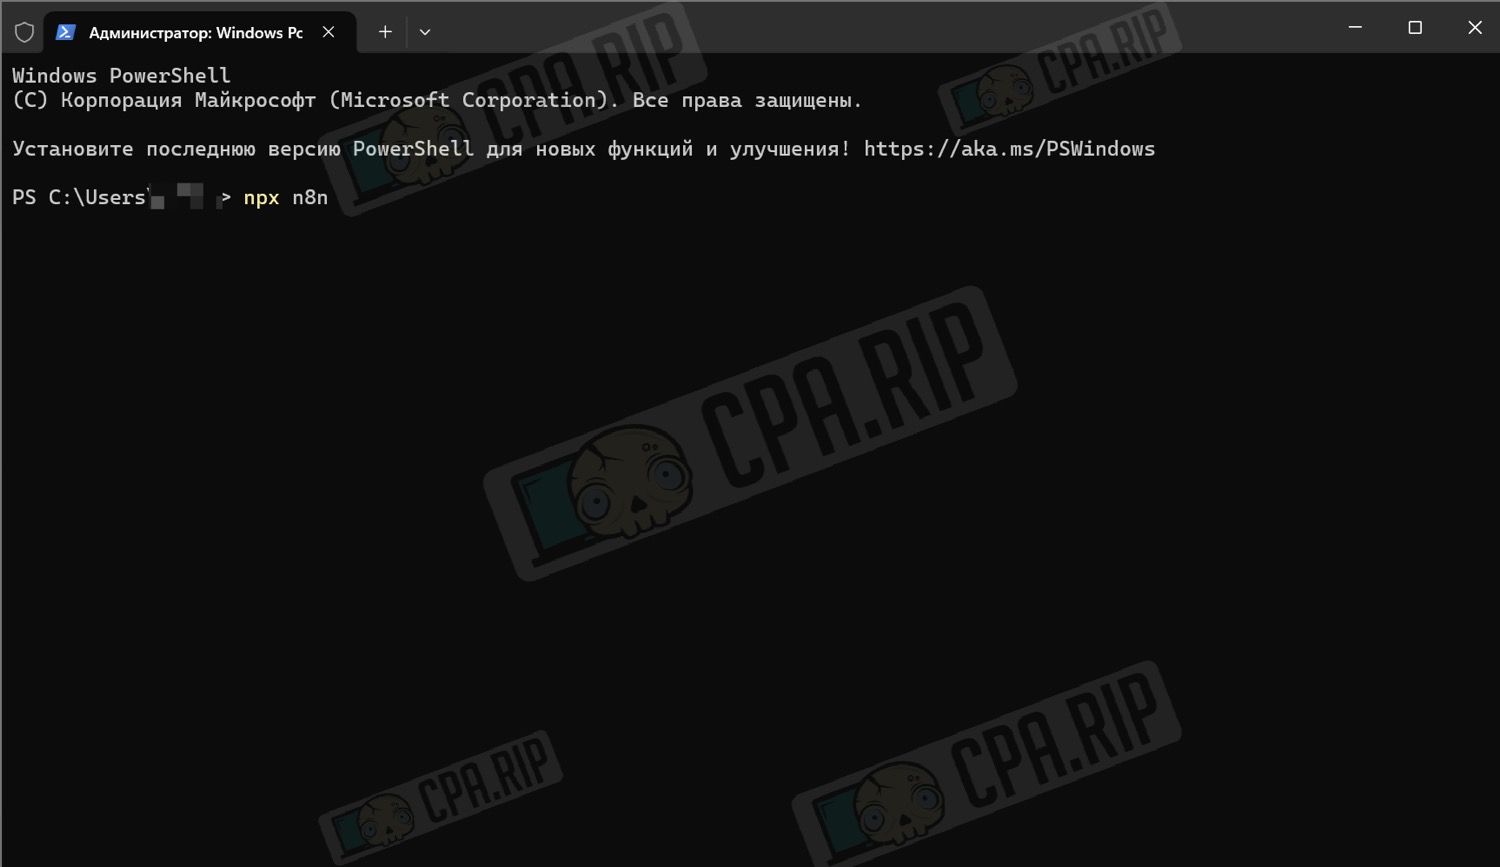
- When you run it for the first time, you will be asked to download the package — press ‘y’

- Go to http://localhost:5678 to open the local web interface
- When you run it for the first time, create an owner account
The local version of n8n only works while it is running in the terminal. If you close the terminal window, the process will stop.
To restart, simply reopen the terminal and run the command npx n8n. No reinstallation is required — all created workflows are saved automatically and will be available after the next launch.
Resolving possible errors
Let’s examine the error ‘script execution disabled’ that we faced:
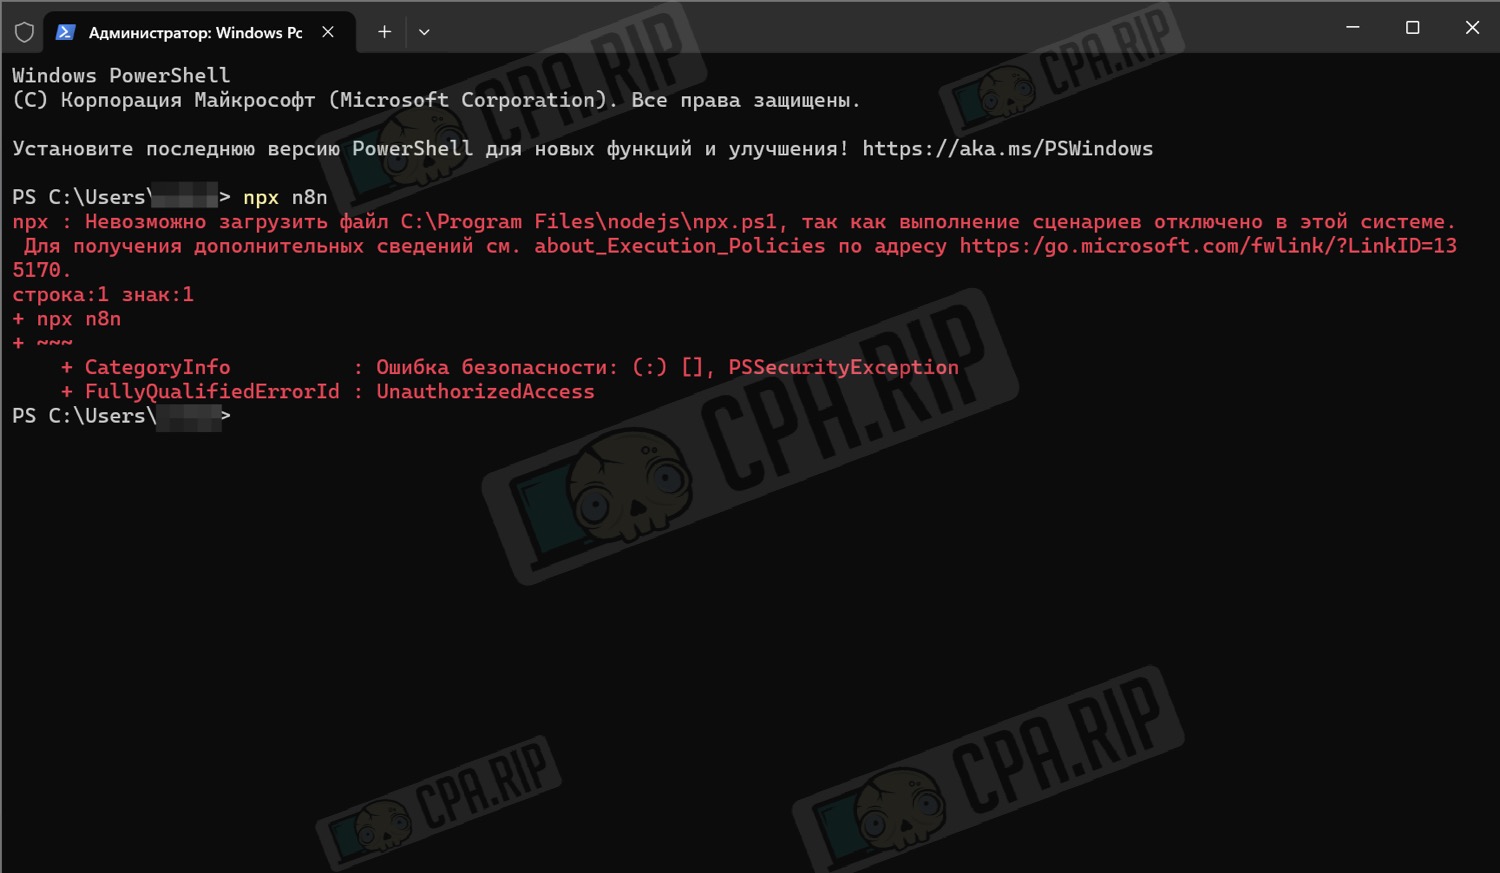
- Open PowerShell as an administrator
-
And execute the command:
Set-ExecutionPolicy RemoteSigned
- When prompted, press ‘y’ and ‘Enter’.
- Restart PowerShell.
Updating n8n
Depending on how you installed the local version, select the appropriate update method from the official instructions: https://docs.n8n.io/hosting/installation/updating/
Obtaining a free n8n licence
Let’s figure out what the n8n licence is for and where to get it for free.
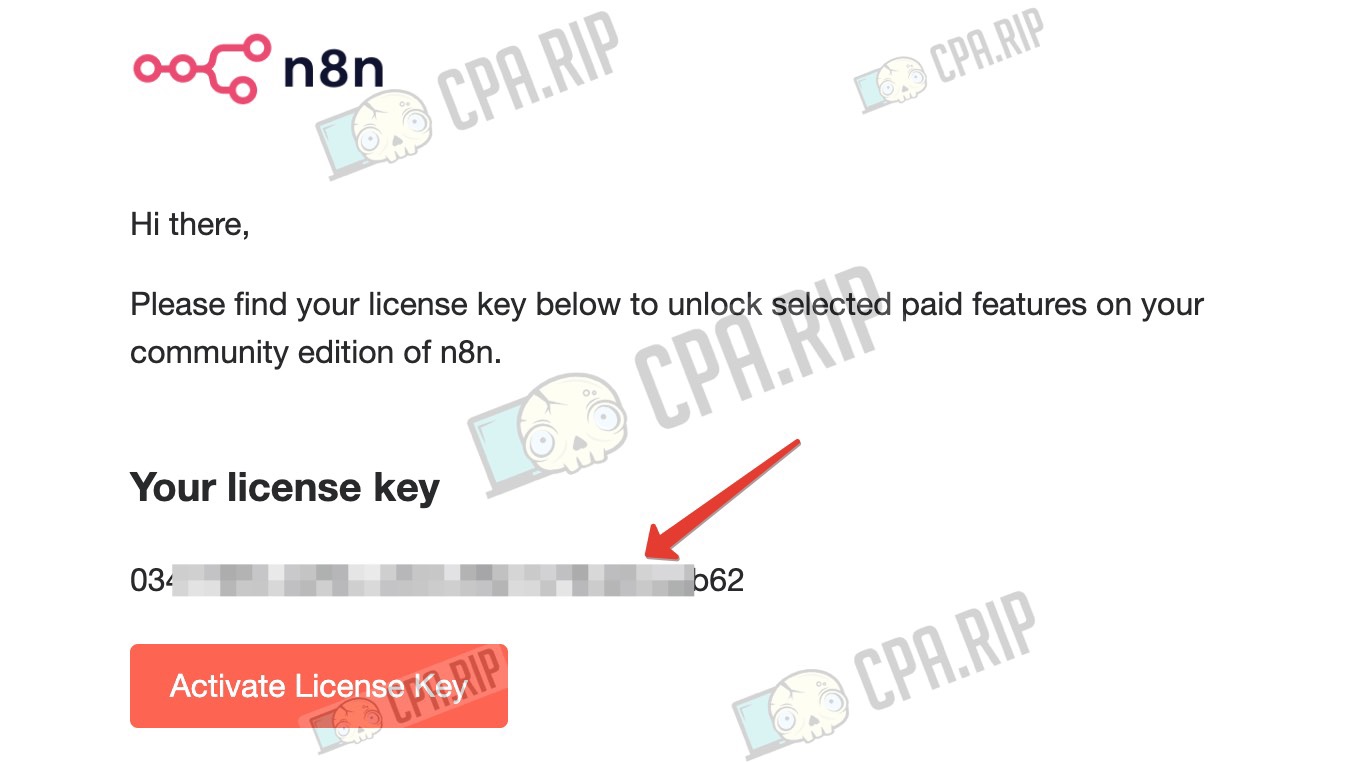
A free n8n licence for local installation is required to unlock certain licensed features in the self-hosted version, in particular Debug in Editor, 24-hour workflow change history storage, and access to advanced execution data. It is issued for free via email, does not require payment, and does not affect the operation of basic automations that are already available in the community version.
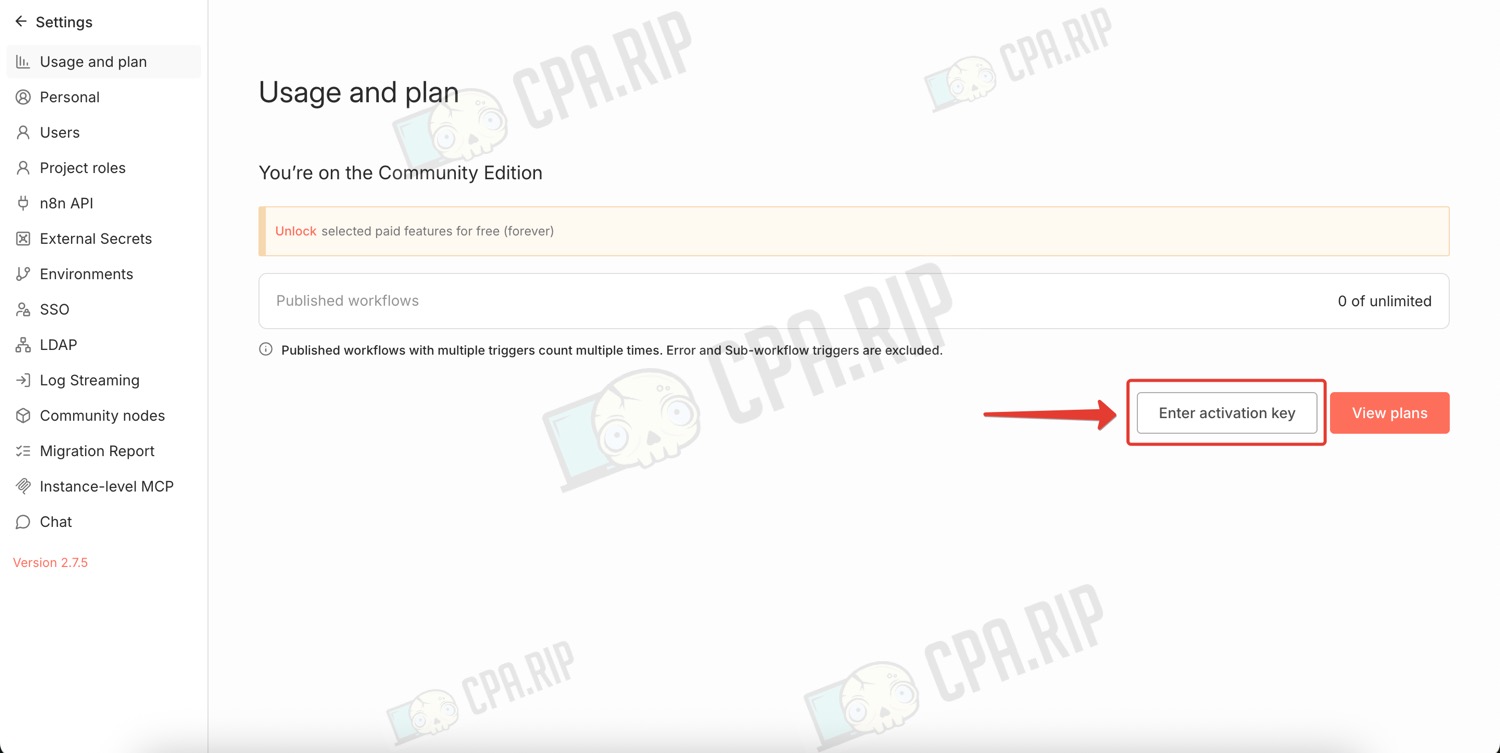
- After you have registered in the local panel, click ‘Settings’ in the lower left corner and click ‘Usage Plan’.
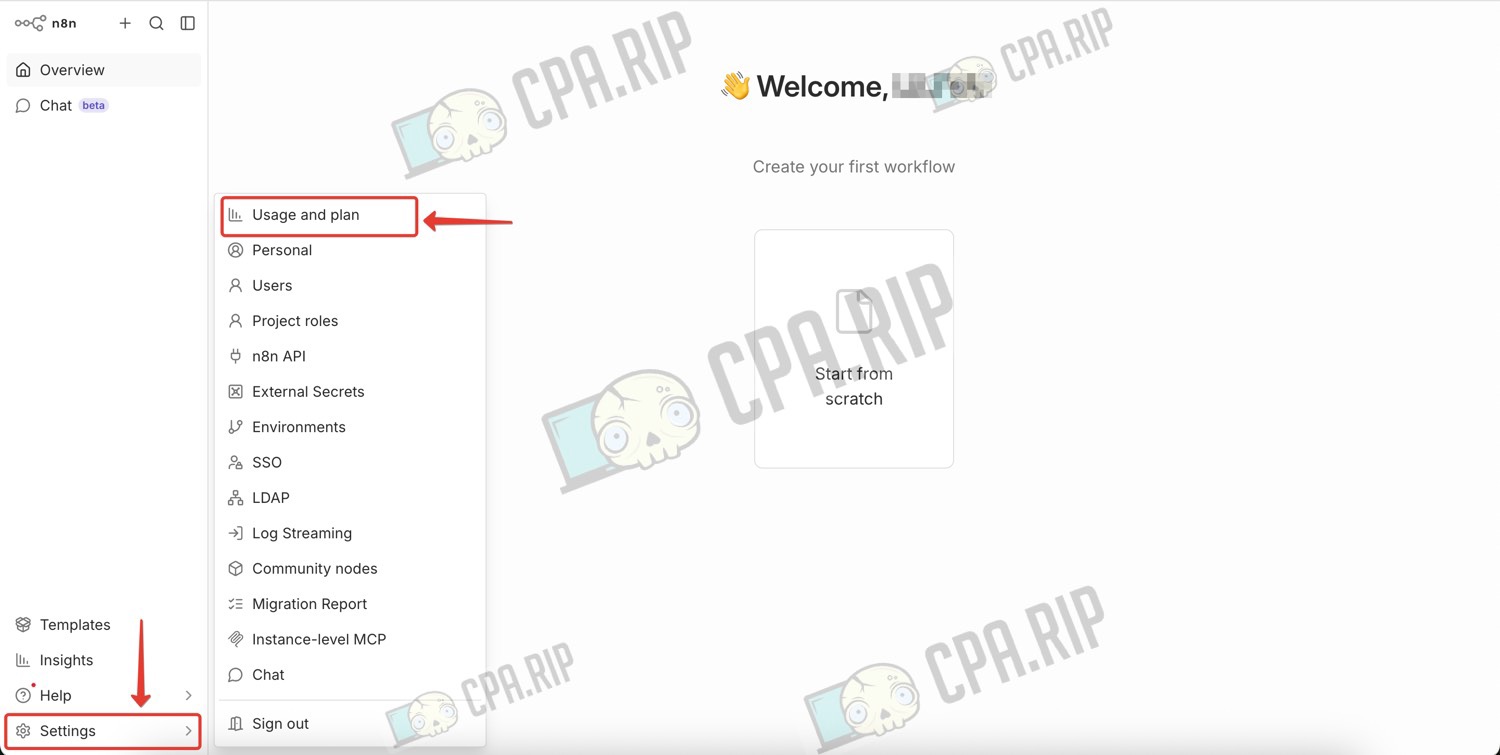
- Click ‘Unlock’.

- Enter your email address in the form that appears and click ‘Send me a free licence key’.
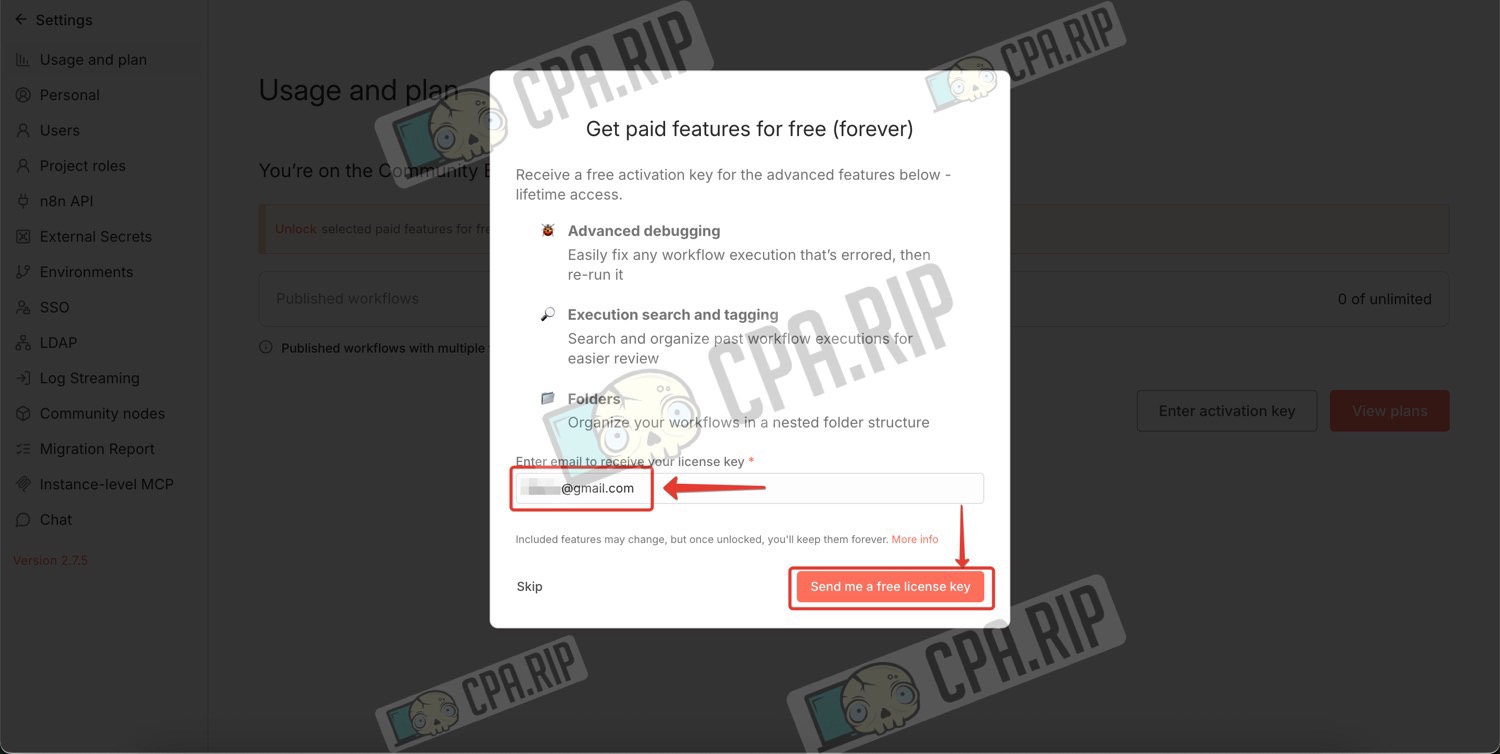
- Copy the licence key sent to the specified email address.
Return to the n8n panel and click ‘Enter activation key’.
Paste the code into the form that appears and click ‘Activate’.
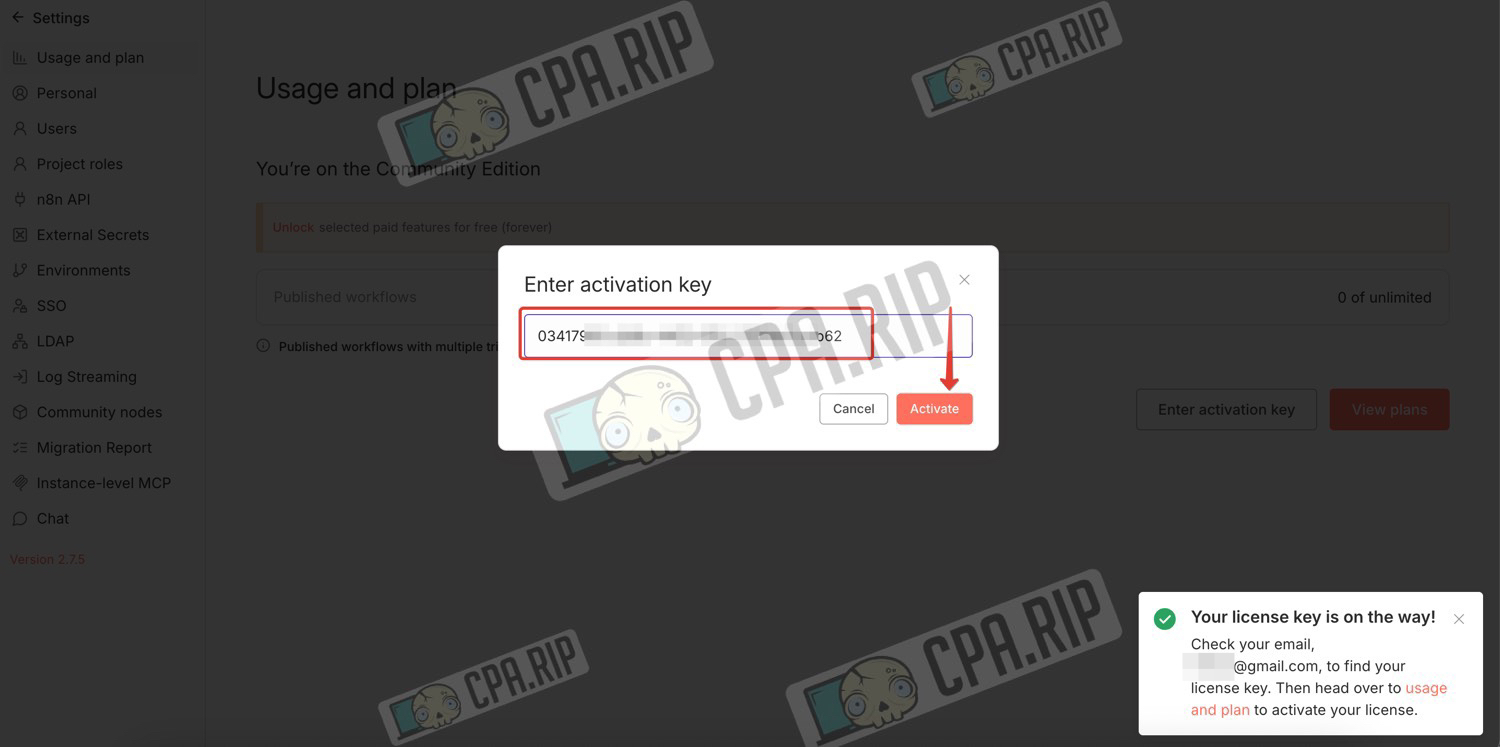
Your free n8n licence is now activated.
Getting started with n8n
Now let’s try running a simple project to make sure the local version of n8n is working. To do this, we will create a script with a manual test workflow.
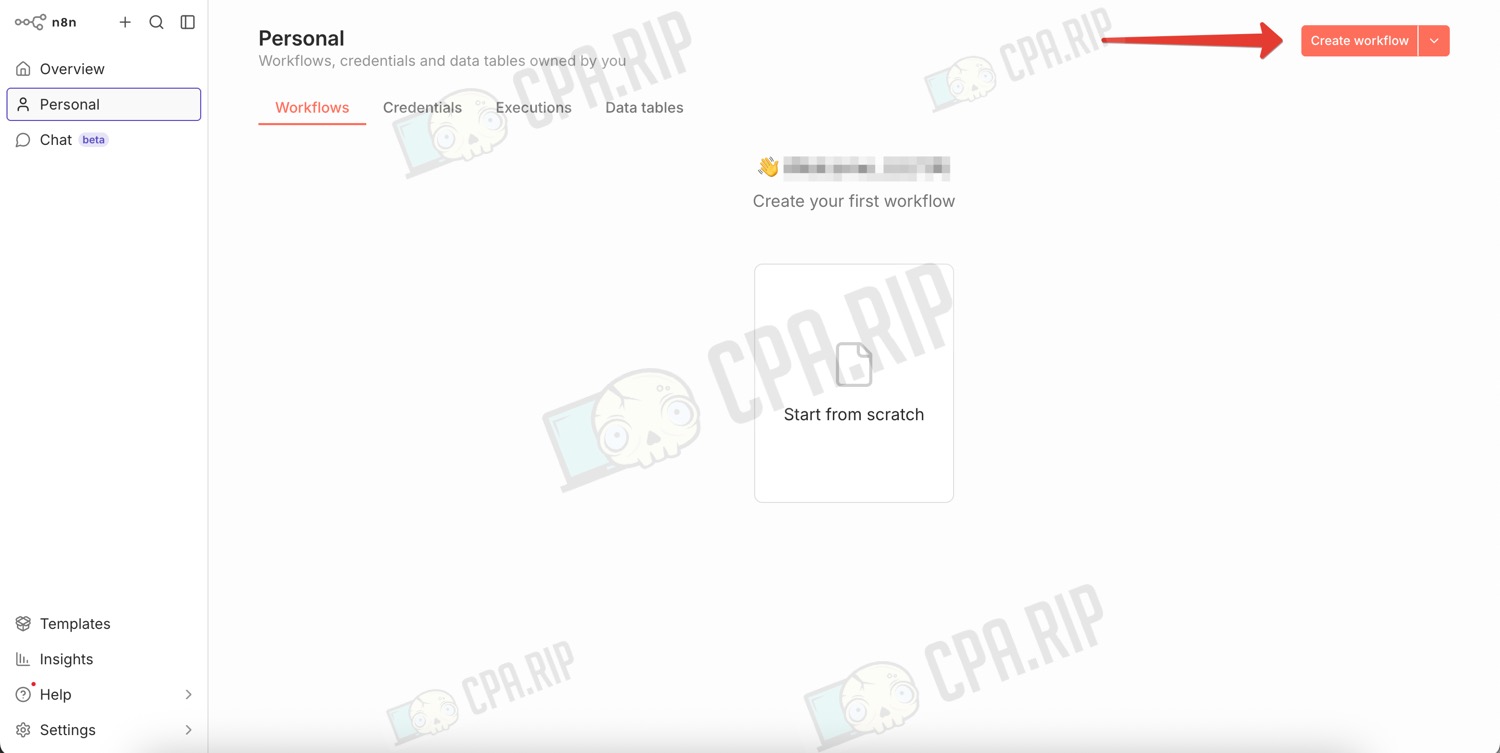
- In the n8n panel, click ‘Create workflow’.
- Click ‘Add first step’.
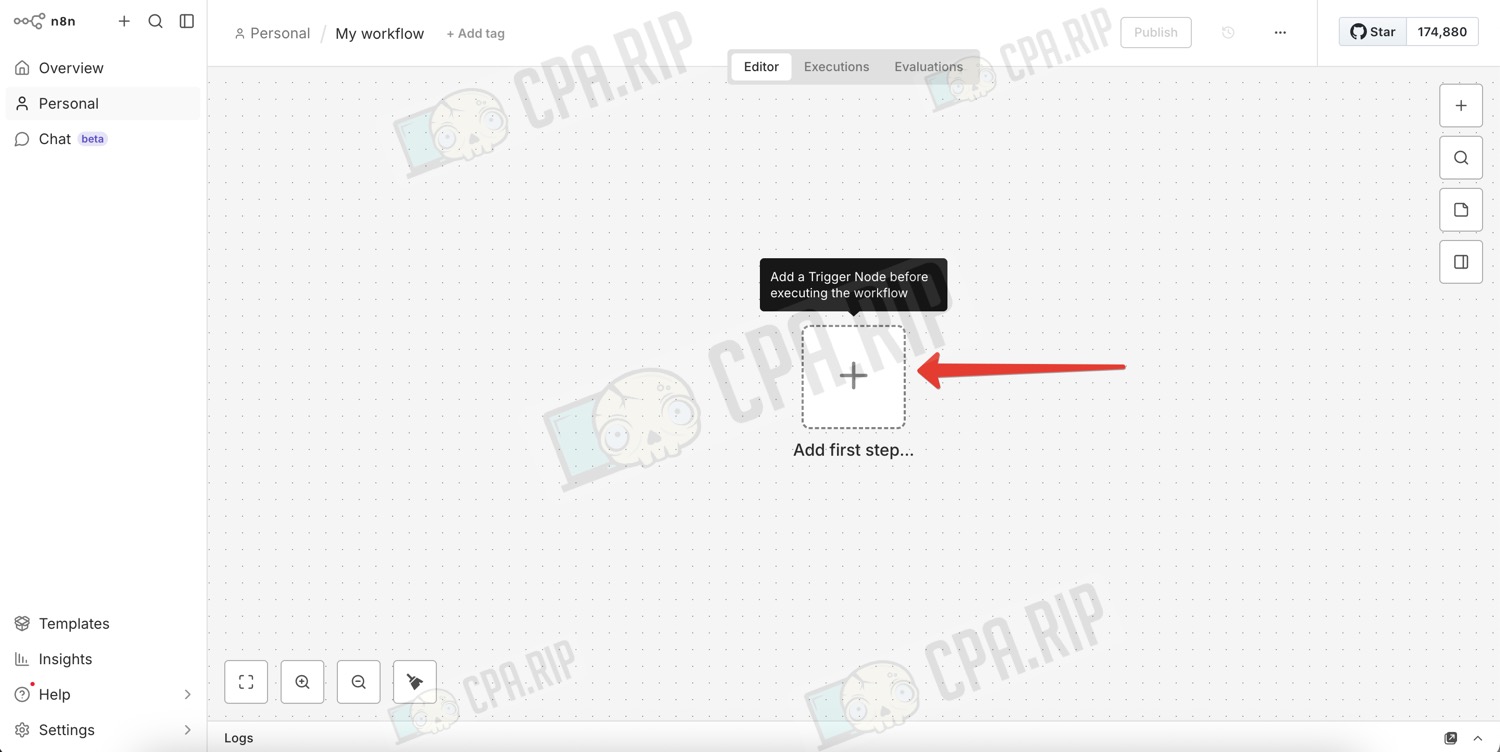
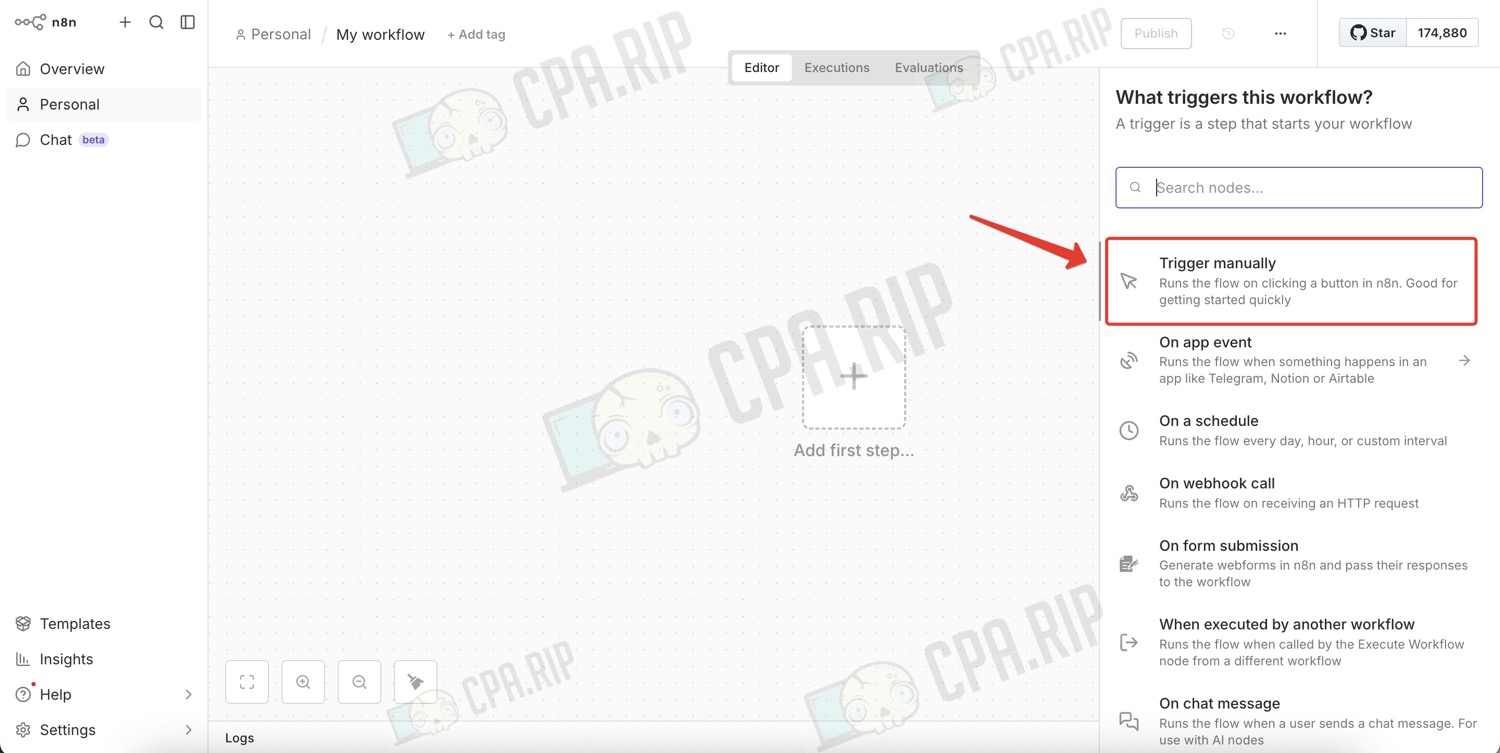
- Add the ‘Trigger Manually’ trigger — this node launches the script manually when the button is pressed.
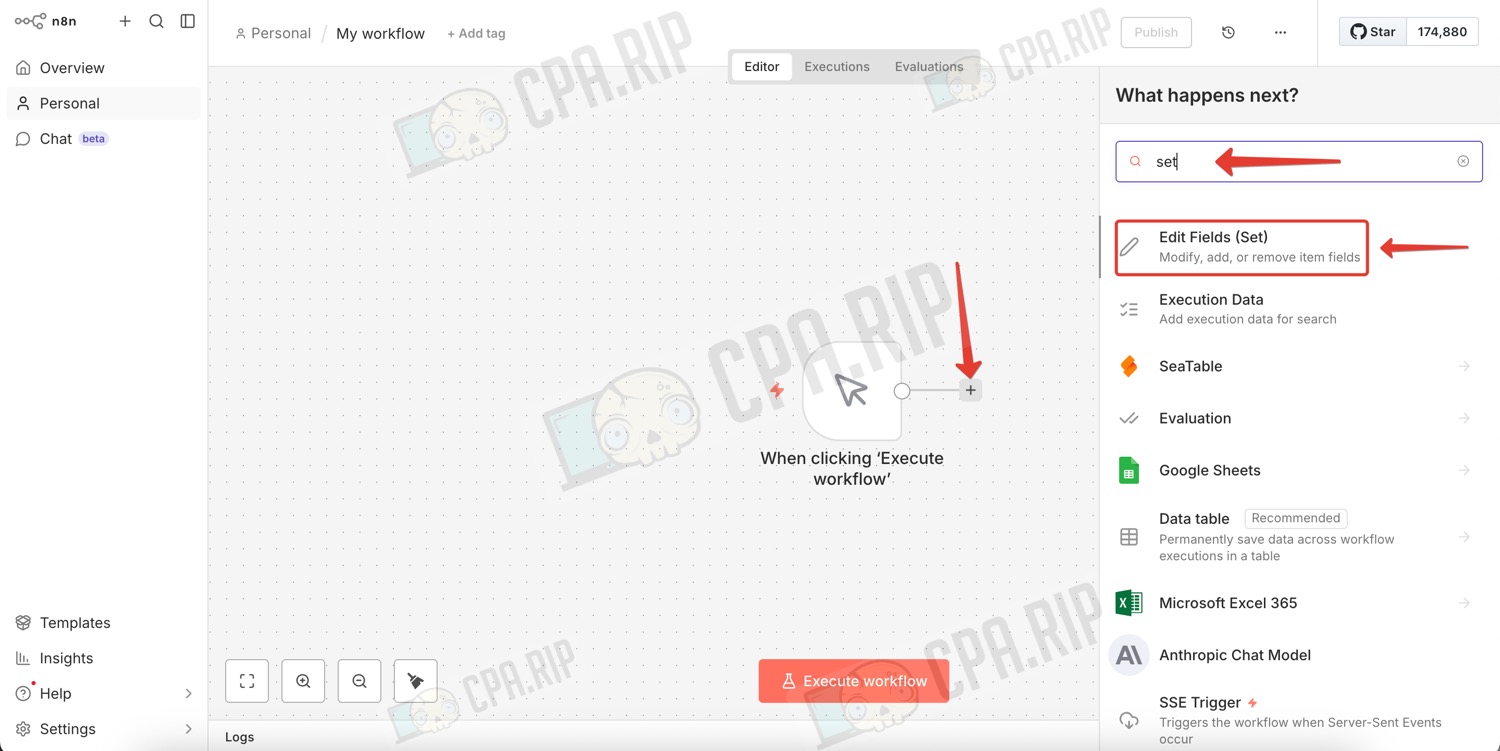
- Click ‘+’ to the right of Trigger Manually.
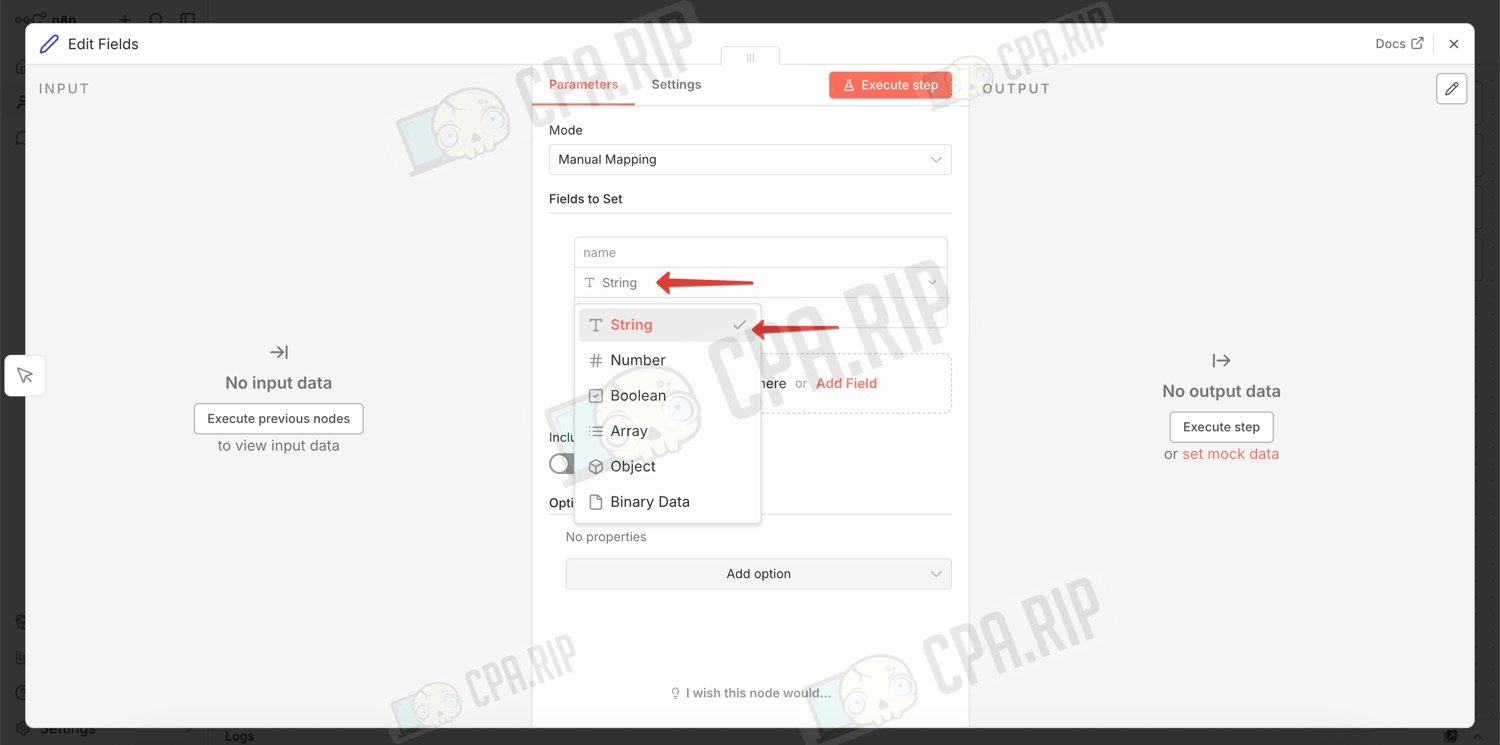
- Select the node: Edit Fields (Set).
- Inside the node, click ‘Add Field.’
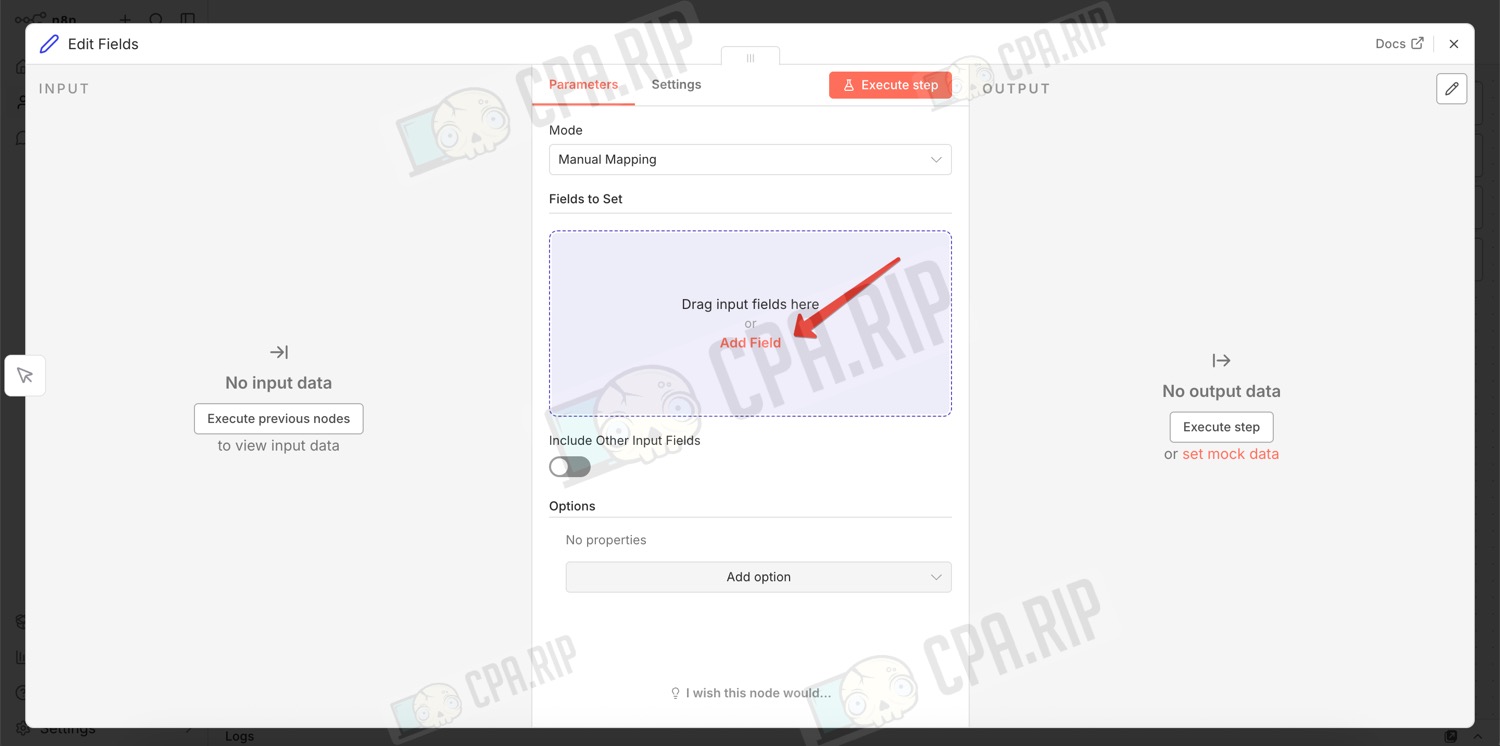
- Select ‘String.’
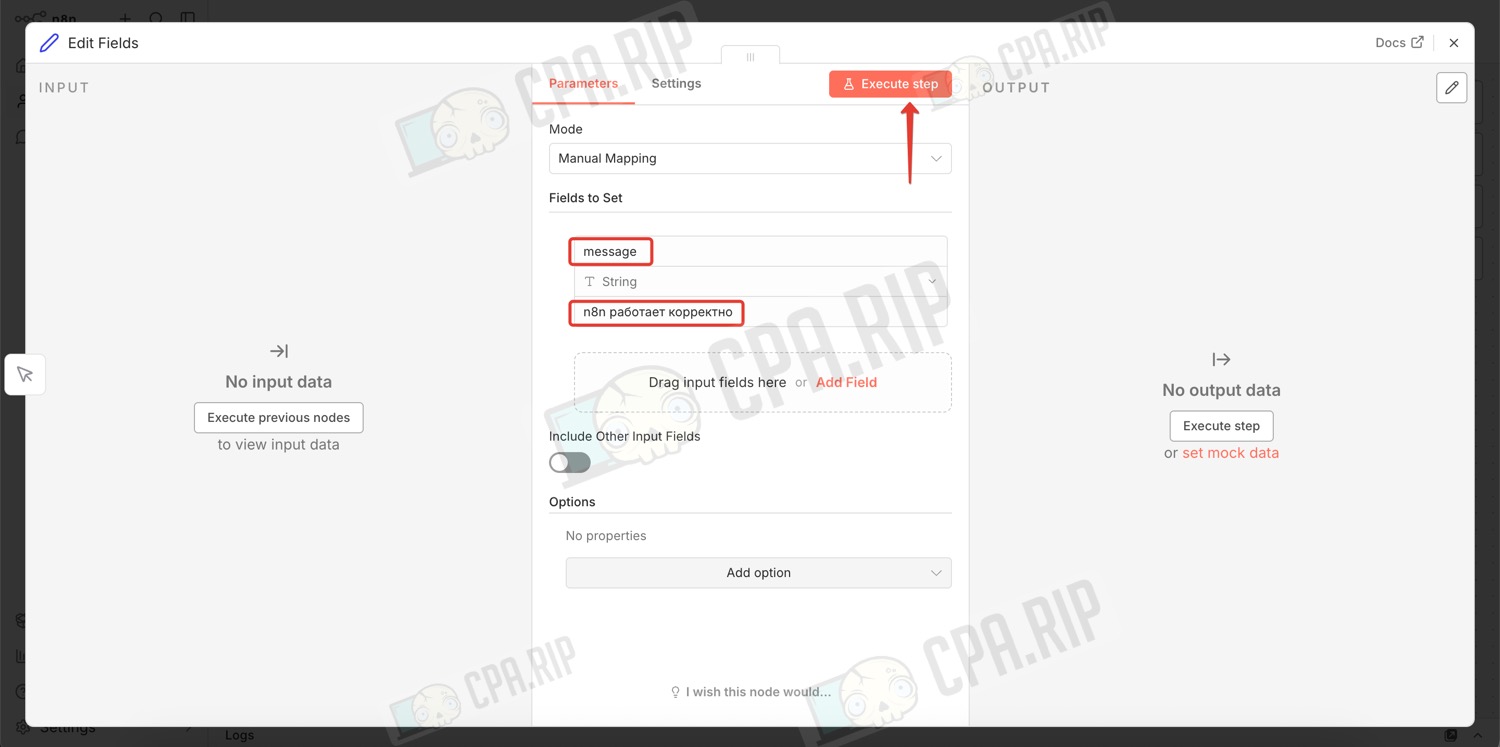
- In the ‘Name’ field, type: ‘message.’
- In the ‘Value’ field, type: ‘n8n is working correctly.’
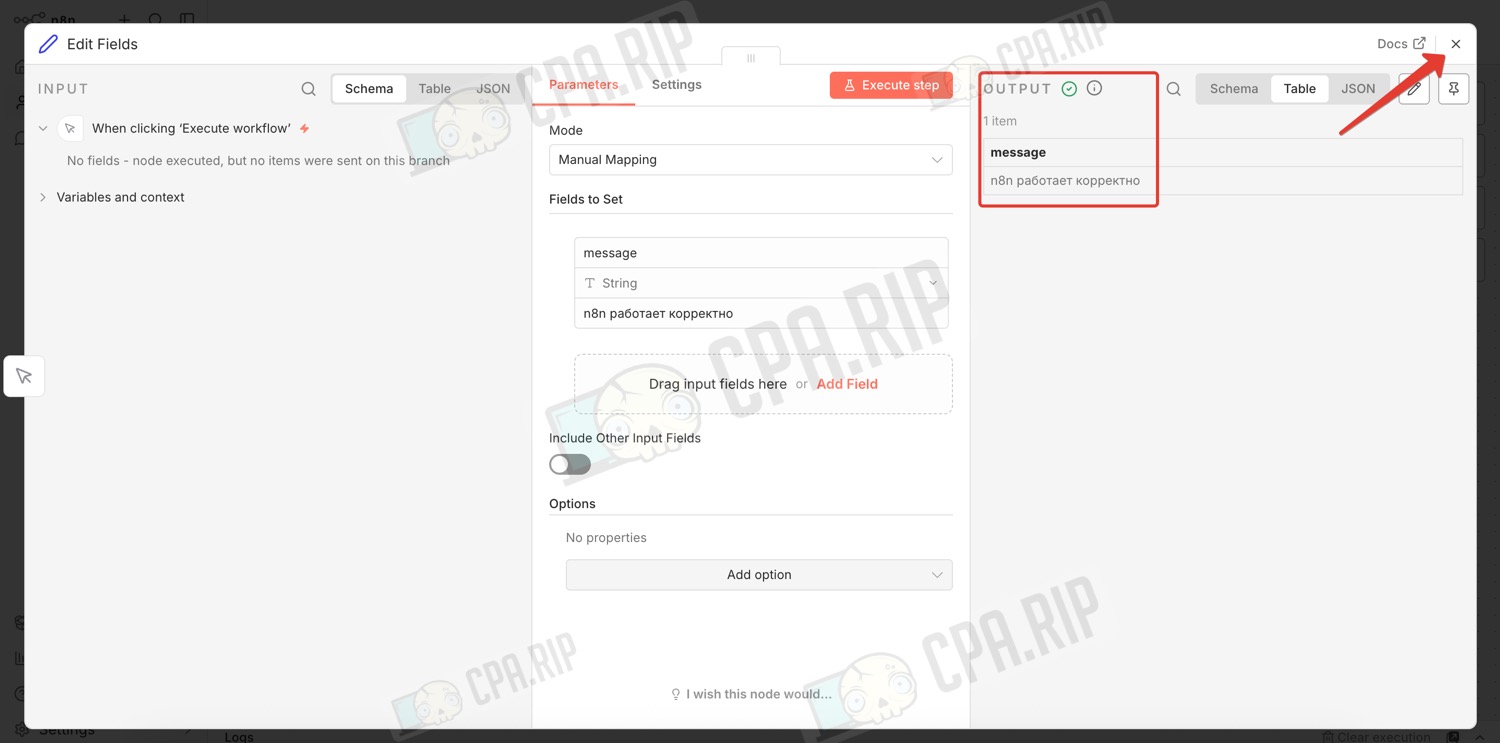
- You can click ‘Execute step’ to check this node.
- A green tick and the specified message will be displayed
- Click the cross to complete the node configuration
- Click the ‘Execute Workflow’ button
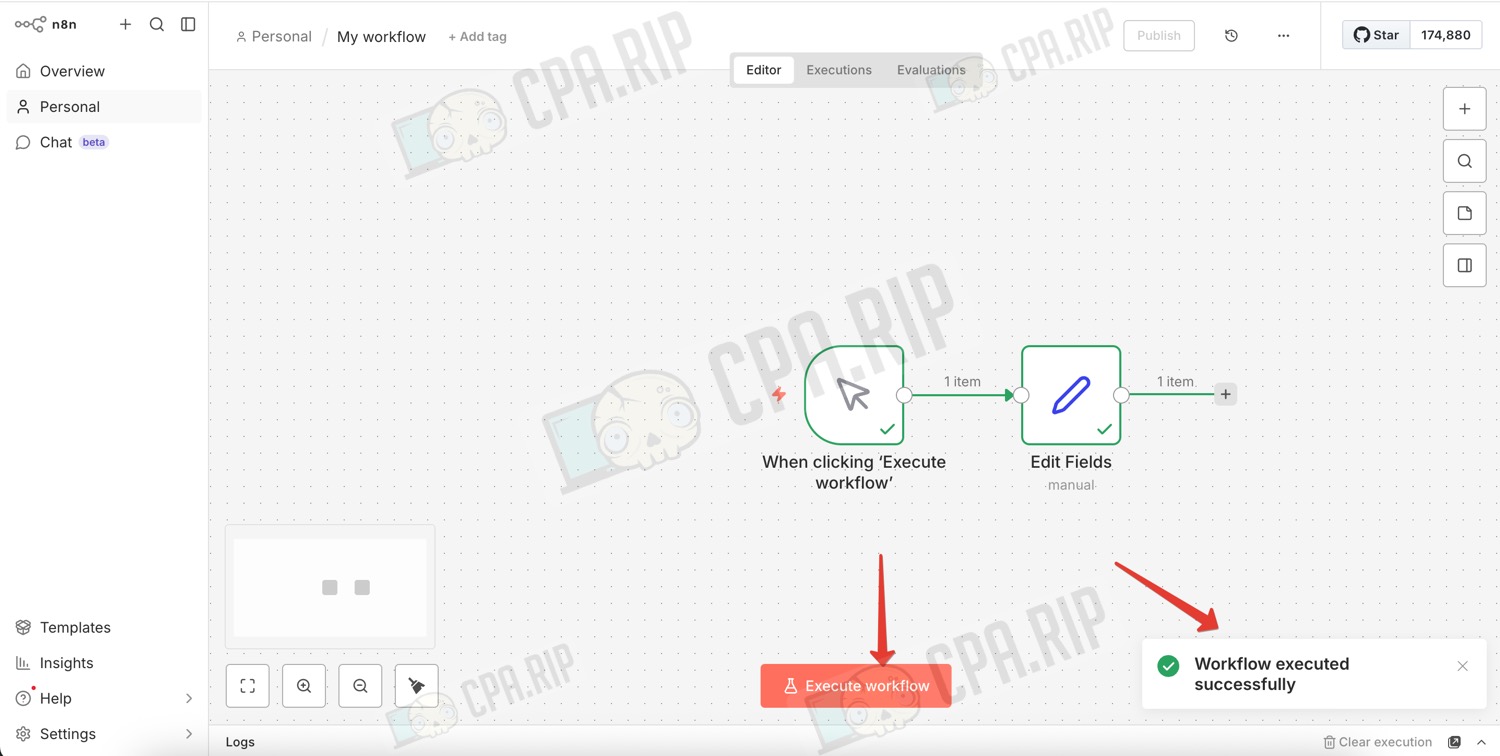
If everything is working, green ticks will appear next to the nodes and the message ‘Workflow executed successfully’ will appear on the right.


