The Keitaro tracker migration is carried out by creating a database dump and transferring it to another server. The installation script imports all available statistics, campaigns, streams, etc. Landing pages and bot lists are transferred manually.
Keitaro is a customizable cost-efficient tracker with a bevy of tools for webmasters and publishers.
Get 20% off with the CPARIP promo code

Keitaro Tracker Installation: Server Requirements
Select the server based on the expected clicks count:
| Clicks per Day | Type | RAM | CPU |
|---|---|---|---|
| Less than 10,000 / day | VPS | 2 GB | 1 CPU |
| 10,000 – 100,000 | VPS | 4 GB | 2 CPU |
| 100,000 – 500,000 | VPS | 8 GB | 4 CPU |
| 500,000 – 1,000,000 | VPS/VDS | 16 GB | 4 CPU |
| 1,000,000 – 5,000,000 | VDS | 32 GB | 4 CPU |
| 5,000,000 – 10,000,000 | VDS | 64 GB | 8 CPU |
Server Requirements
There are also mandatory requirements to install the tracker:
- A bare-metal server without a control panel;
- CentOS 8 Stream;
- Min. RAM 2GB;
- KVM virtualization;
- Min. 20GB SSD.
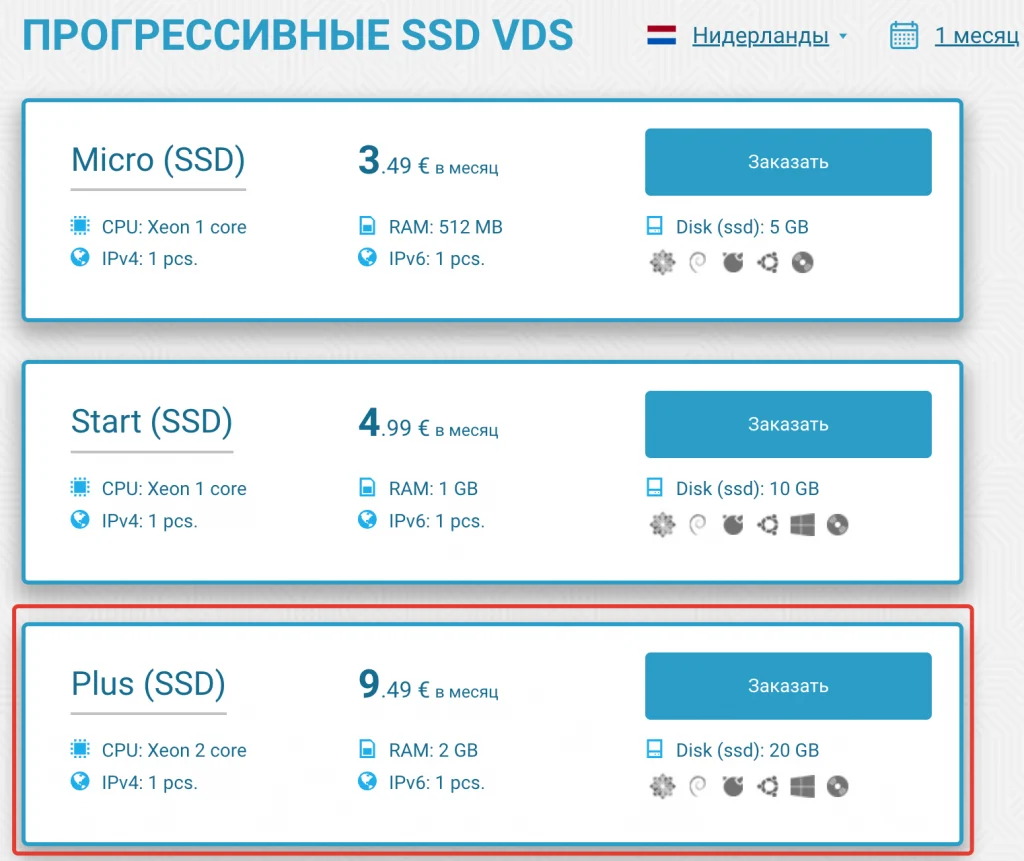
Friend Hosting VDS for Keitaro
![]()
![]()
Friendhosting LTD is a European company that has been operating in the international IT market since 2009.
To install the tracker, we recommend a VDS server that combines the advantages of a dedicated server and customizable virtual hosting at an affordable price.
To install Keitaro, you may opt for a “Plus” tariff or better:
- Flexible tariffs
- Professional support
- High uptime
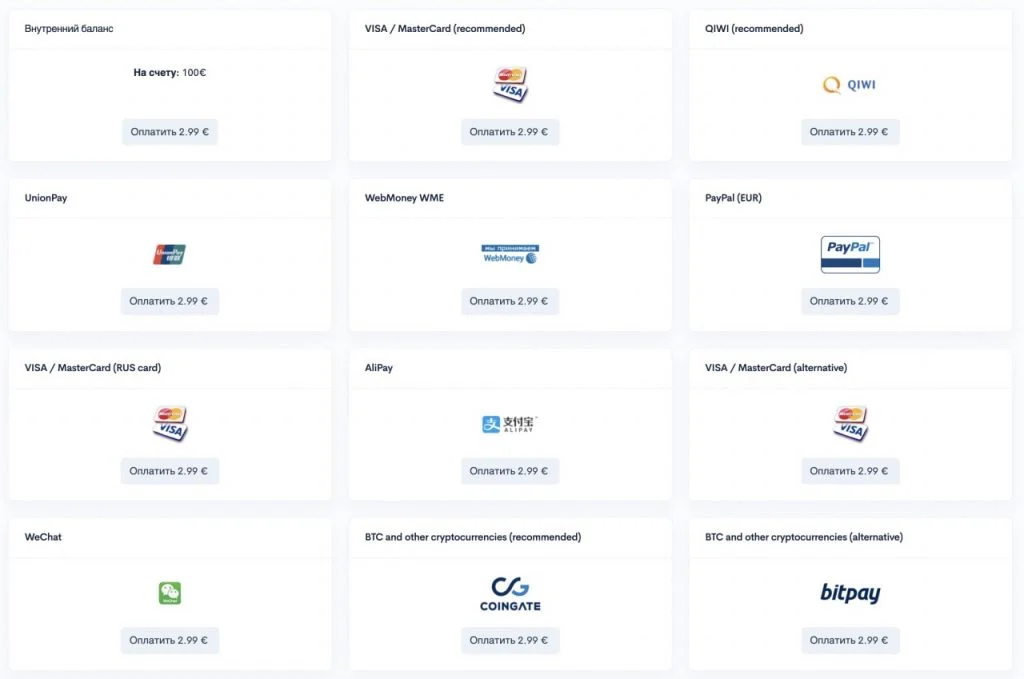
- A wide selection of payment methods:
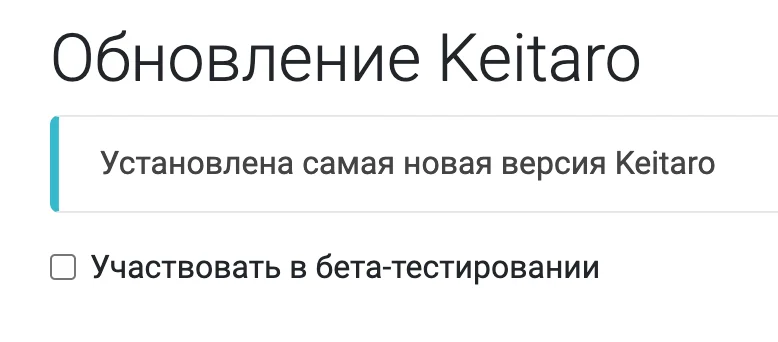
How to Update the Tracker to the Latest Version?
For successful tracker migration, you must update it to the latest version.
- Service -> Keitaro Update
What Data is Required for Tracker Migration?
For further steps, you’ll require the following data:
Root access (IP root pass) to the current and new server. You can obtain it from the hosting provider.
- Server IP
- User name (root)
- SSH password
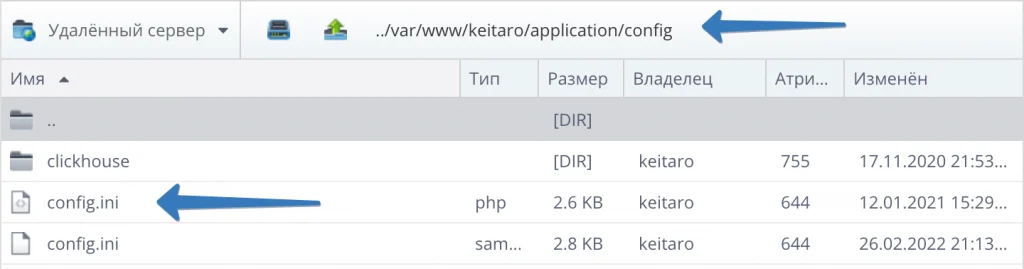
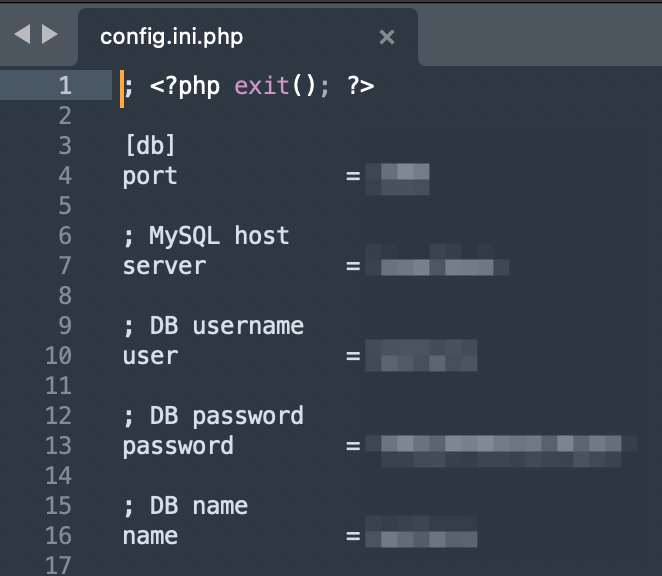
Database name and Salt value from the config.ini.php file of the current server.
- To download “config.ini.php”, log in to the server via SFTP
- Download a file: var/www/keitaro/application/config/config.ini.php
- Save the database name and Salt

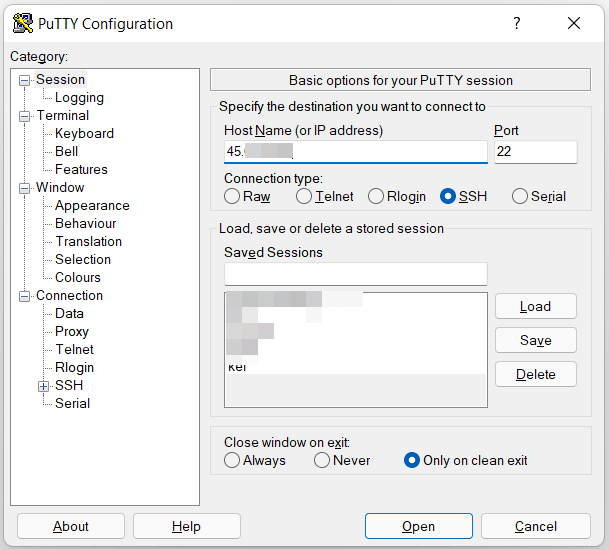
How to Connect to the Server via SSH?
To connect to the server via SSH on a Mac, use a terminal, and for Windows, we recommend the PuTTY software.
- In PuTTY, enter the server IP and click “Open”
Further steps are similar for both Mac and Windows OS users.
- On the console that pops up, enter the user name (root) and press “Enter”
- Paste the SHH password from the clipboard or type it in and press “Enter” again
Note! The password you entered won’t be displayed on the console. It is there but it’s hidden for security reasons.

How to Create a Tracker Dump?
Database
- After you’ve successfully connected to the old server, enter the following command:
mysqldump <DB_NAME> | gzip > dump.sql.gz
Where the <DB_NAME> value must be replaced with the database name – the “db_name” value from the config.ini.php file.
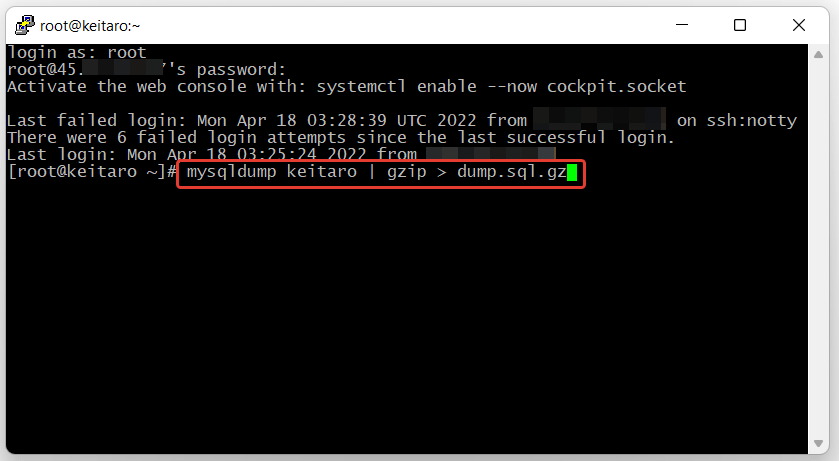
The execution of the command may take some time depending on the database file size. When the cursor bar in the console starts blinking, you can proceed to the next step.
- Download the dump from the /var/root directory on the old server

Landing Pages
- Download the landing pages available from the var/www/keitaro/lander directory via FTP
Bots
- Download files from the /var/www/keitaro/var/bots directory
How to Transfer the Dump & Install the Tracker on a New Server?
- Connect to the new server via FTP and upload the previously downloaded database dump to the /var/root directory.
- Connect to the new server via SSH.
- Enter the following command:
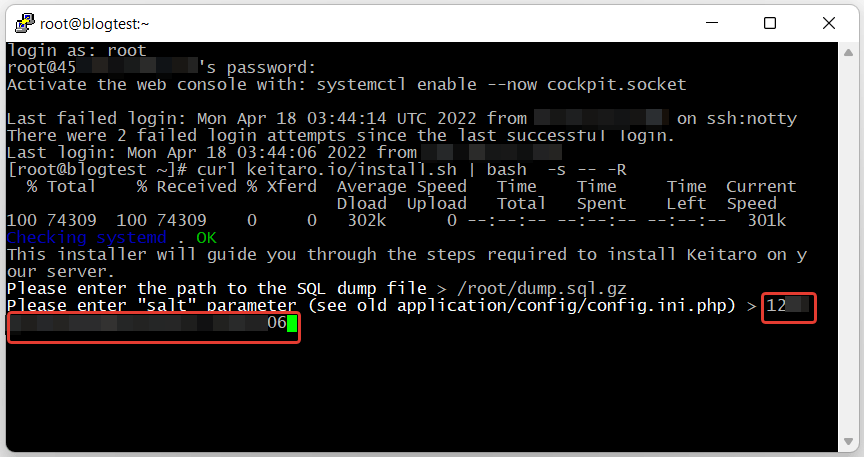
curl keitaro.io/install.sh | bash -s -- -R
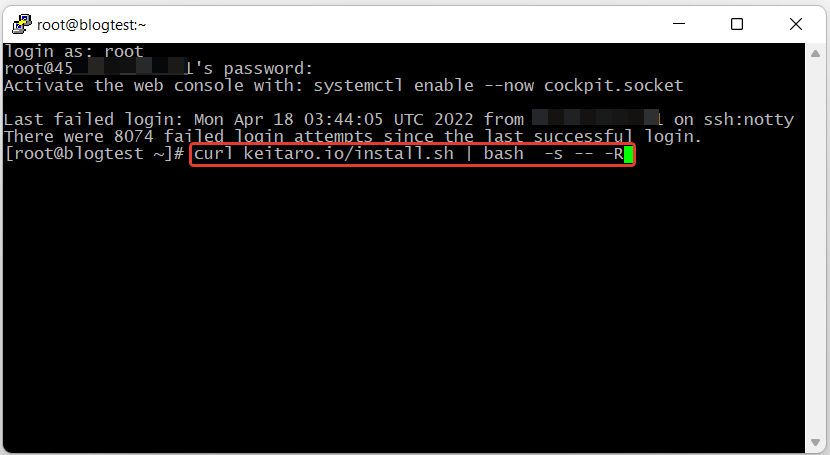
- When the request pops up in the console, enter the path to the server dump file:
/root/dump.sql.gz
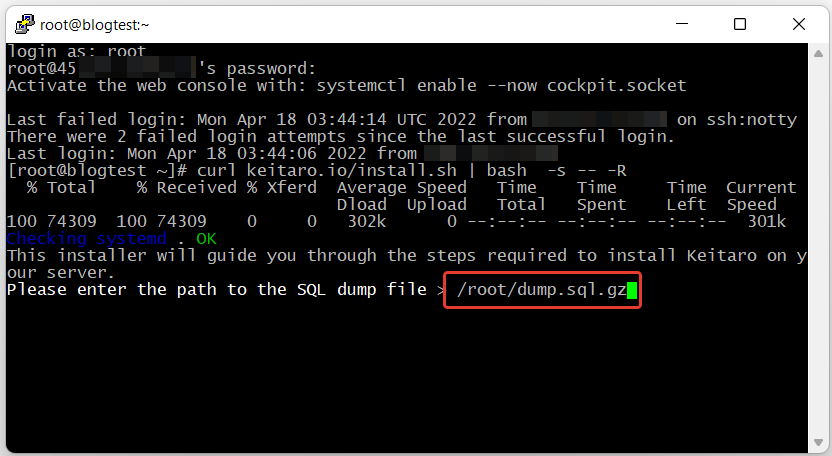
- Next, enter the salt value obtained from the config.ini.php file.
- Wait for the installation to complete:
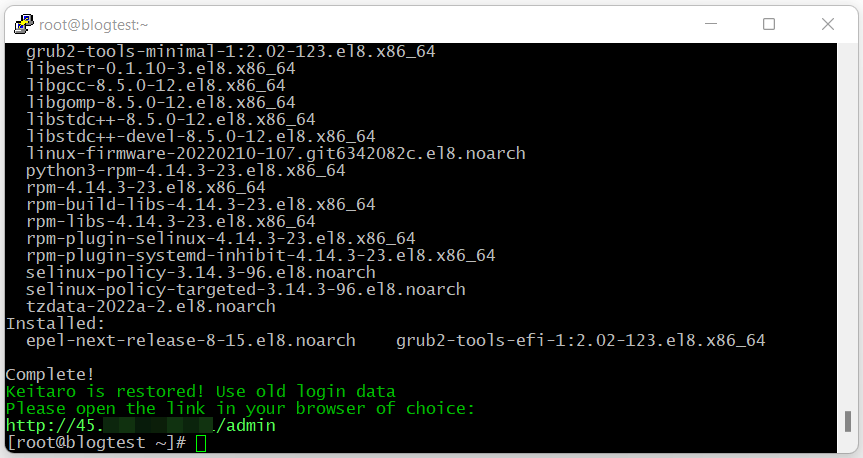
- Close the console
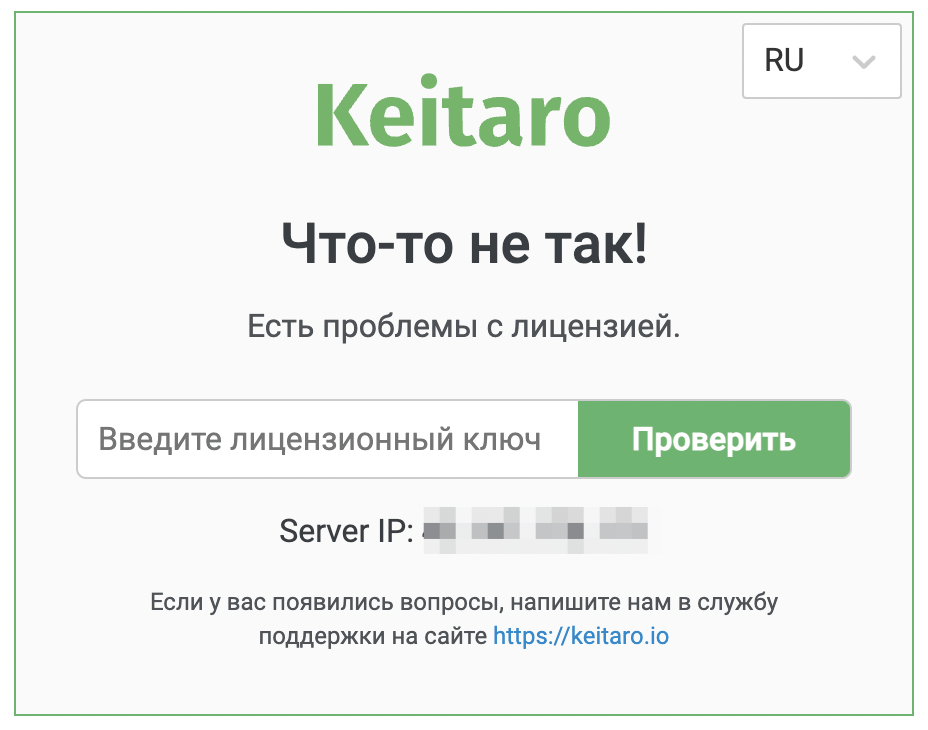
How to Transfer the Keitaro License?
- Log in to your account on the Keitaro website.
- Disable the license for the current IP.
- Go to the newly installed tracker at https://new_server_IP/admin
- Log in using your old tracker username:password
- Enter the license key from the Keitaro dashboard.
Note! Do not forget to add the domains available in the registrar to the new server
The Keitaro tracker is all set now. All that remains is to transfer some files:
Landing Pages/Offers Transfer
Create a landing page or an offer in the new tracker by downloading any archive. As a result, a Lander folder with the necessary access rights will be created.
Upload landing pages/offers from the previous tracker to the folder.
Bot List Transfer
Transfer the previously downloaded bot files to the /var/www/keitaro/var/bots directory in the new tracker.