In 2024 you can earn good money using girls generated by a neural network (similar to AI Aitana Lopez who has recently been hyped on the Internet). AI girls on Instagram and Onlyfans are becoming a usual thing. Here is a detailed step-by-step tutorial on how to generate a girl using neural networks.
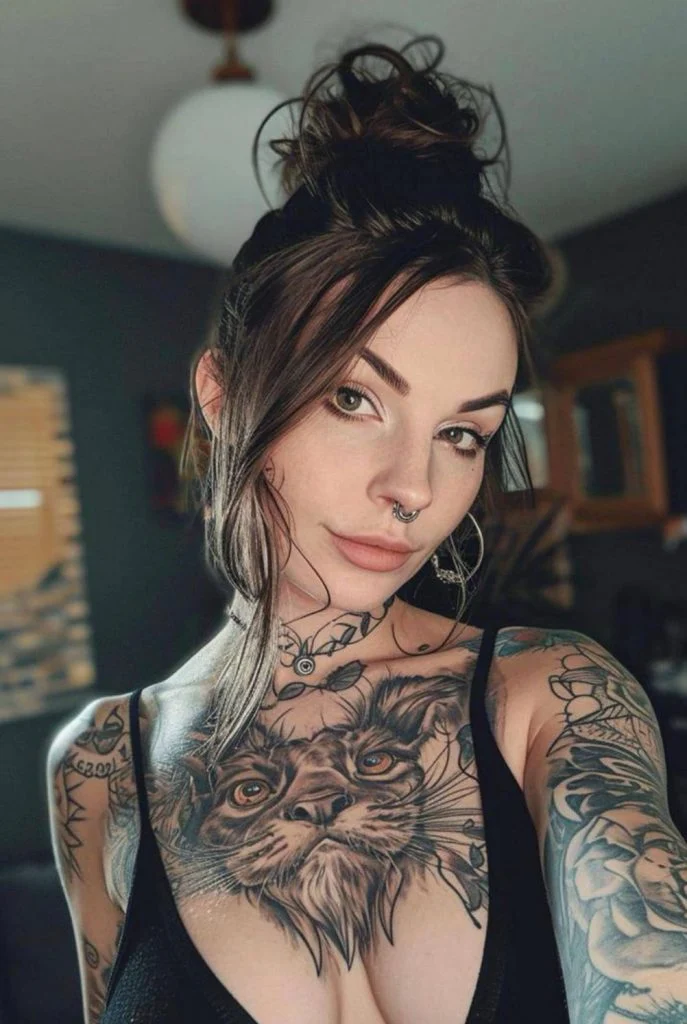
Girl created by a neural network
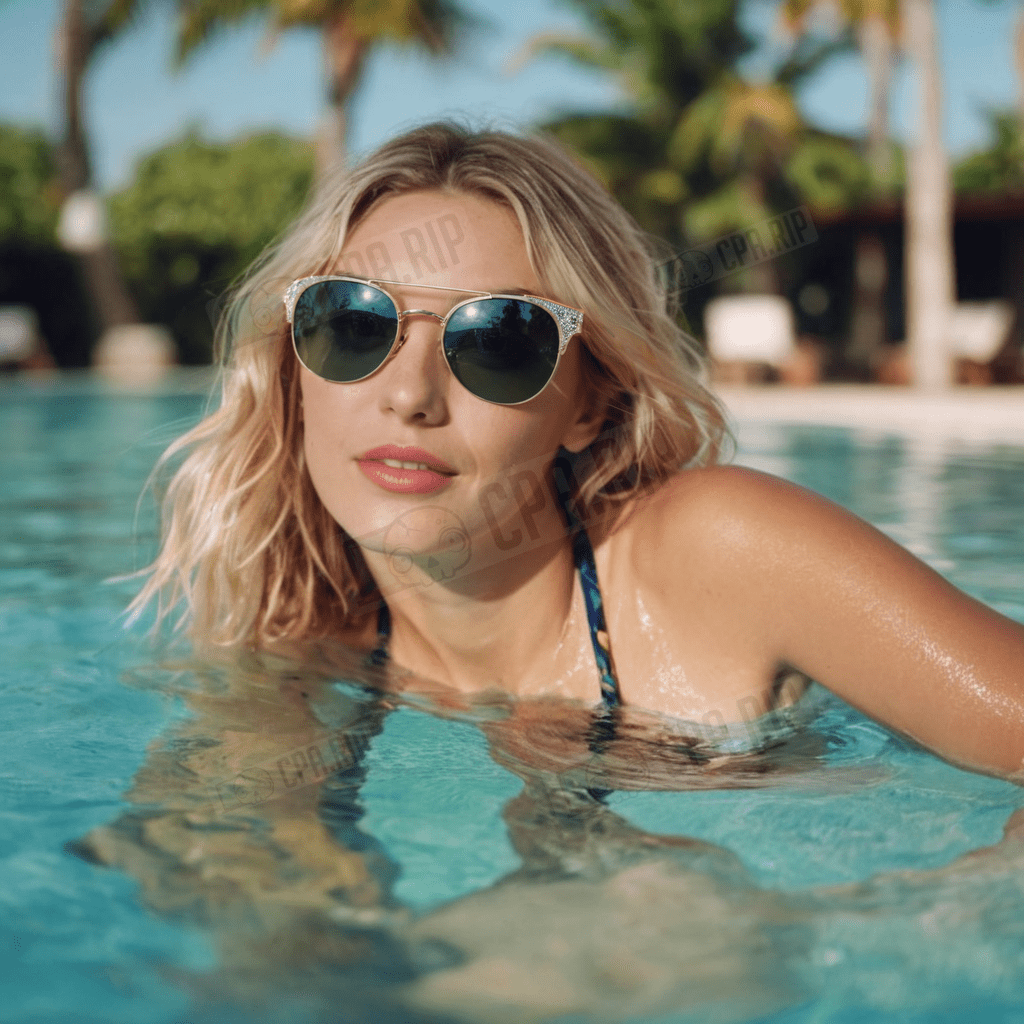
As a part of this article we have used Fooocus Stable Diffusion XL to create a portrait of a non-existent AI model girl and generated a series of photos with her using the FaceSwap feature:
Where to promote and monetize AI girls
Such models are created by neural networks primarily to earn money but where and how to monetize AI girls? The first thing that comes to mind is OnlyFans. But there can be verification or ban issues, so let’s list alternative promotion resources:
- https://instagram.com/
- https://fansly.com/
- https://www.fanvue.com/(analog of OnlyFans)
- https://www.reddit.com/
- https://www.patreon.com/
How to create your AI-influencer
There are various services on the basis of neural networks suitable for the creation of non-existent AI models. Two of the most popular neural networks are RenderNet and Fooocus Stable Diffusion XL (using the last one we have made the photos above). We mainly recommend this tool as it is free, easy to install and work with, and most importantly it can create realistic portraits of people. As for the downsides: it has high requirements for PC hardware (can be solved with the help of cloud GPUs).
Most important is that both of these neural networks have a FaceLock or FaceSwap function.
FaceLock / FaceSwap function
FaceLock or FaceSwap in a generative neural network allows generation of different images of people using the given face. It is a kind of deepfake for the generated people. Thanks to this it is possible to create a series of “photos” of a non-existing person (in our case an AI blogger/influencer).
Next, we will figure out in detail how to work with RenderNet, install Fooocus Stable Diffusion XL and generate an AI girl.
RenderNet
- Website: https://rendernet.ai/
Let’s consider how to create your AI blogger on the example of a paid service – RenderNet. This option is the simplest and many people use it. Until recently it was possible to get 100-200 credits on your balance for performing a couple of simple actions. But apparently, because of the influx of new users, it has been stopped:

Now you only get 5 credits when you sign up. You can simply register many accounts or buy credits using a card issued by one of the card services https://cpa.rip/finance/bank-cards/.
RenderNet Fees:
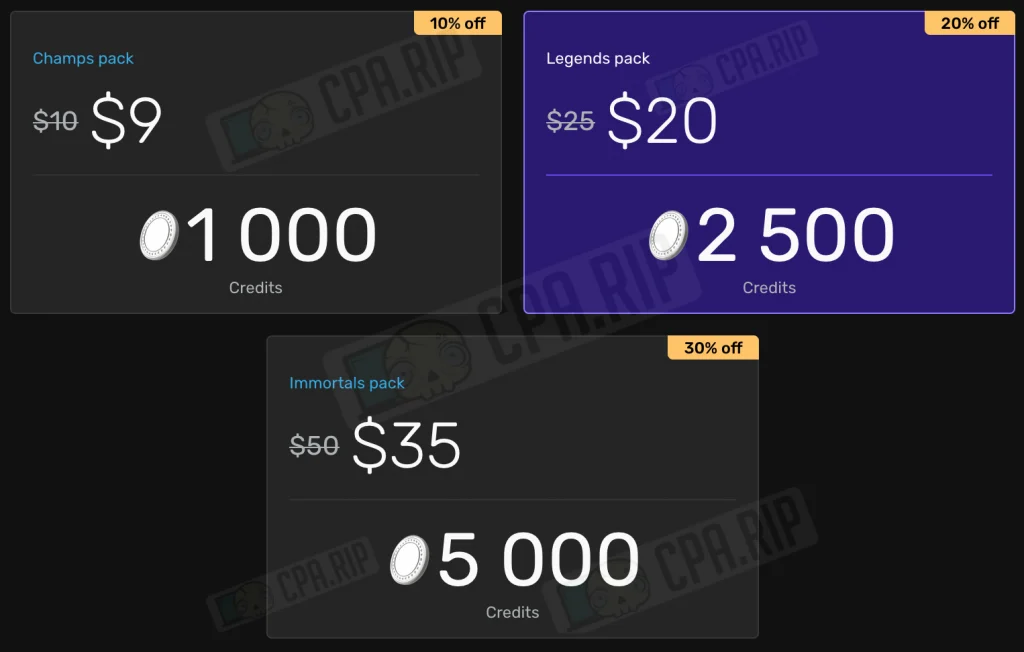
Above is a detailed guide for creating an AI Influencer on RenderNet:
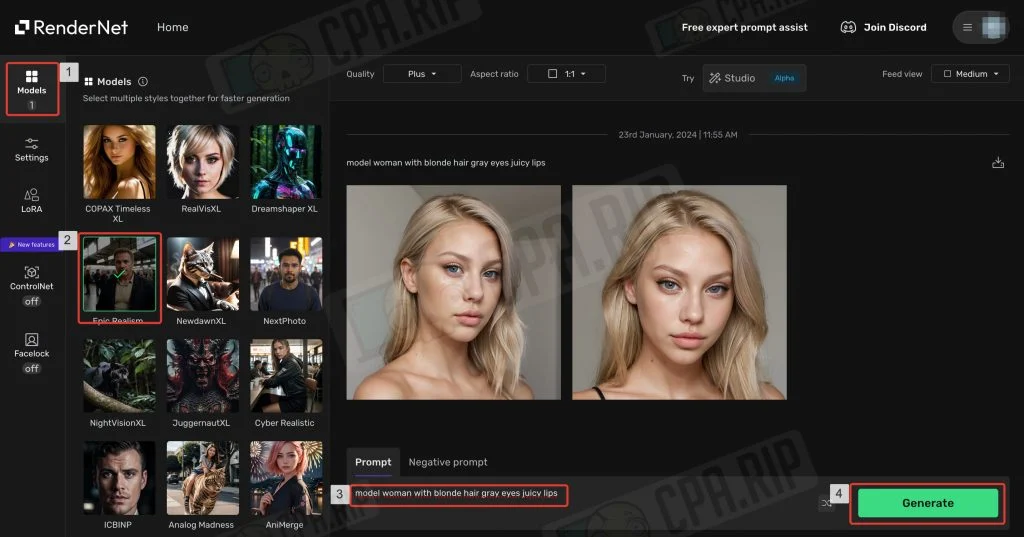
- Go to https://rendernet.ai/ and log in via Google.
- In the left menu click Studio
- Next, select the model to generate. The “Epic Realism” model is great for generating an AI photo model but you can also test “RealVisXL” and “Absolute Reality”.
- Write a prompt. In our example, we have used the prompt: “model woman with blonde hair gray eyes juicy lips”.
- Click Generate
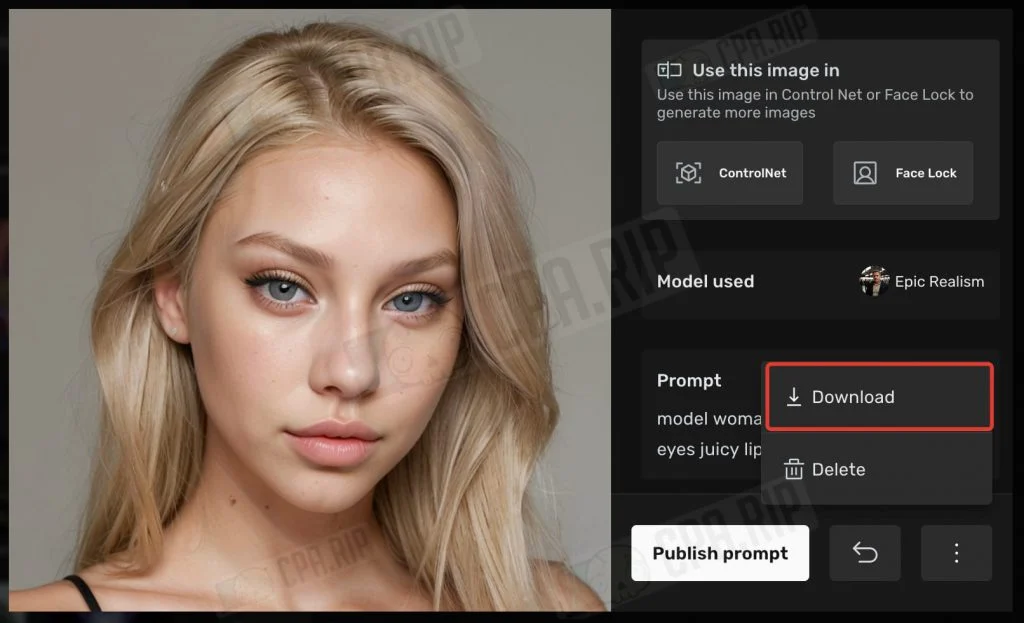
 Generation is very fast – 5 seconds. For Plus quality (768 px) 1 credit is spent. The generated images can be downloaded:
Facelock
- Once you have achieved the desired result, go to the “Facelock” function by clicking the corresponding menu item on the left.
- Make sure that the Facelock toggle switch is on.
- In the “Upload source photo” field, upload a portrait of the previously generated model.
- Write the desired prompt. In our case it is “A blonde girl in a blue summer dress sits on a park bench and strokes a red cat”. You can see from the result that the neural network has not understood the task correctly and you should add more details, for example, indicate that the girl is holding the cat in her arms.
- Click Generate.
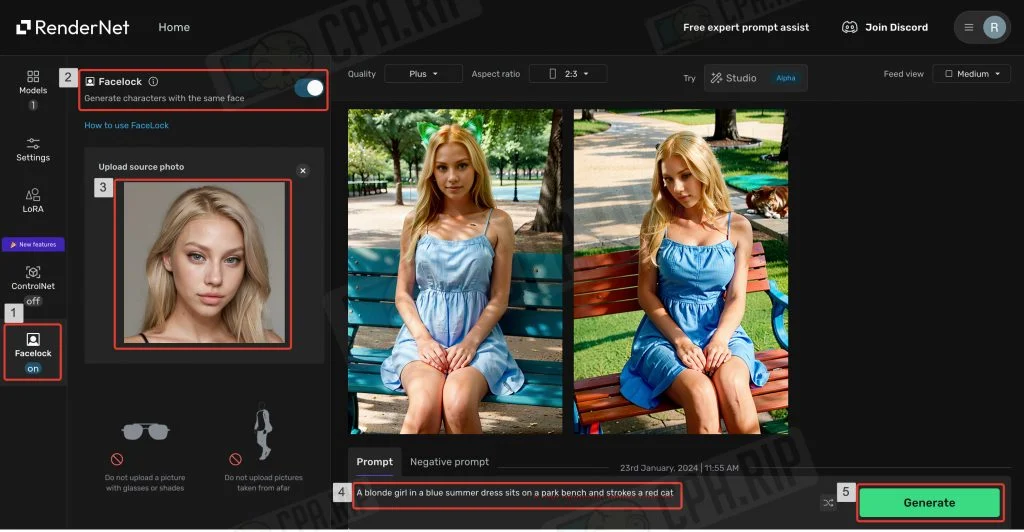
In 10 seconds you will get the finished result. As you can see the new images use the face we have uploaded. The Facelock feature on RenderNet makes it perfect and allows you to generate different photos of the same AI model.
ControlNet
Another useful feature is ControlNet. It allows you to set additional specific conditions such as character pose, general composition, etc. For example, you can regenerate the background or clothes separately while keeping the character itself.
- Go to the “ControlNet” feature by clicking the corresponding menu item on the left.
- Make sure that the ControlNet toggle switch is on.
- In the “Upload photo” field upload the original image.
- You can not change other settings for now.
- Write the required prompt and click the “Generate” button.
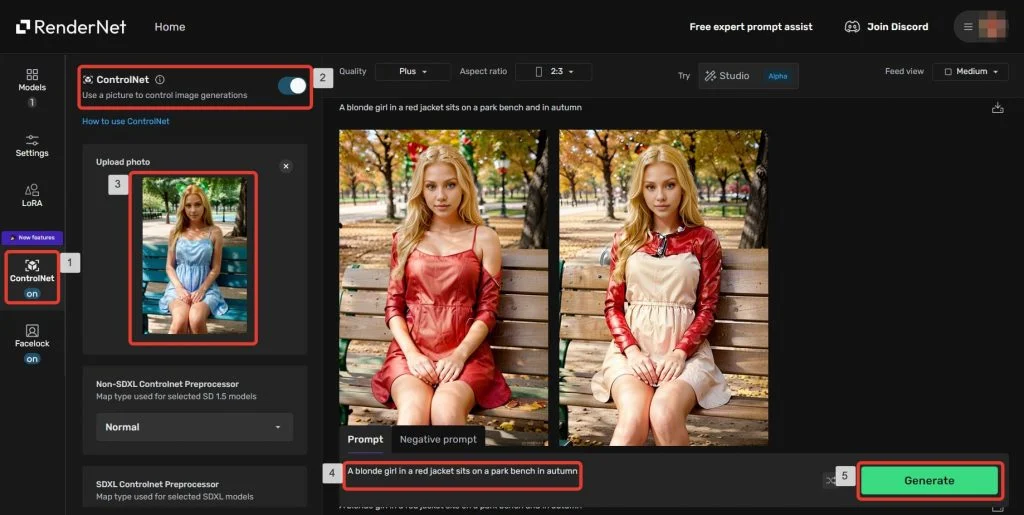
The neural network has generated new images based on the original one and the new prompt but fully kept the main composition and the character.
Now we will finish studying RenderNet for generating AI models and move on to Fooocus Stable Diffusion XL.
Нейросеть Fooocus Stable Diffusion XL
- Official project page on Github: https://github.com/lllyasviel/Fooocus.

A neural network for generating images according to the text description, Fooocus, based on Stable Diffusion XL, can be called a free Midjourney on your computer. It is created by the developer of ControlNet (an important part of Stable Diffusion). It is free, easy to learn and has a user-friendly Web UI.
Fooocus neural network allows you to create high-quality images without unnecessary customizations and complex prompts. Fooocus contains a GPT engine that analyzes and expands the entered queries to generate more detailed images. Most importantly, it supports FaceSwap which makes it ideal for creating non-existing photo models, bloggers, and AI influencers.
Installing Fooocus is as easy as possible – you can put it on Windows, macOS, and Linux in a couple of clicks.
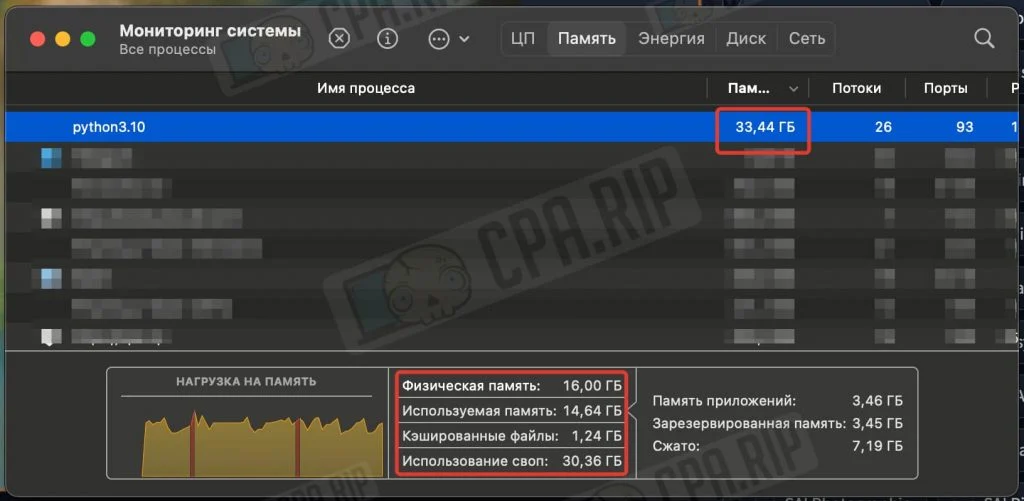
IMPORTANT: The neural network uses GPU power for generation and needs a lot of RAM. It will work on Macbook Air M1 16Gb but we recommend using a system with a graphics card not lower than Nvidia RTX 2XXX with 4Gb video memory and 8Gb RAM minimum!
Swap must be enabled to compensate for missing RAM. You will also need 25-40Gb of free disk space.
Installing Fooocus Stable Diffusion XL on Windows
The installation on Windows is as simple as possible:
- Follow this link to download the archive: https://github.com/lllyasviel/Fooocus/releases/download/release/Fooocus_win64_2-1-831.7z
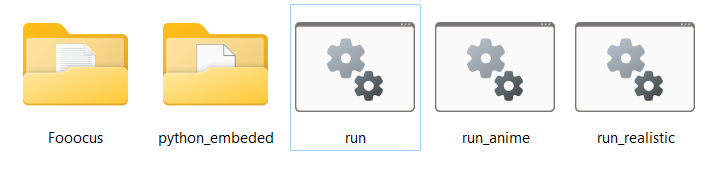
- Unzip it and run the
run.batfile.
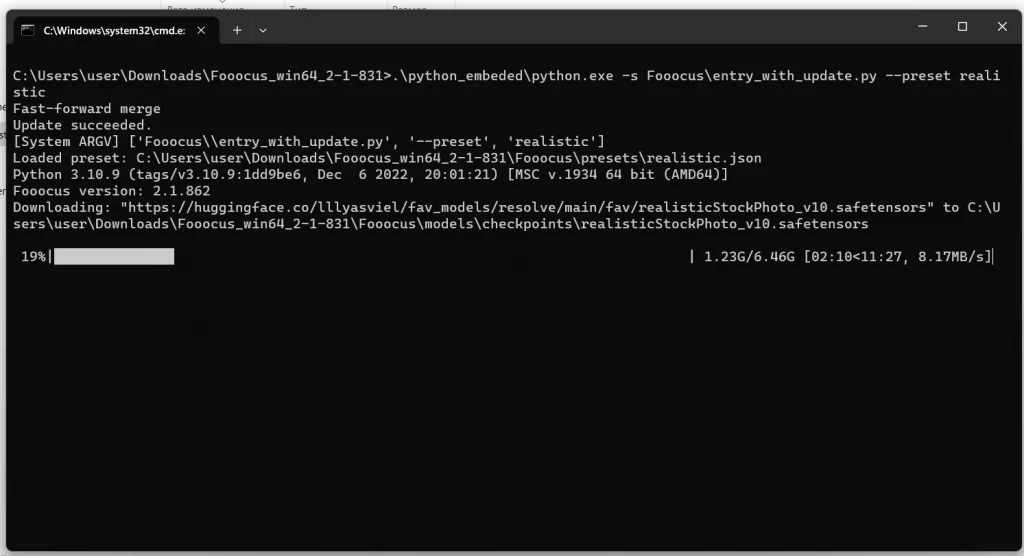
A console with the installation process will be opened. The necessary files will be downloaded automatically (about 6.5Gb).
After the installation is complete the neural network interface will open in your browser:

IMPORTANT: do not close the console/terminal running in the background because all work is done via it. The tab opened in the browser is only used as a web-interface for management.
Launch Modes
There are 3 Fooocus launch modes that use different models, settings, lores, and styles. Choose based on your tasks:
- general – run with run.bat file – universal mode, which is suitable for everything.
- realistic – run with run_realistic.bat file – great for close-up portraits of people, objects, landscapes, etc.
- anime – run with _anime.bat file – perfect for Anime and artwork.
Installing Fooocus Stable Diffusion XL on macOS
To install Fooocus Stable Diffusion XL on macOS, you need to pre-install conda package manager and pytorch nightly. Open macOS terminal and run the commands below.
- Install Miniconda3 on Apple silicon (M1/M2/M3) with the command:
curl -O https://repo.anaconda.com/miniconda/Miniconda3-latest-MacOSX-arm64.sh
sh Miniconda3-latest-MacOSX-arm64.sh
- If you have the x86 version use this command:
curl -O https://repo.anaconda.com/miniconda/Miniconda3-latest-MacOSX-x86_64.sh sh Miniconda3-latest-MacOSX-x86_64.sh
- Install pytorch nightly:
conda install pytorch torchvision torchaudio -c pytorch-nightly
Next, you can move on to installing Fooocus.
- Clone the repository with the command:
git clone https://github.com/lllyasviel/Fooocus.git
- Navigate to the Fooocus directory:
cd Fooocus
- Create a new conda environment:
conda env create -f environment.yaml
- Activate this environment:
conda activate fooocus
- Install the packages required for Fooocus:
pip install -r requirements_versions.txt
- Run Fooocus Stable Diffusion XL with the command:
python entry_with_update.py
- To run Fooocus in the realistic mode, use the command:
python entry_with_update.py --preset realistic
- To run Fooocus in the anime mode, use the command:
python entry_with_update.py --preset anime
If you have done everything correctly, the Fooocus Stable Diffusion XL neural network interface will open in your browser.
Running Fooocus Stable Diffusion XL on Google Colab
If you don’t have the right high-power hardware, Fooocus can be run on Google Colab, a cloud-based Python environment that also provides free access to GPUs. However, keep in mind that Google can block Fooocus at any time as it has done with Stable Diffusion WebUI AUTOMATIC1111.
The developers warn that refiner is disabled on Google Colab to save resources (to avoid blocking Fooocus). We have also noticed that the container with a neural network may occasionally crash due to heavy loads. However, it’s a working method and is suitable for the first acquaintance with Stable Diffusion XL and creating your own AI blogger.
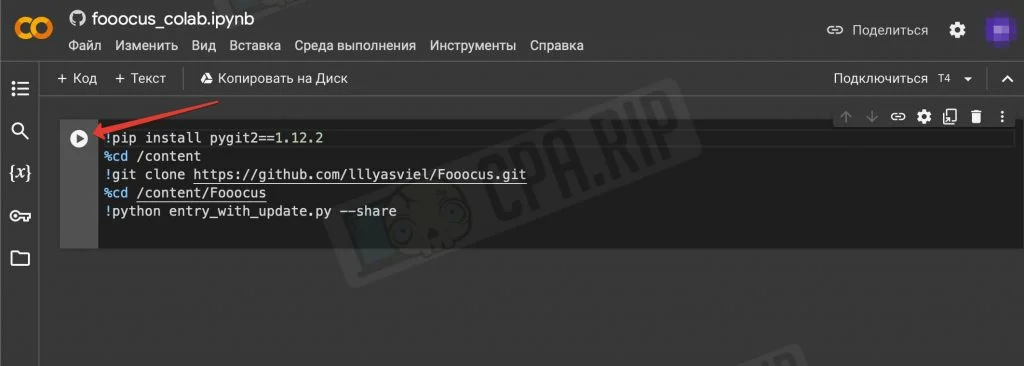
- Go to https://colab.research.google.com/github/lllyasviel/Fooocus/blob/main/fooocus_colab.ipynb
- Click the “Play” button:
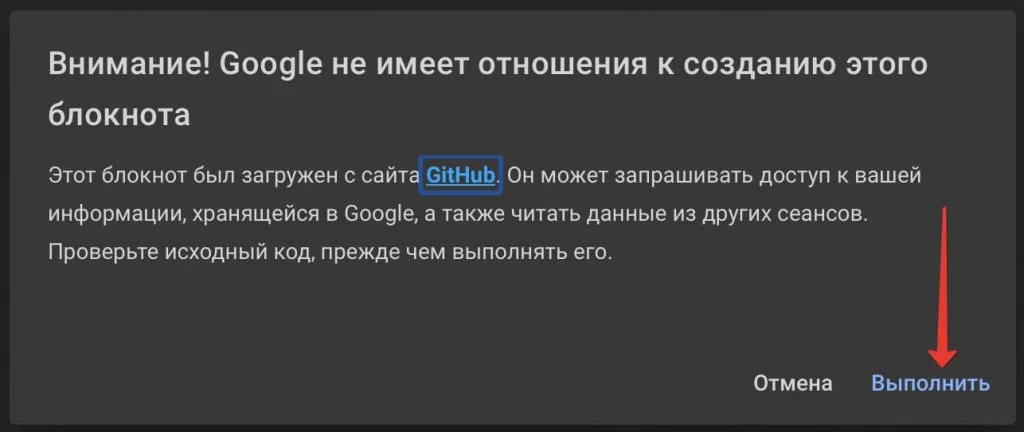
- A warning from Google will appear – click “Run”:
Fooocus will be downloaded and installed on the Google Colab server. It will take about 10 minutes. When it is finished you will see “App started successful” at the bottom of the console and a link to the interface like https://kjhvj34jhv3j4hv5j3.gradio.live.
![]()
![]()
Follow the link to get to the Fooocus interface.
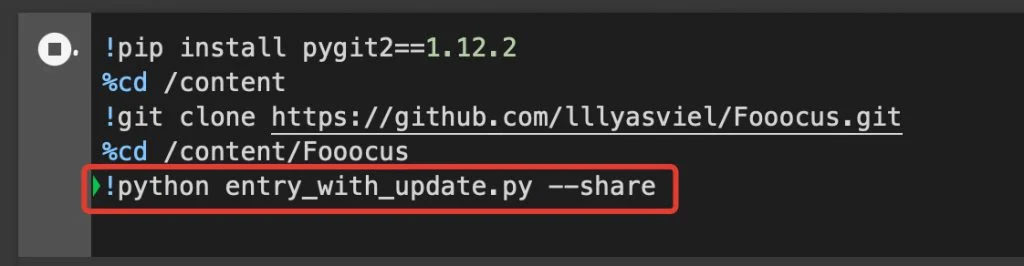
To run in the Realistic or Anime mode before installing replace the 5th line !python entry_with_update.py --share with !python entry_with_update.py --preset realistic --share or !python entry_with_update.py --preset anime --share respectively.
Running Fooocus Stable Diffusion XL on Cloud GPU
Another option to run Fooocus is to rent cloud servers with good graphics cards (GPUs). There are a lot of paid Cloud GPU’s on the market. We have tested some of them.
rundiffusion
- Website: https://rundiffusion.com/
In our opinion, the best one is Cloud GPU for Stable Diffusion. We definitely recommend it.
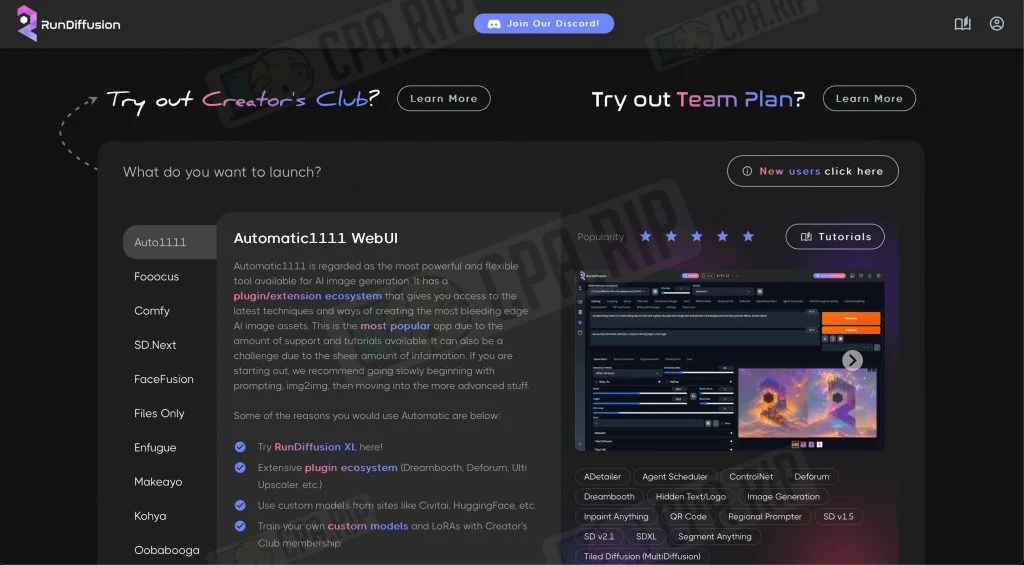
Prices start at just $0.5 per hour. Different variants of Stable Diffusion are available on the platform: Auto1111, Fooocus, Comfy, etc. You can launch and start using it immediately. The service does not accept RU cards, you can use one of these payment systems: https://cpa.rip/finance/bank-cards/.
It is possible to directly load and use the assets hosted on Civitai such as:
- Checkpoints
- LoRA’s
- Textual inversions
- Hypernetworks
immers.cloud
- Website: https://immers.cloud/ (for Ru payments)
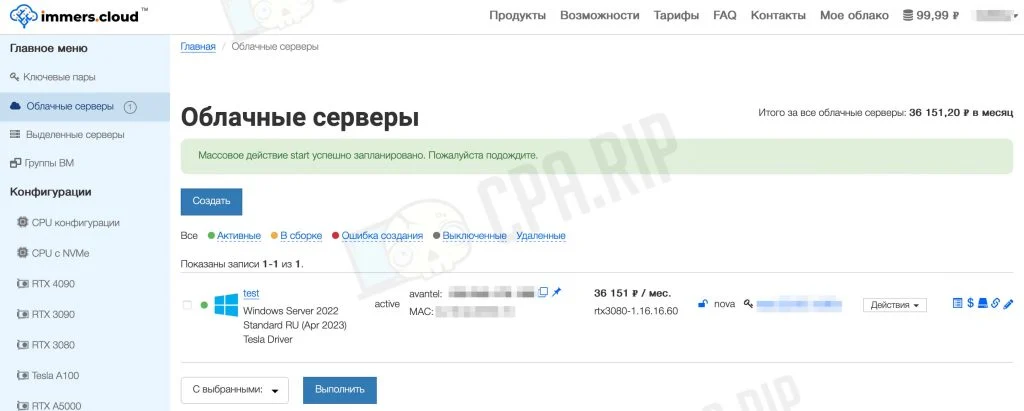
Various configurations of machines are available for rent. Average prices for an hour of rent are about 40-70 rubles. For the test we have taken a machine with a GPU Nvidia RTX 3080 16Pi. The generation speed is excellent – less than 10 seconds per image.
Notes:
- Accepts only RU cards for payment.
- Connection to the rented machine is via RDP
- At the first startup of the system you need to install the appropriate video card drivers by downloading them from the official Nvidia website. After that you should install Fooocus Stable Diffusion XL. All these actions take about an hour of paid time.
- In order not to spend money from the balance it is not enough to turn off the machine. It must be stopped and uninstalled + delete a storage volume in the “Storage → Volumes” section. Accordingly, each time you will have to create a new machine and configure everything on it from scratch.
- Choose the machine with a large storage volume. You will have to manually increase the swap size up to 20-30Gb. Otherwise, the generation of images will end with an error.
Step-by-step instruction on how to create a non-existent AI-model on Fooocus Stable Diffusion XL
Setting up Fooocus Stable Diffusion XL
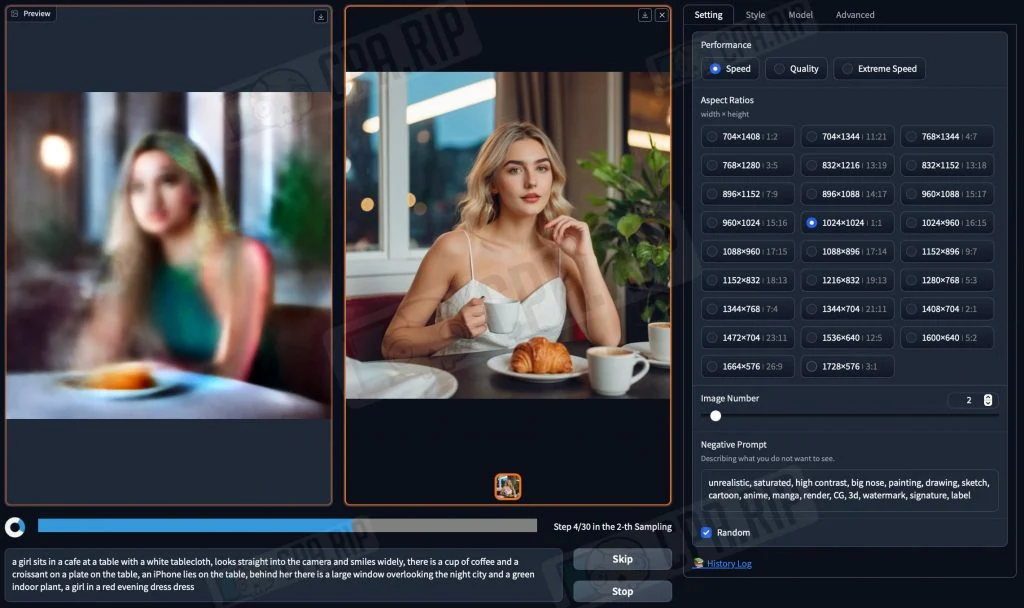
When you start Fooocus in the realistic mode, the optimal settings for generating realistic photo portraits will be set. The only thing you will have to change is the image size. And if your hardware allows, select the “Quality” mode. To access the settings sidebar check the “Advanced” box at the bottom:
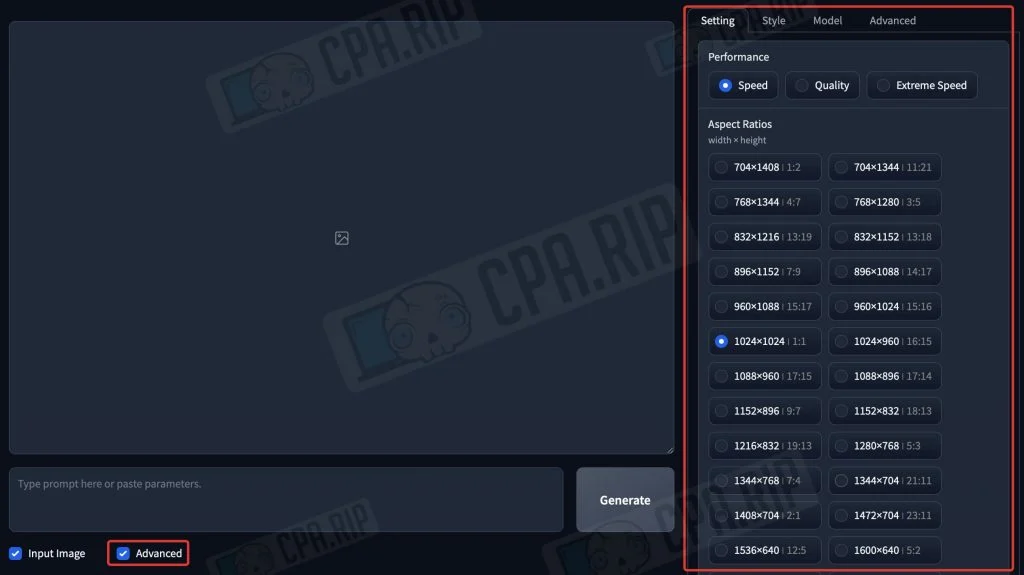
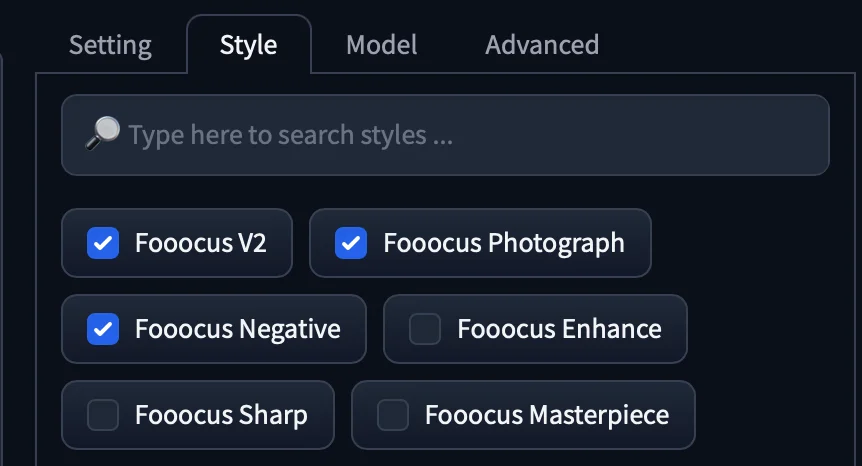
The optimal size for generation is 1024×1024 (1:1). There is no need to change other settings. In the Style tab you can generate images in other styles, for example, the anime.
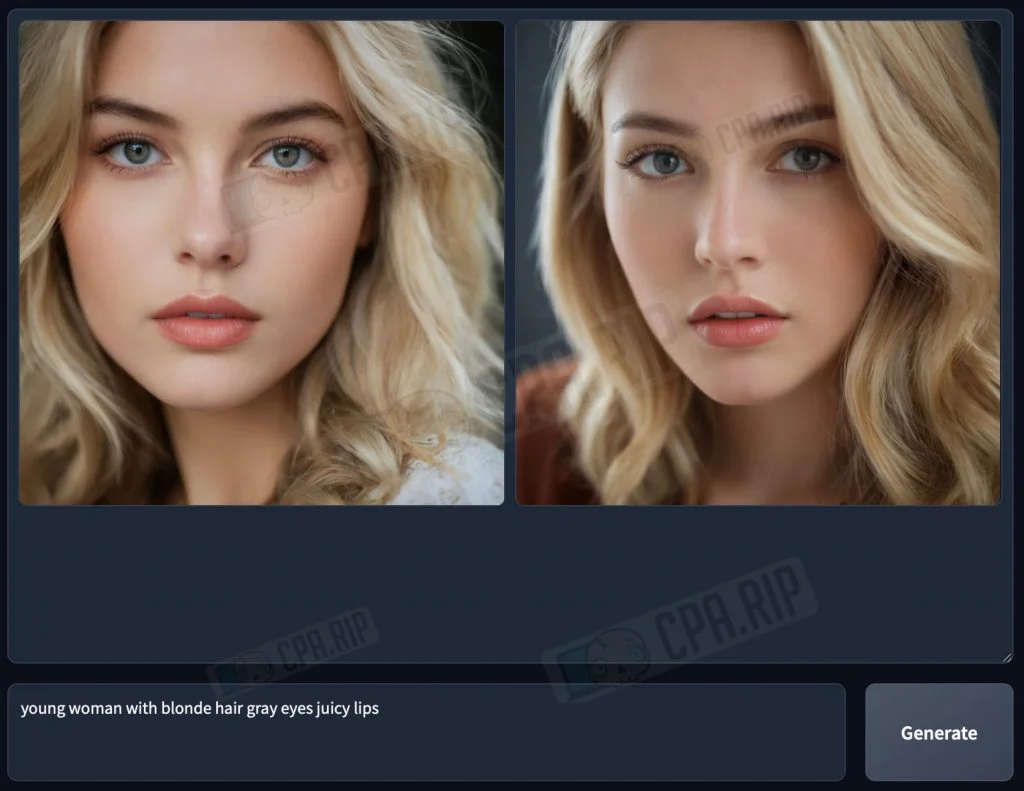
Generating a girl’s face
The most important step is to generate a unique and attractive face of a young girl, who we will eventually promote as an Influencer blogger. Let’s generate it in Fooocus SDXL. To do this, we need to make a prompt. Since Fooocus expands prompts using the built-in GPT, we can use relatively simple queries like “young woman with blonde hair gray eyes juicy lips” and see what happens:
ImagePrompt
When generating as a reference you can use “ImagePrompt” in addition to the text prompt and Fooocus will generate based on the uploaded image.
- Check the “Input Image” box and the corresponding interface will be unrolled:
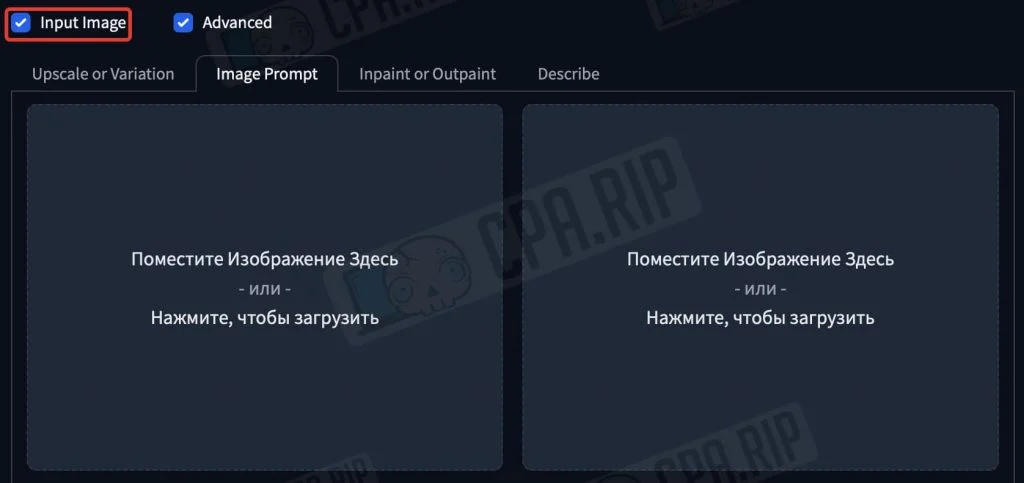
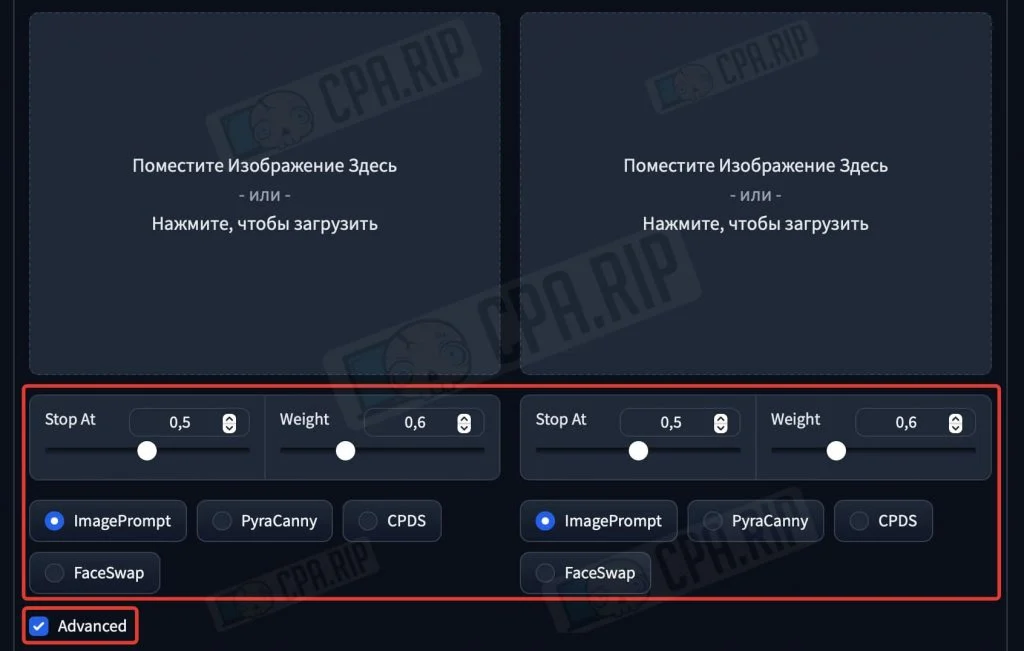
- At the very bottom, put another checkmark against “Advanced” and additional tools will appear:
- Type a text prompt.
- In the tab “Image Prompt” load an image as a reference, SDXL will base on it during the generation process.
- The “ImagePrompt” mode under it should be selected
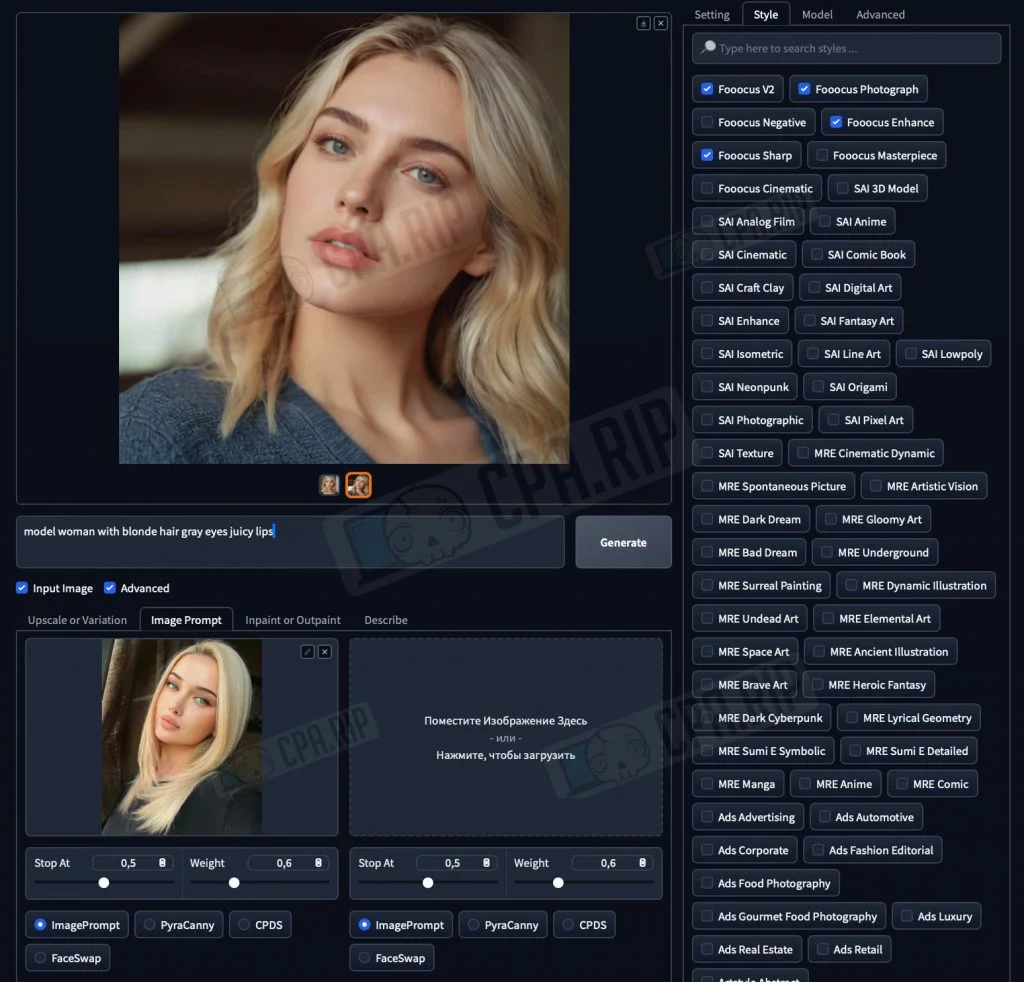
For the test we have uploaded a random photo of a girl from the Internet and got a result that satisfies us. Next, we will use a portrait of this non-existent girl.
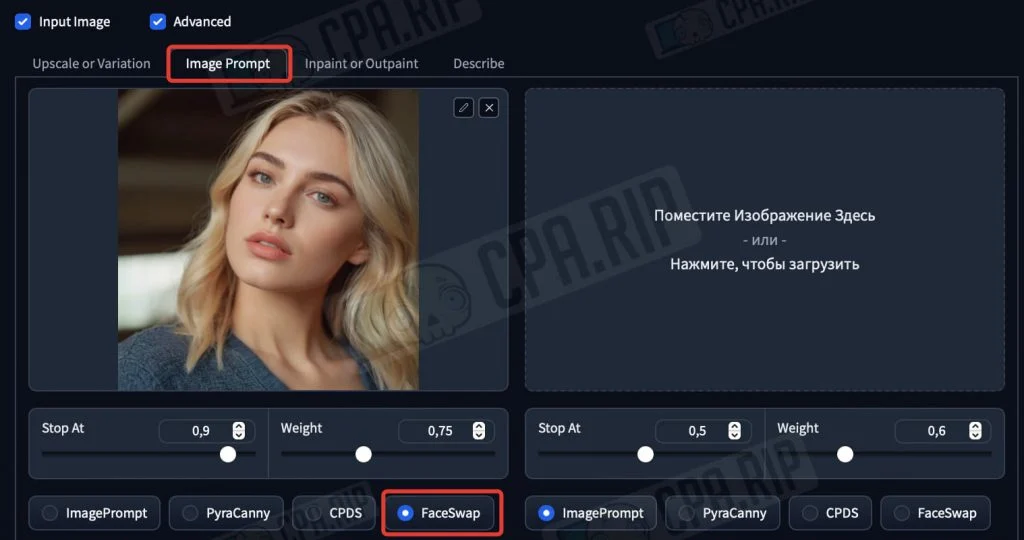
FaceSwap and a series of photos
Next, use FaceSwap feature to generate new photos with the same face.
- Write a prompt describing the photo.
- In the “Image Prompt” tab, upload a portrait of the previously generated blogger girl.
- Activate the “FaceSwap” mode below, otherwise the new images will contain completely different girls.
- Click Generate
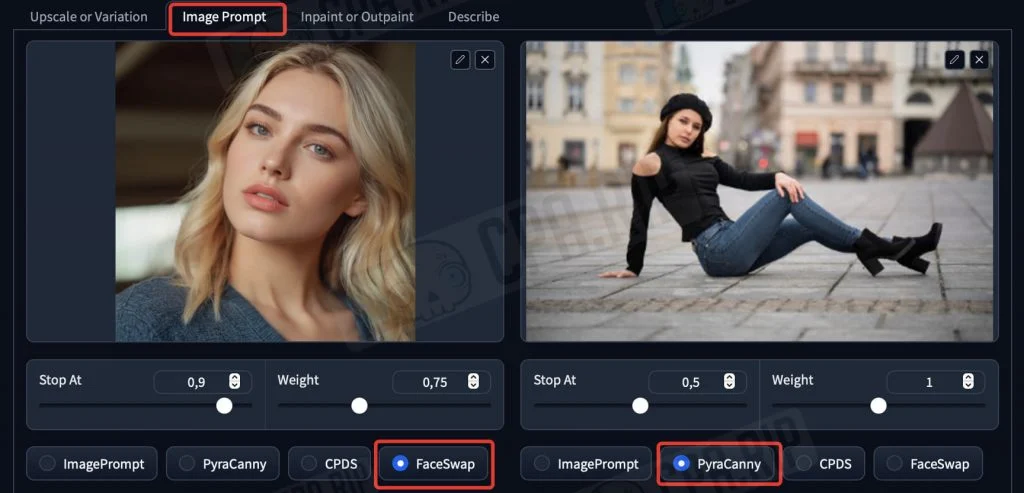
PyraCanny – alternative to ControlNet
When working with RenderNet, we have already figured out what ControlNet is and what it is used for. Fooocus Stable Diffusion XL has a PyraCanny feature that performs a similar function. It allows us to get a specific composition or pose of a person without creating a long prompt to explain what we exactly need to the neural network. PyraCanny makes it simple: load a reference and get the picture you want. This allows you to significantly improve the AI influencer’s content.
- Go to the “Image Prompt” tab.
- Load the model’s portrait into the first field and enable the “FaceSwap” mode
- In the second field, load a reference, for example, with a posing girl whose pose you want to emulate.
- Under the reference, activate the “PyraCanny” mode.
- Type the required prompt
- Click Generate
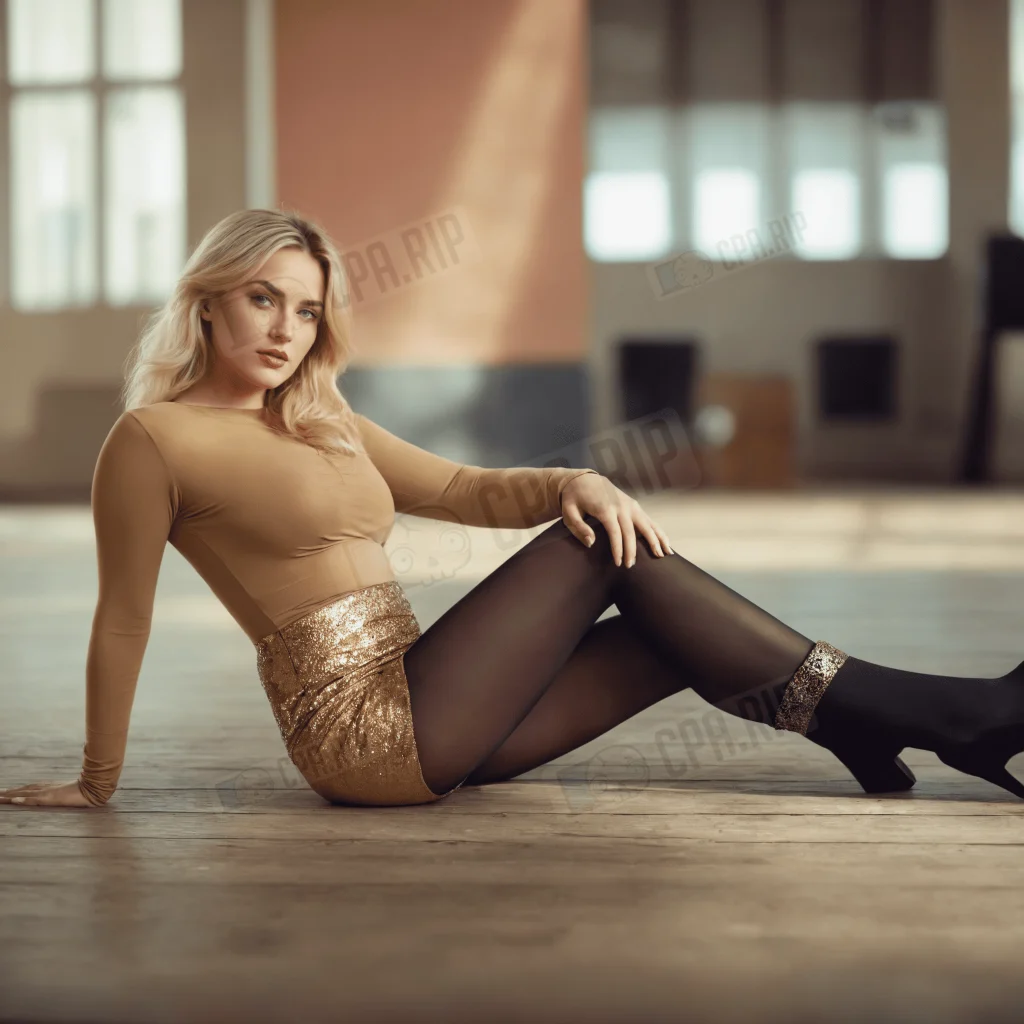
As a result, you will get a photo of a model with the required face and pose:
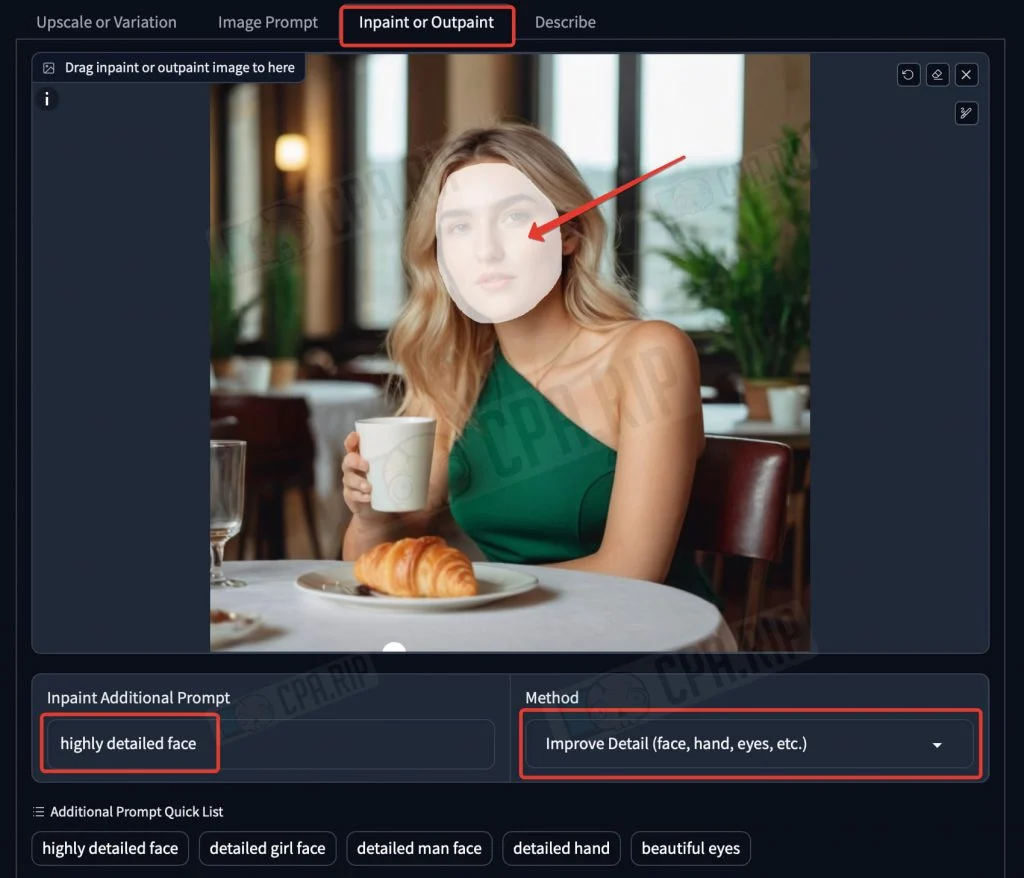
Inpaint or Outpaint
The “Inpaint or Outpaint” tool allows you to manually redraw or repaint individual defined areas of the image. There are 3 modes (methods):
- Inpaint or Outpaint (default) – universal method – the prompt is written in a common field.
- Improve Detail (face, hand, eyes, etc.) – improves details of the selected area. It is used specifically for improving faces, hands, etc. There is a field for entering a prompt and a hint.
- Modify Content (add objects, change background, etc.) – intended for adding new objects to change background, etc. There is also a field for a prompt.
Modify Content
This mode is used when you need to add separate details or objects to the finished image.
- Go to the “Inpaint or Outpaint” tab
- Load the image.
- Draw a mask with a brush in the area where you want to add the object.
- Select the “Modify Content” method
- Enter a prompt, for example, “sunglasses”.
- Click Generate.
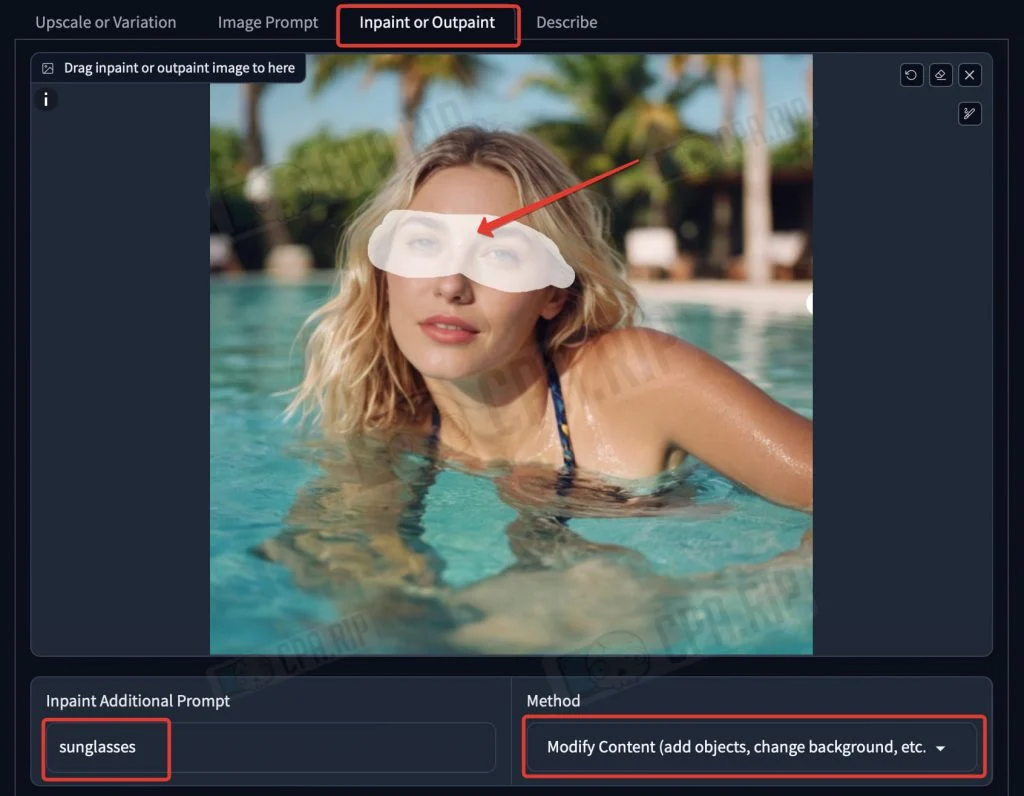
As a result, the sunglasses are now on the model:
Improve Detail
This tool is useful when you need to improve the hands and fingers. It helps to improve the detail of the face. But it is important to note that this may change the facial features and the model will no longer look the same.
- Go to the “Inpaint or Outpaint” tab.
- Load the image.
- Paint a mask with a brush in the area you want to improve and enhance the detail.
- Select the “Improve Detail” method
- Enter a prompt or choose one of the suggested ones, such as “highly detailed face”.
- Click Generate
Upscaling
As a result of all the generations you can get the images in 1024×1024 resolution. For modern social networks this is not enough, so all photos of the neural photo model should be run via an upscaler. It will not only increase the resolution, but also increase the detail. SDXL upscaler will do for the starters.
- Go to the “Upscale or Variation” tab.
- Load the image
- Select the Upscale mode (2x).
- Click Generate
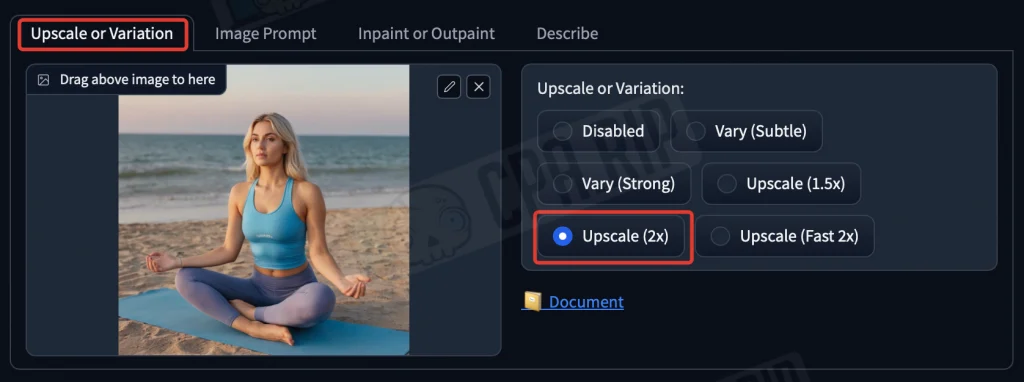
As a result, the quality and detail of the photo will be noticeably improved.
In addition to the upscaler, this tab has a “Vary” function that generates slightly modified variations of the uploaded image.
Lifehack. Generative Fill
You can refill the image environment or some individual details using the Generative Fill neural network built into Photoshop. Available only in a paid subscription, but gives good control over generation.

Additional options for generating a portrait of an AI-model
To generate a girl’s face you can use other neural networks as well. This will give you more unique and varied portrait options.
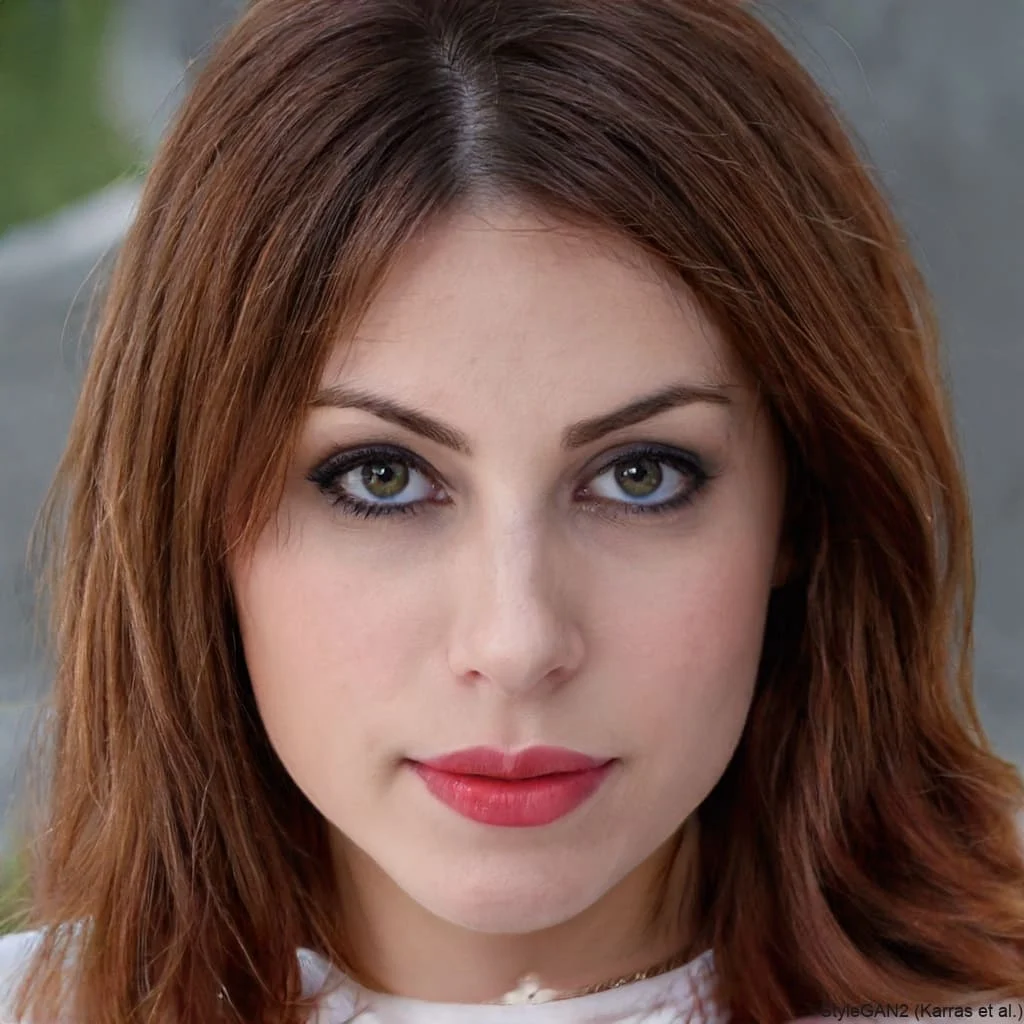
Face generator of non-existent people
You can use one of the face generators from our selection https://cpa.rip/services/this-person-does-not-exist to generate and search random faces until you find a suitable one.
Midjourney
If you have a paid subscription on the Midjourney neural network, it can also generate high-quality portraits. In the 6th version of the neural network, the generated images look much more realistic.
For example, using the prompt “Interior selfie of a woman with (here write a description of the girl’s appearance), shot on a low camera quality phone” you can get the result almost indistinguishable from real photos:
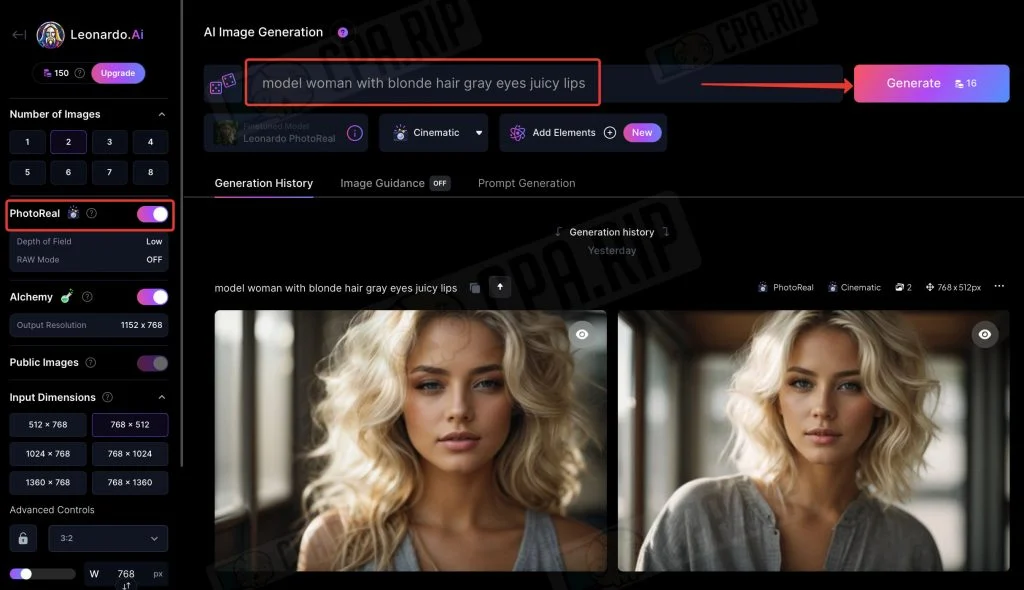
leonardo.ai
Popular neural network leonardo, in which you can generate photorealistic portraits of people using the text description. After signing up 150 credits will be added to your balance.
Be sure to enable a “PhotoReal” mode when generating:
Civitai
Civitai is an interesting platform that provides access to a huge database of models trained for certain tasks and styles, among which you can find the very realistic ones. Some can be used immediately to generate girls online. For others, there is an option to switch to third-party neural networks for further generation. For example, RunDiffusion.
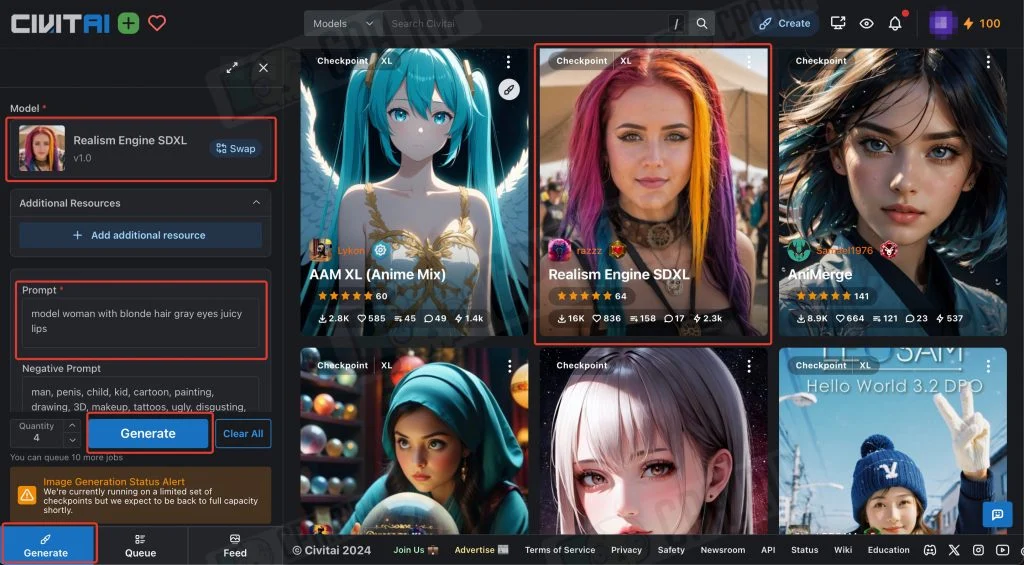
Using suitable checkpoints from civitai.com you can generate adult images.
Bonus: Adult content
Fooocus Stable Diffusion XL will also allow you to generate light adult/nude content. The easiest way to do this is to load a nude reference in the PynaCanny mode.
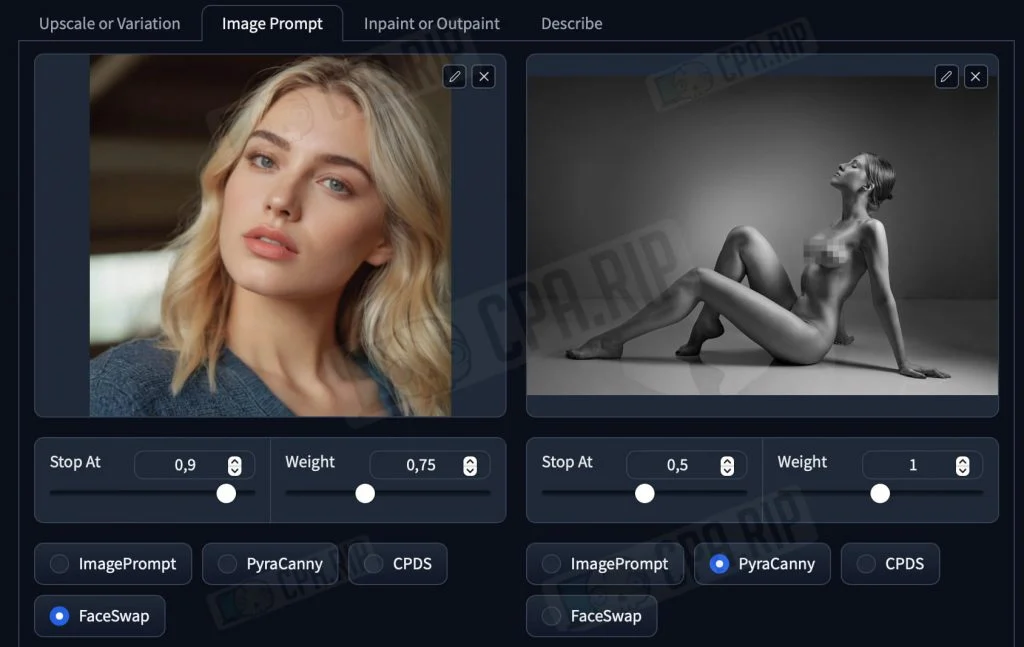
The result will look like this:
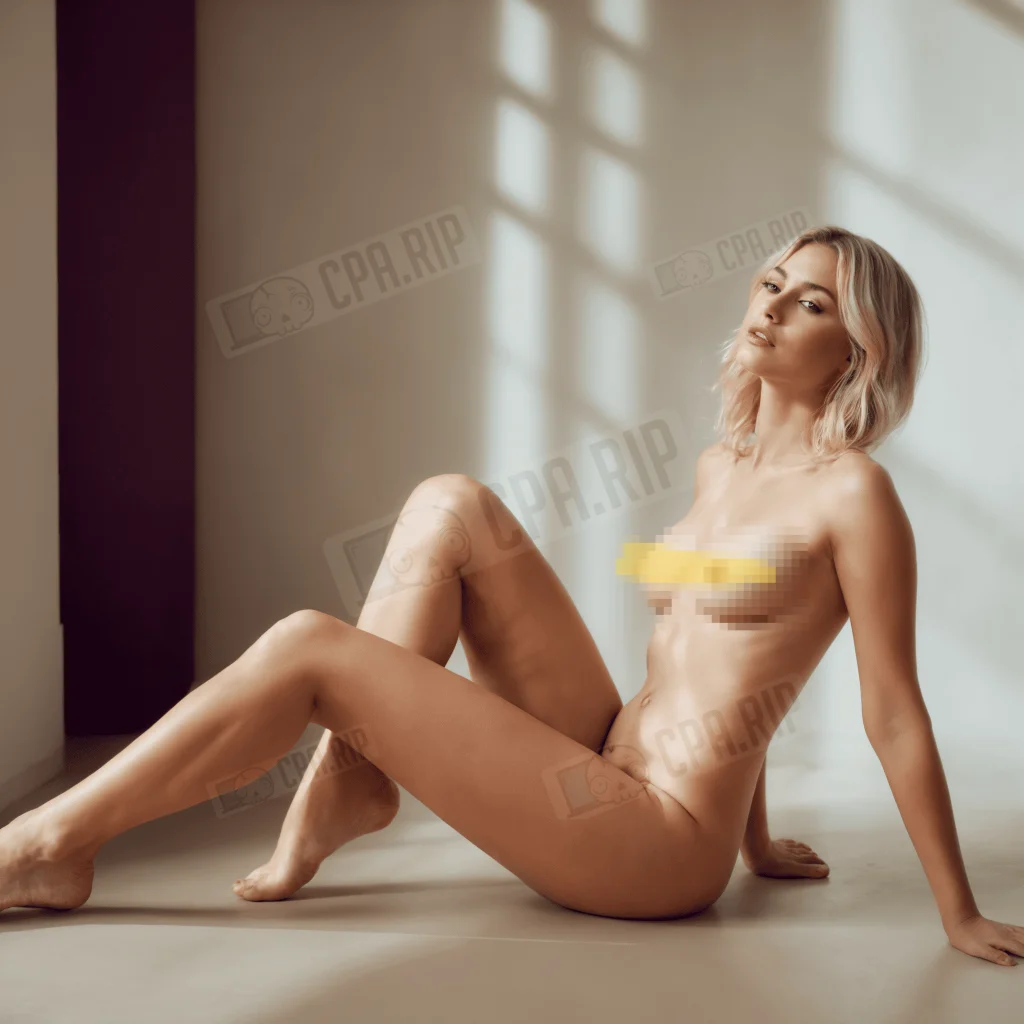
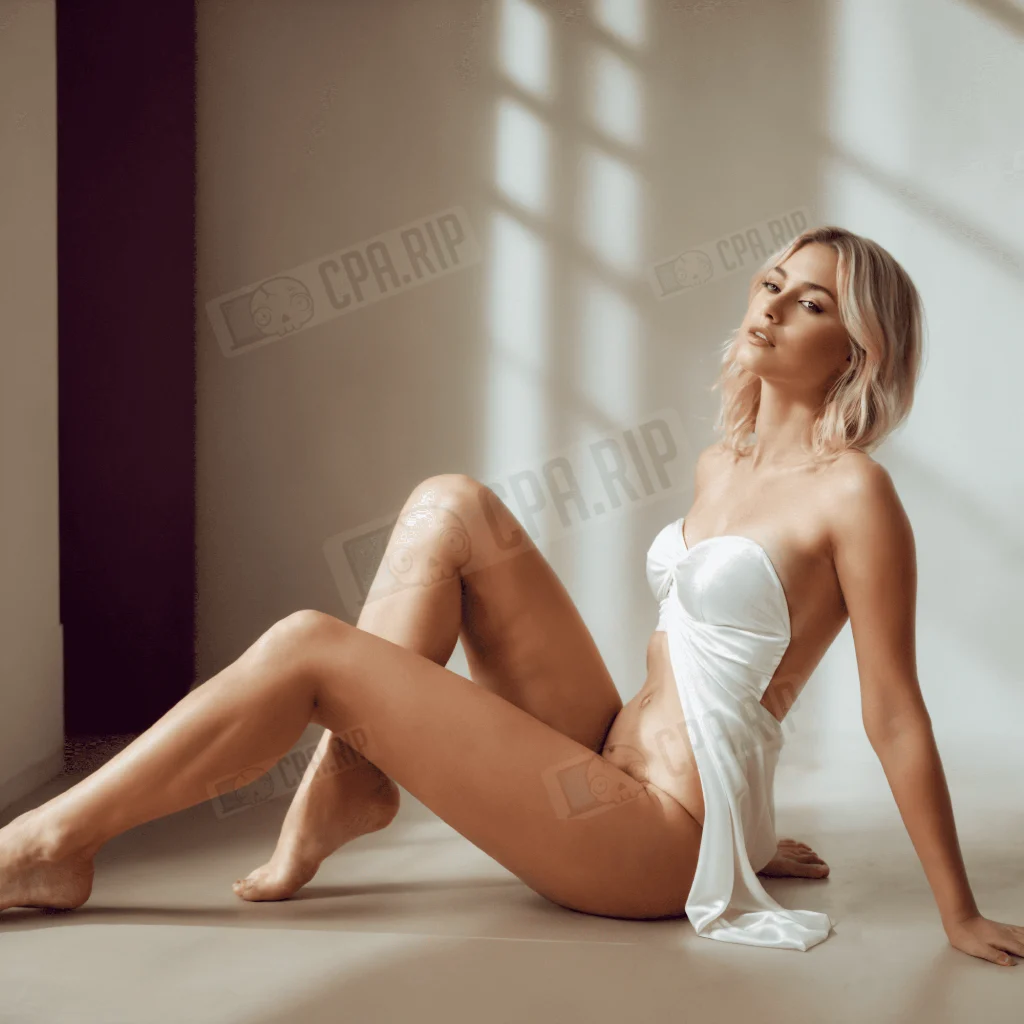
You can cover up the girl using “Inpaint or Outpain” feature, if desired:
And to create a more explicit AI porn model you can use specialized services such as: https://pornpen.ai, https://onlyfakes.app, etc.