Step-by-step instructions on how to install and configure the Yellow Cloaker cloaking script from Yellow Web. We have tested it on running Facebook Ads.
Buying a server and installing Yellow Cloaker
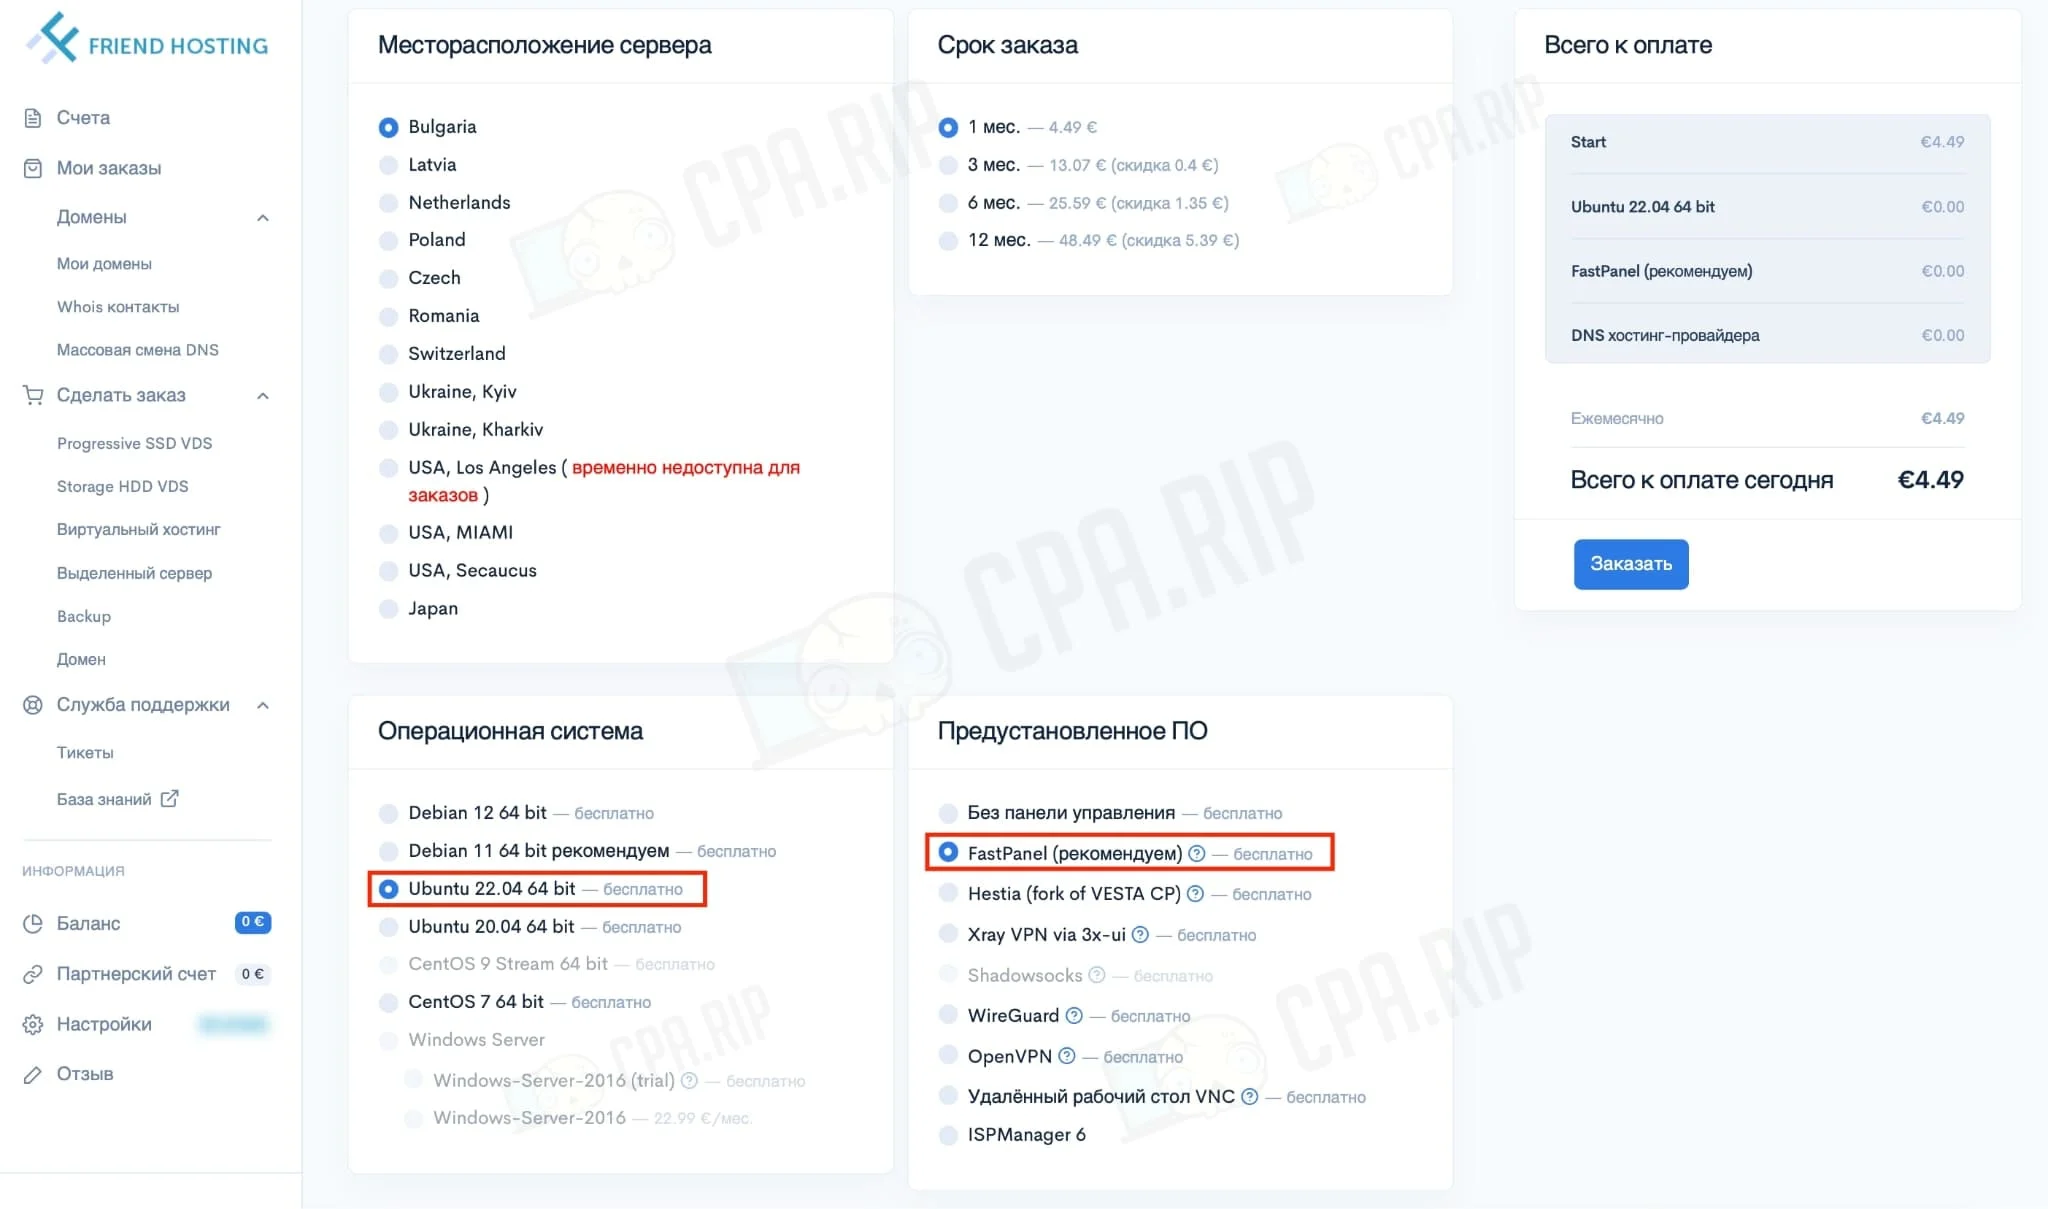
We have bought a VDS server with Ubuntu 22.04 bit operating system and FastPanel software from FriendHosting and will analyze further work with it. You can choose any other one.
PHP version 7.2 or higher must be enabled on the hosting for the script to work.
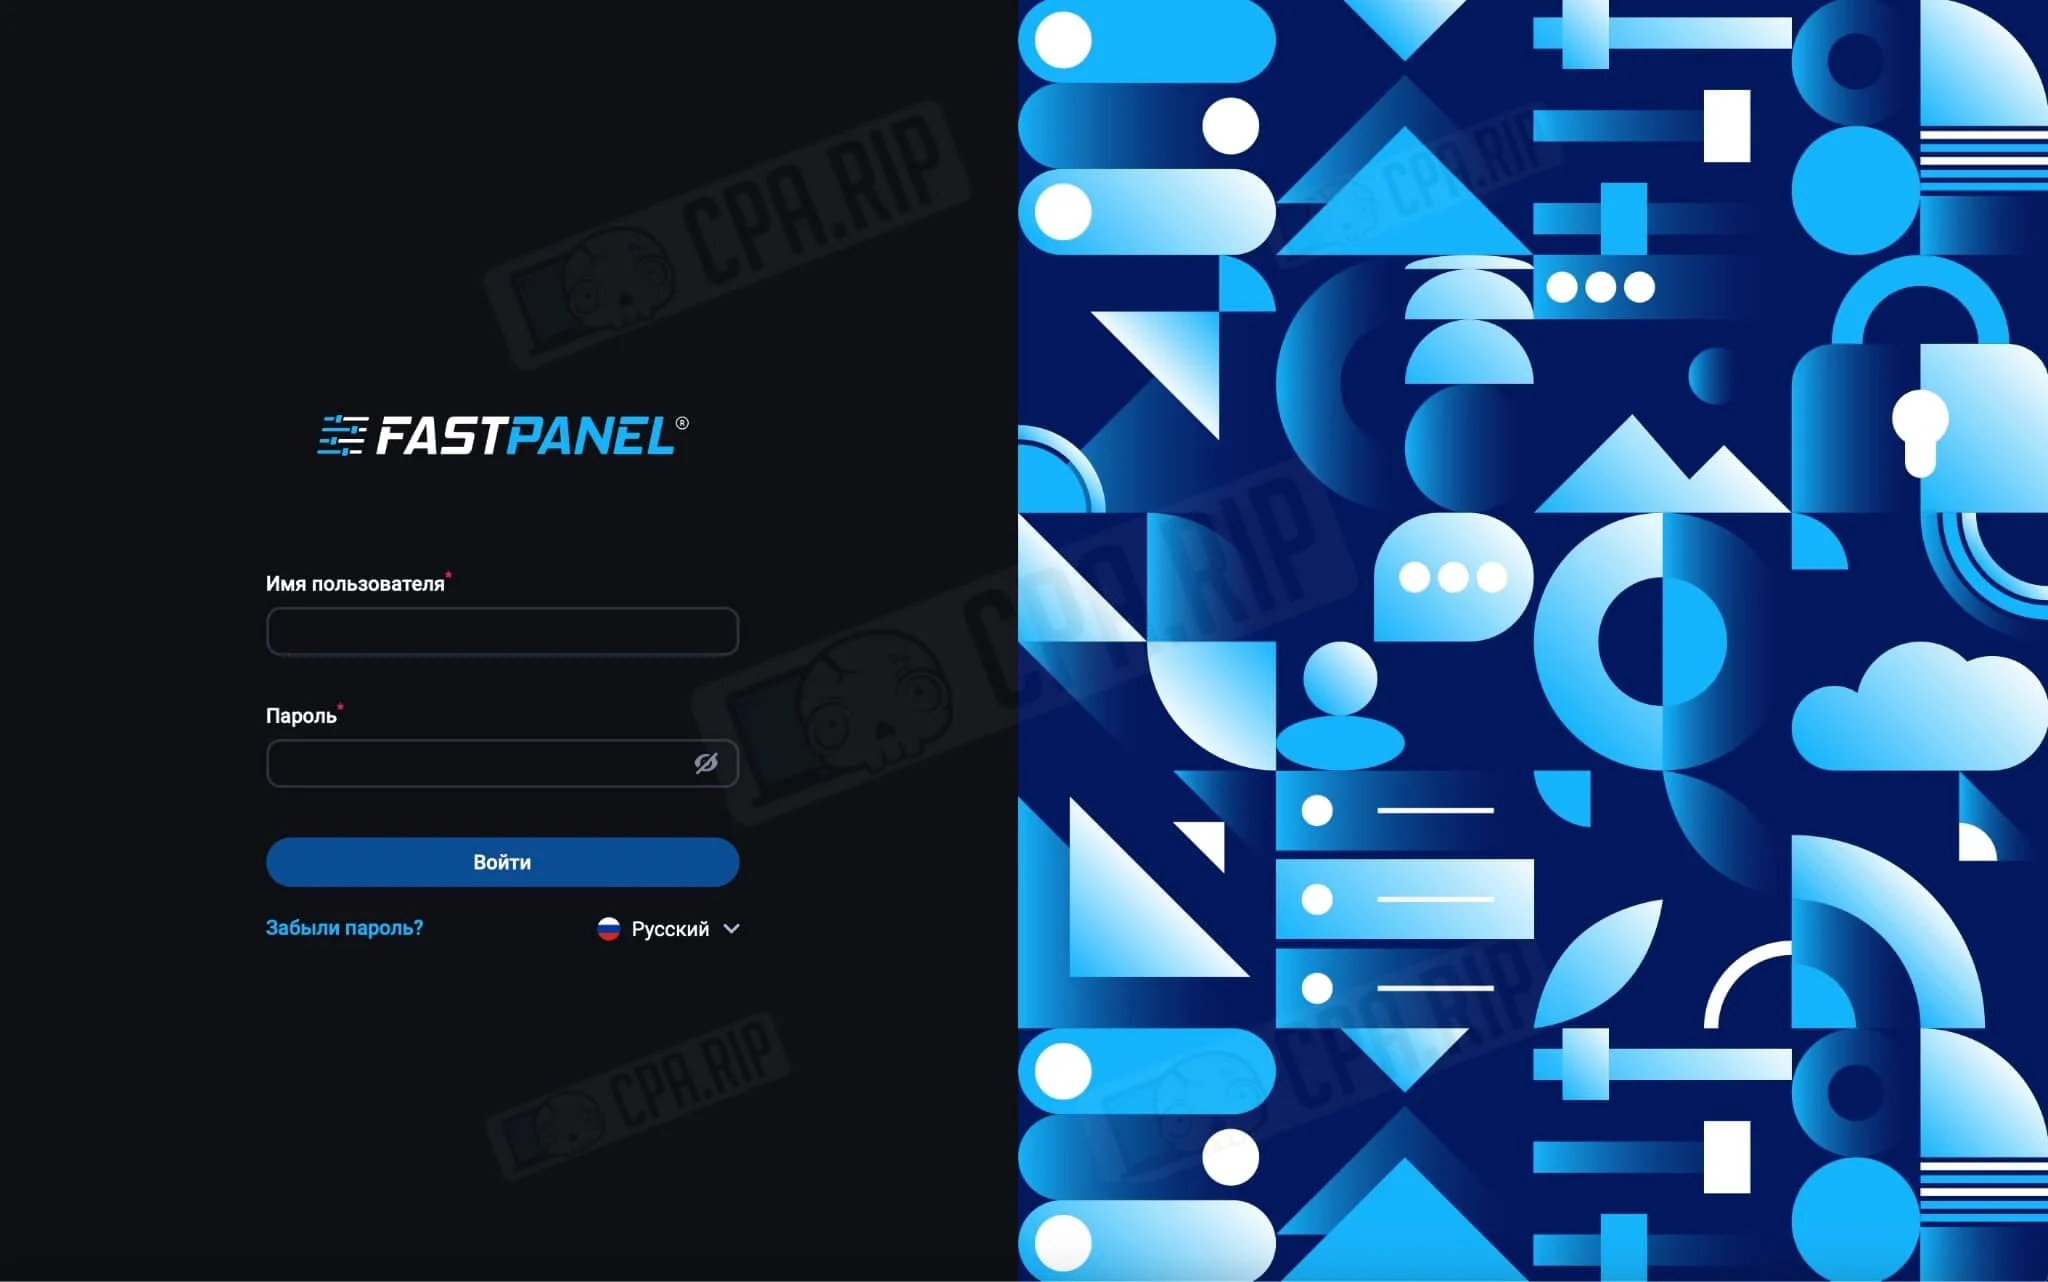
After purchasing a VDS server, you will receive FastPanel access data via email.
- Authorize in the panel:
- Buy a domain and link it via A-record to the server.
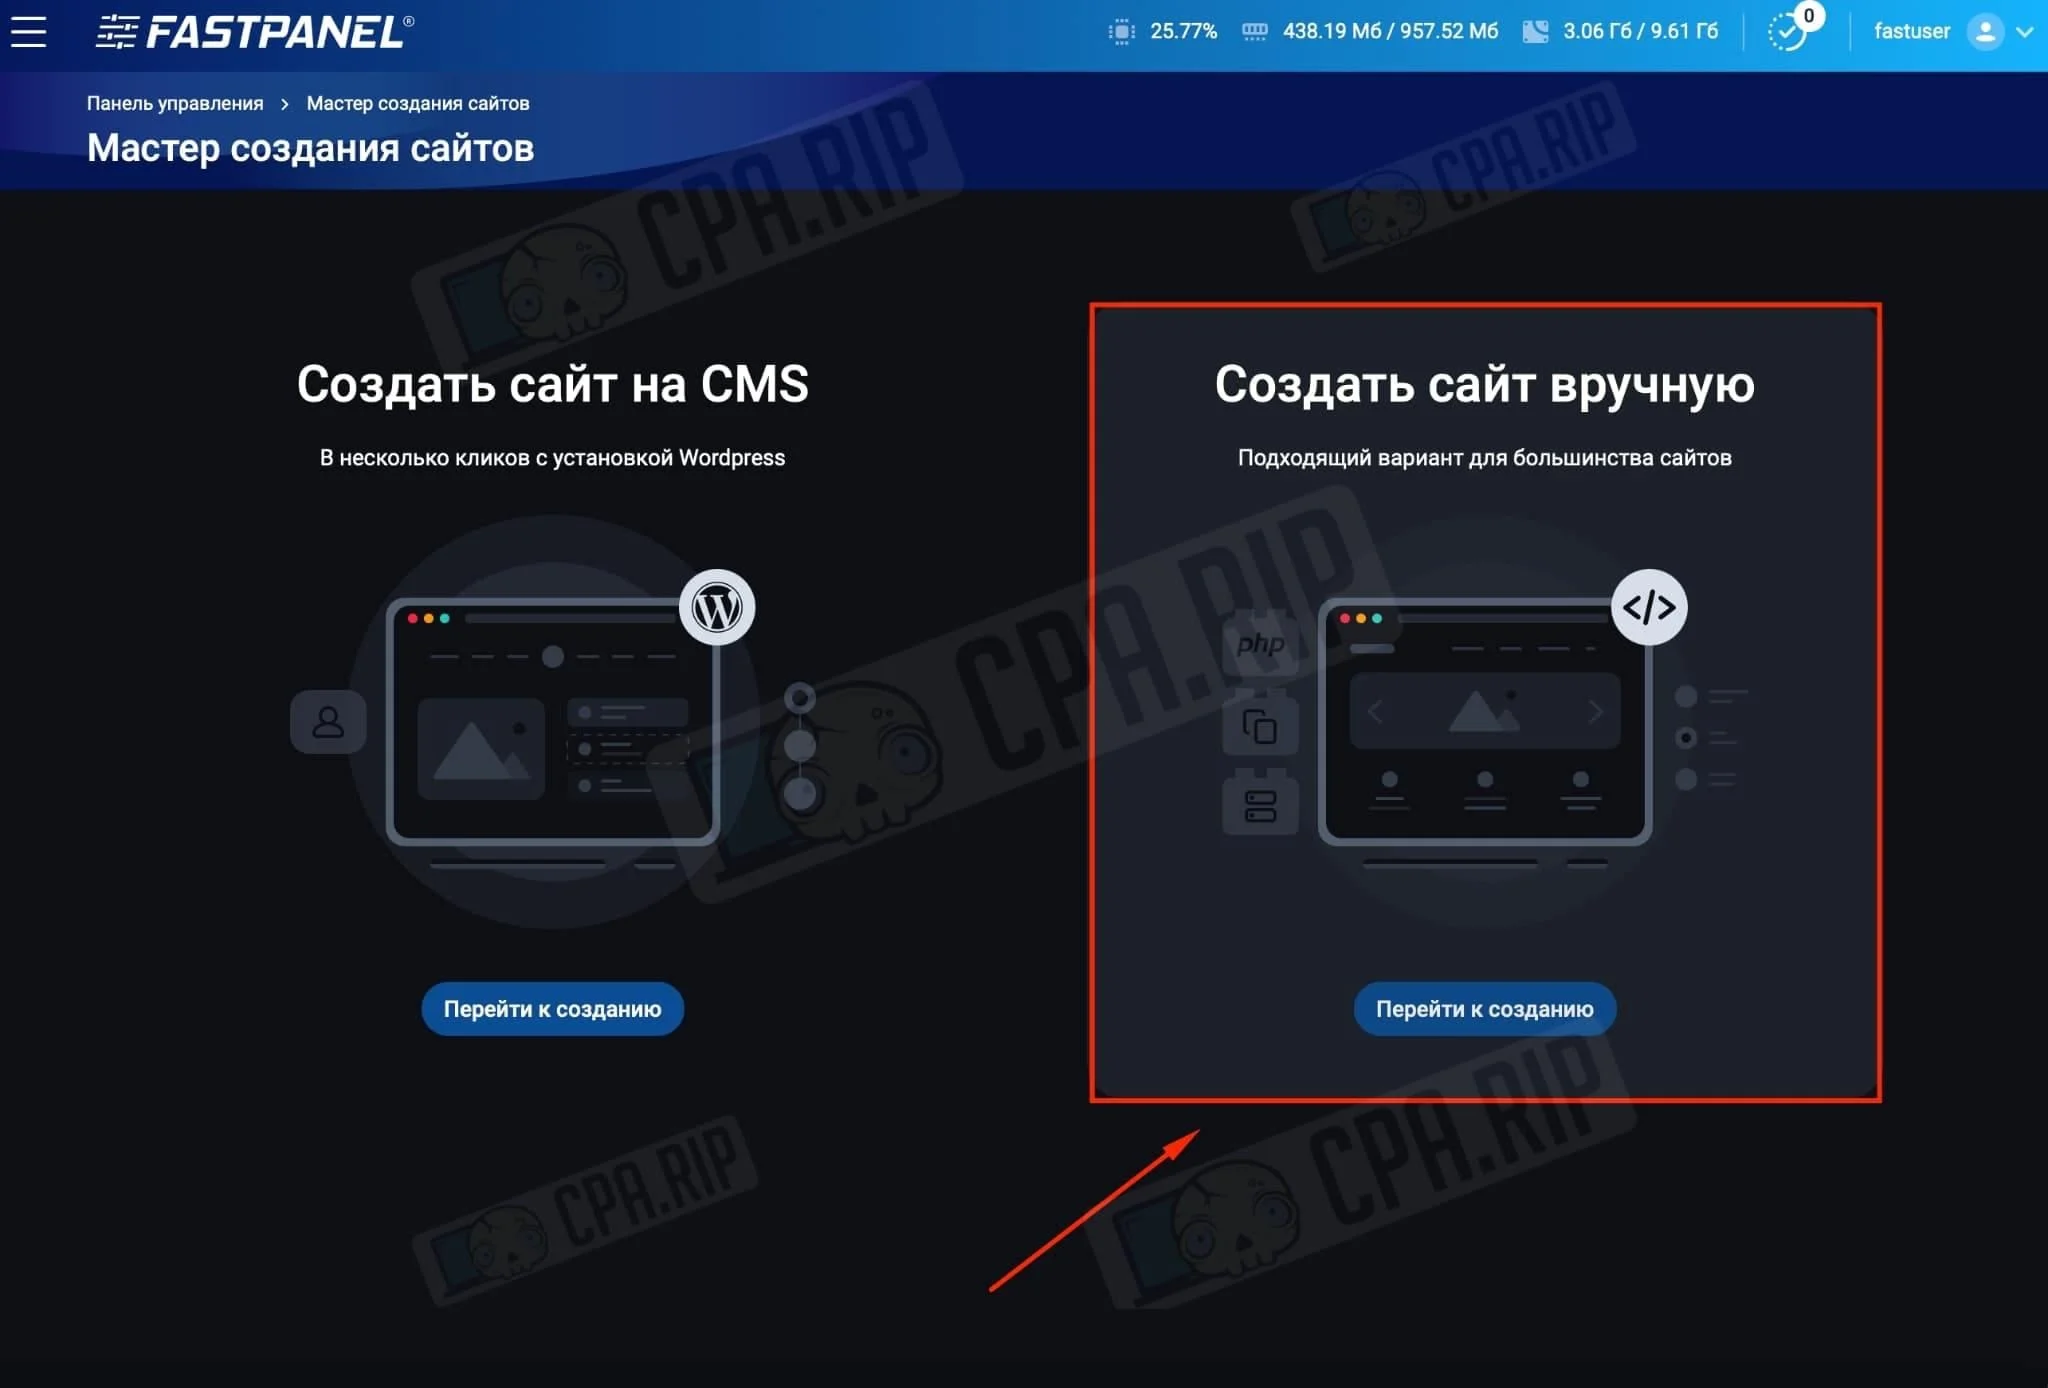
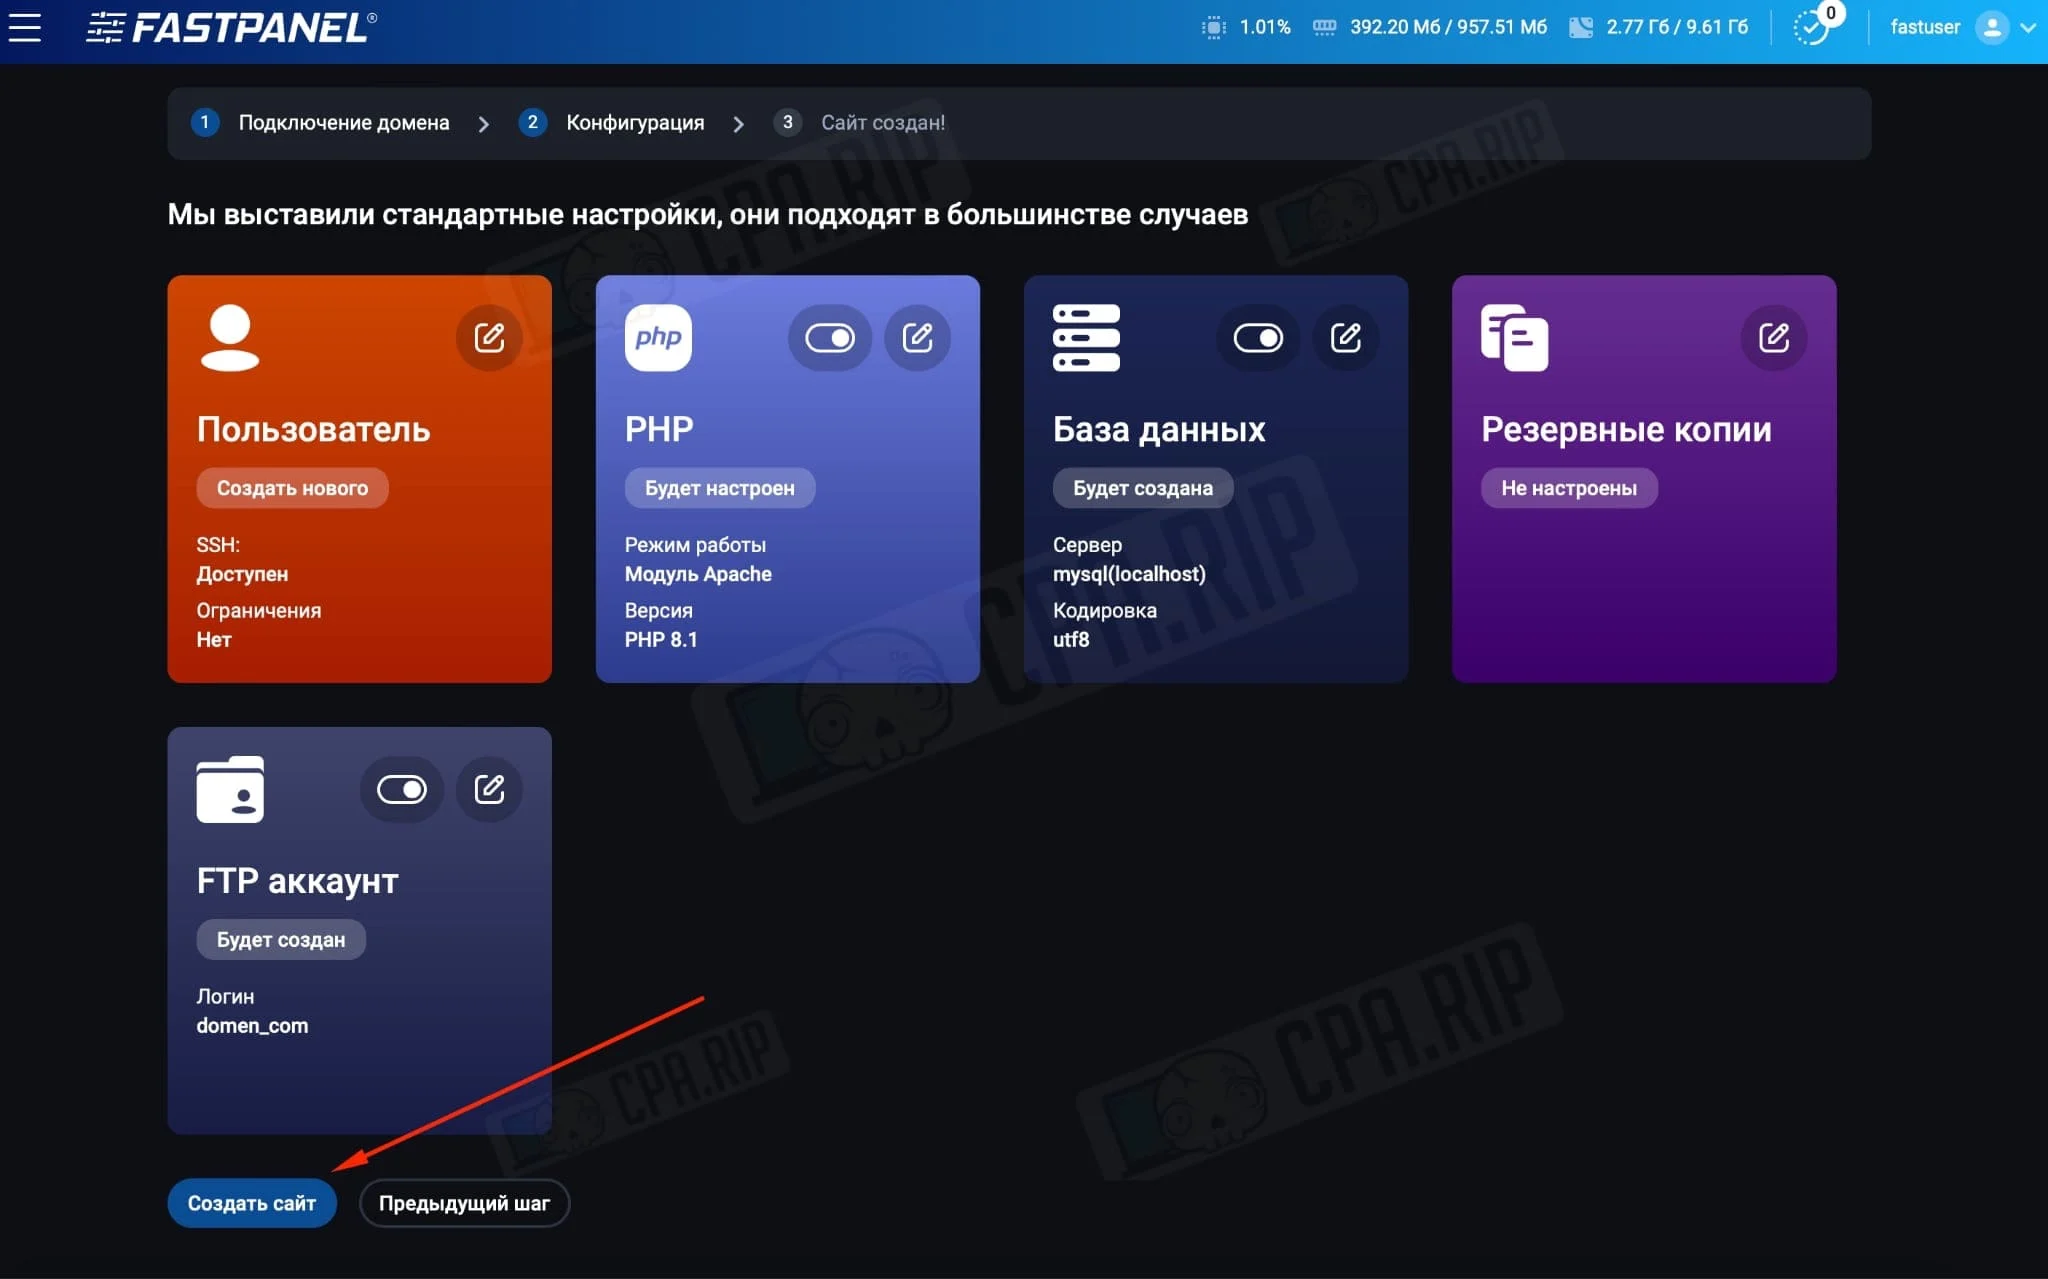
- In FastPanel, click “Create a website” → “Create a website manually”
- In the page that opens, enter your domain in the “What is the connection domain?” line and click “Next Step”:

- Click “Create a website”:
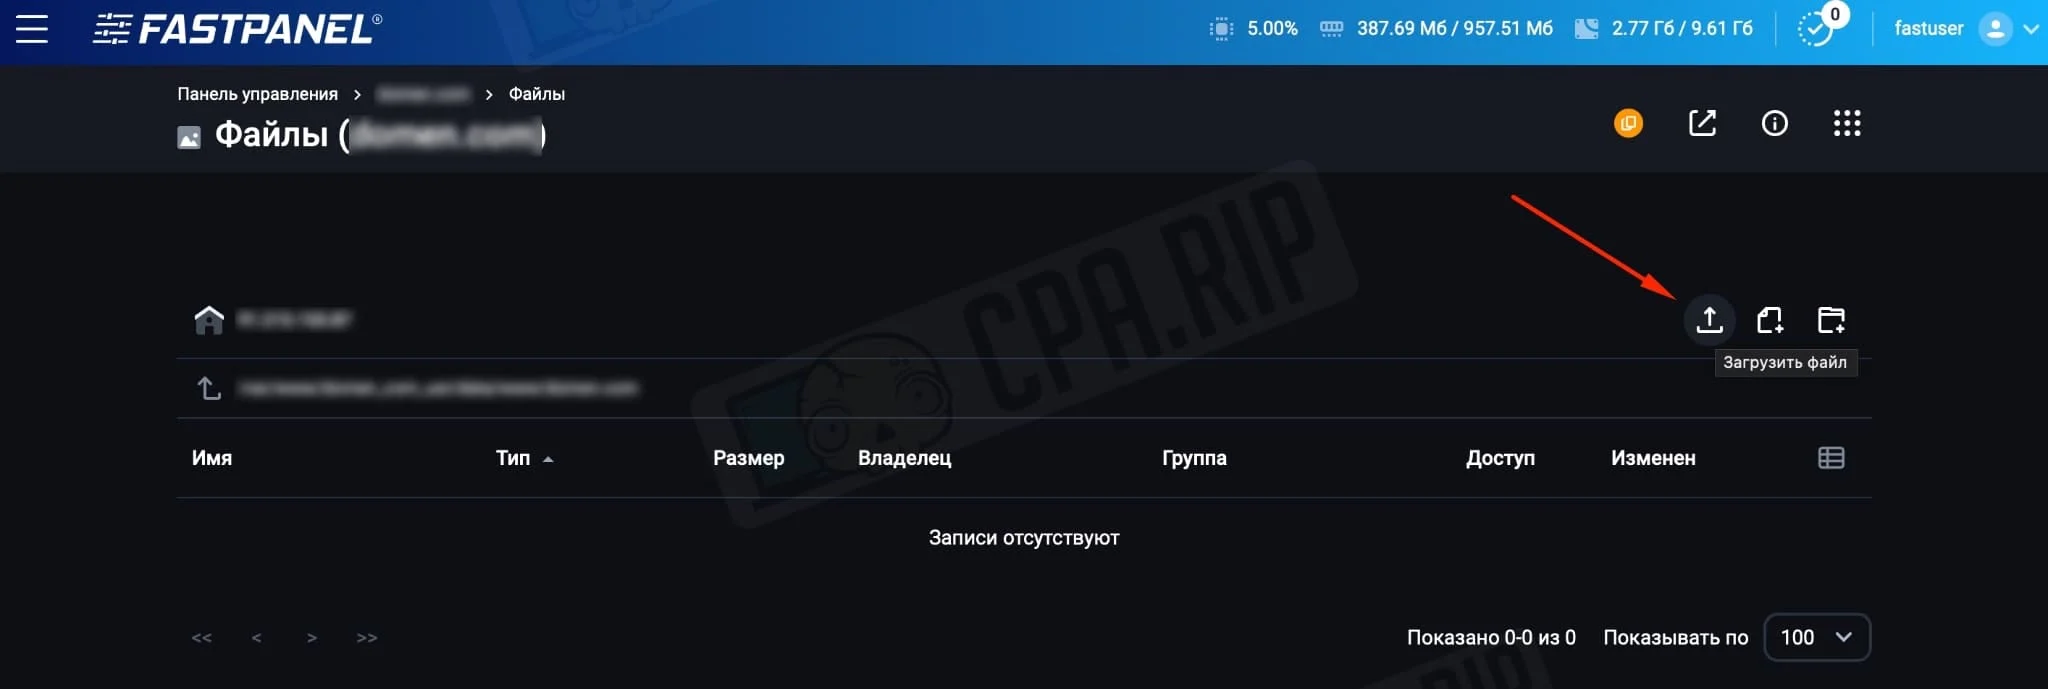
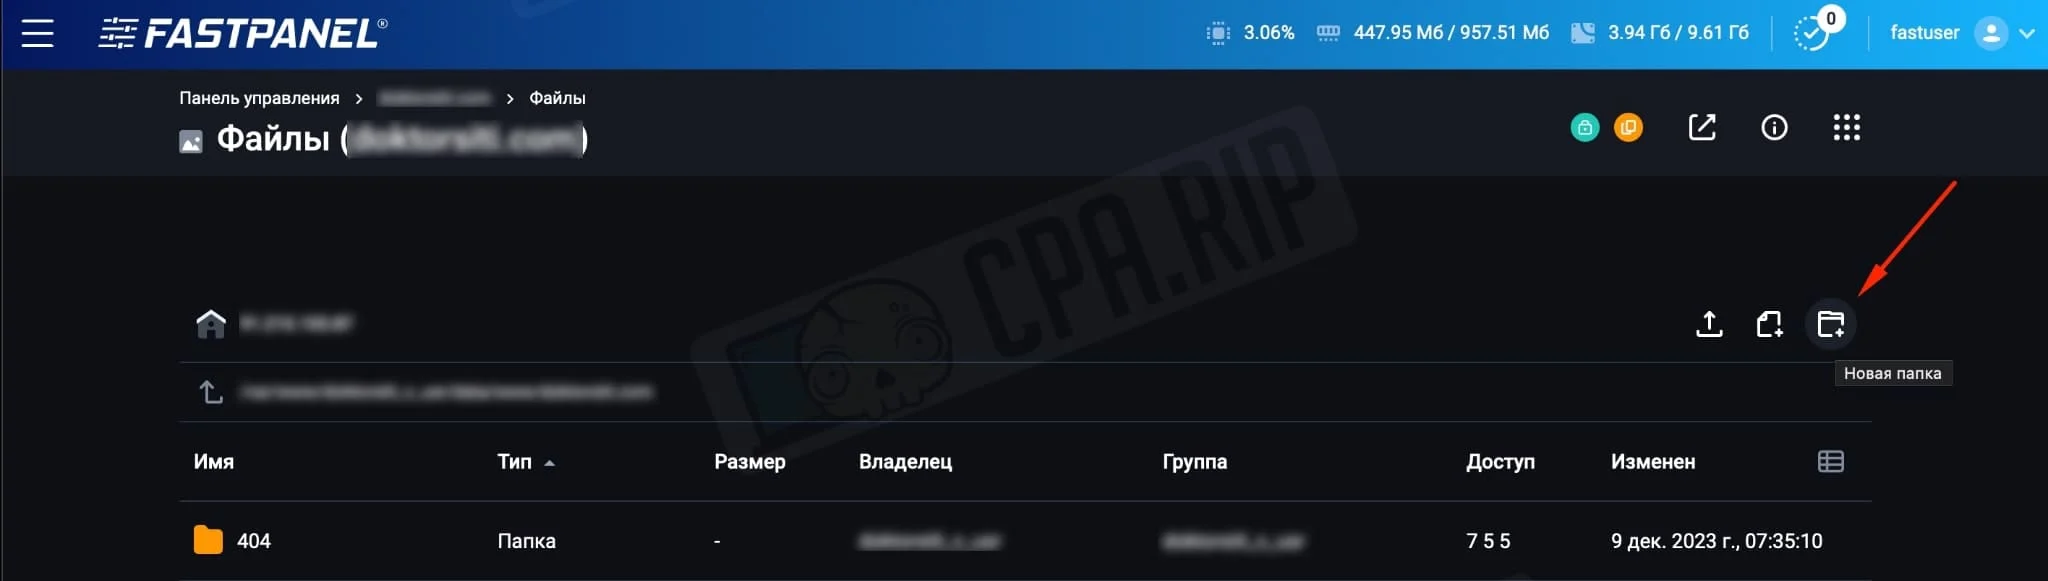
- Next, under the “Site Management” tab, go to “Files”:
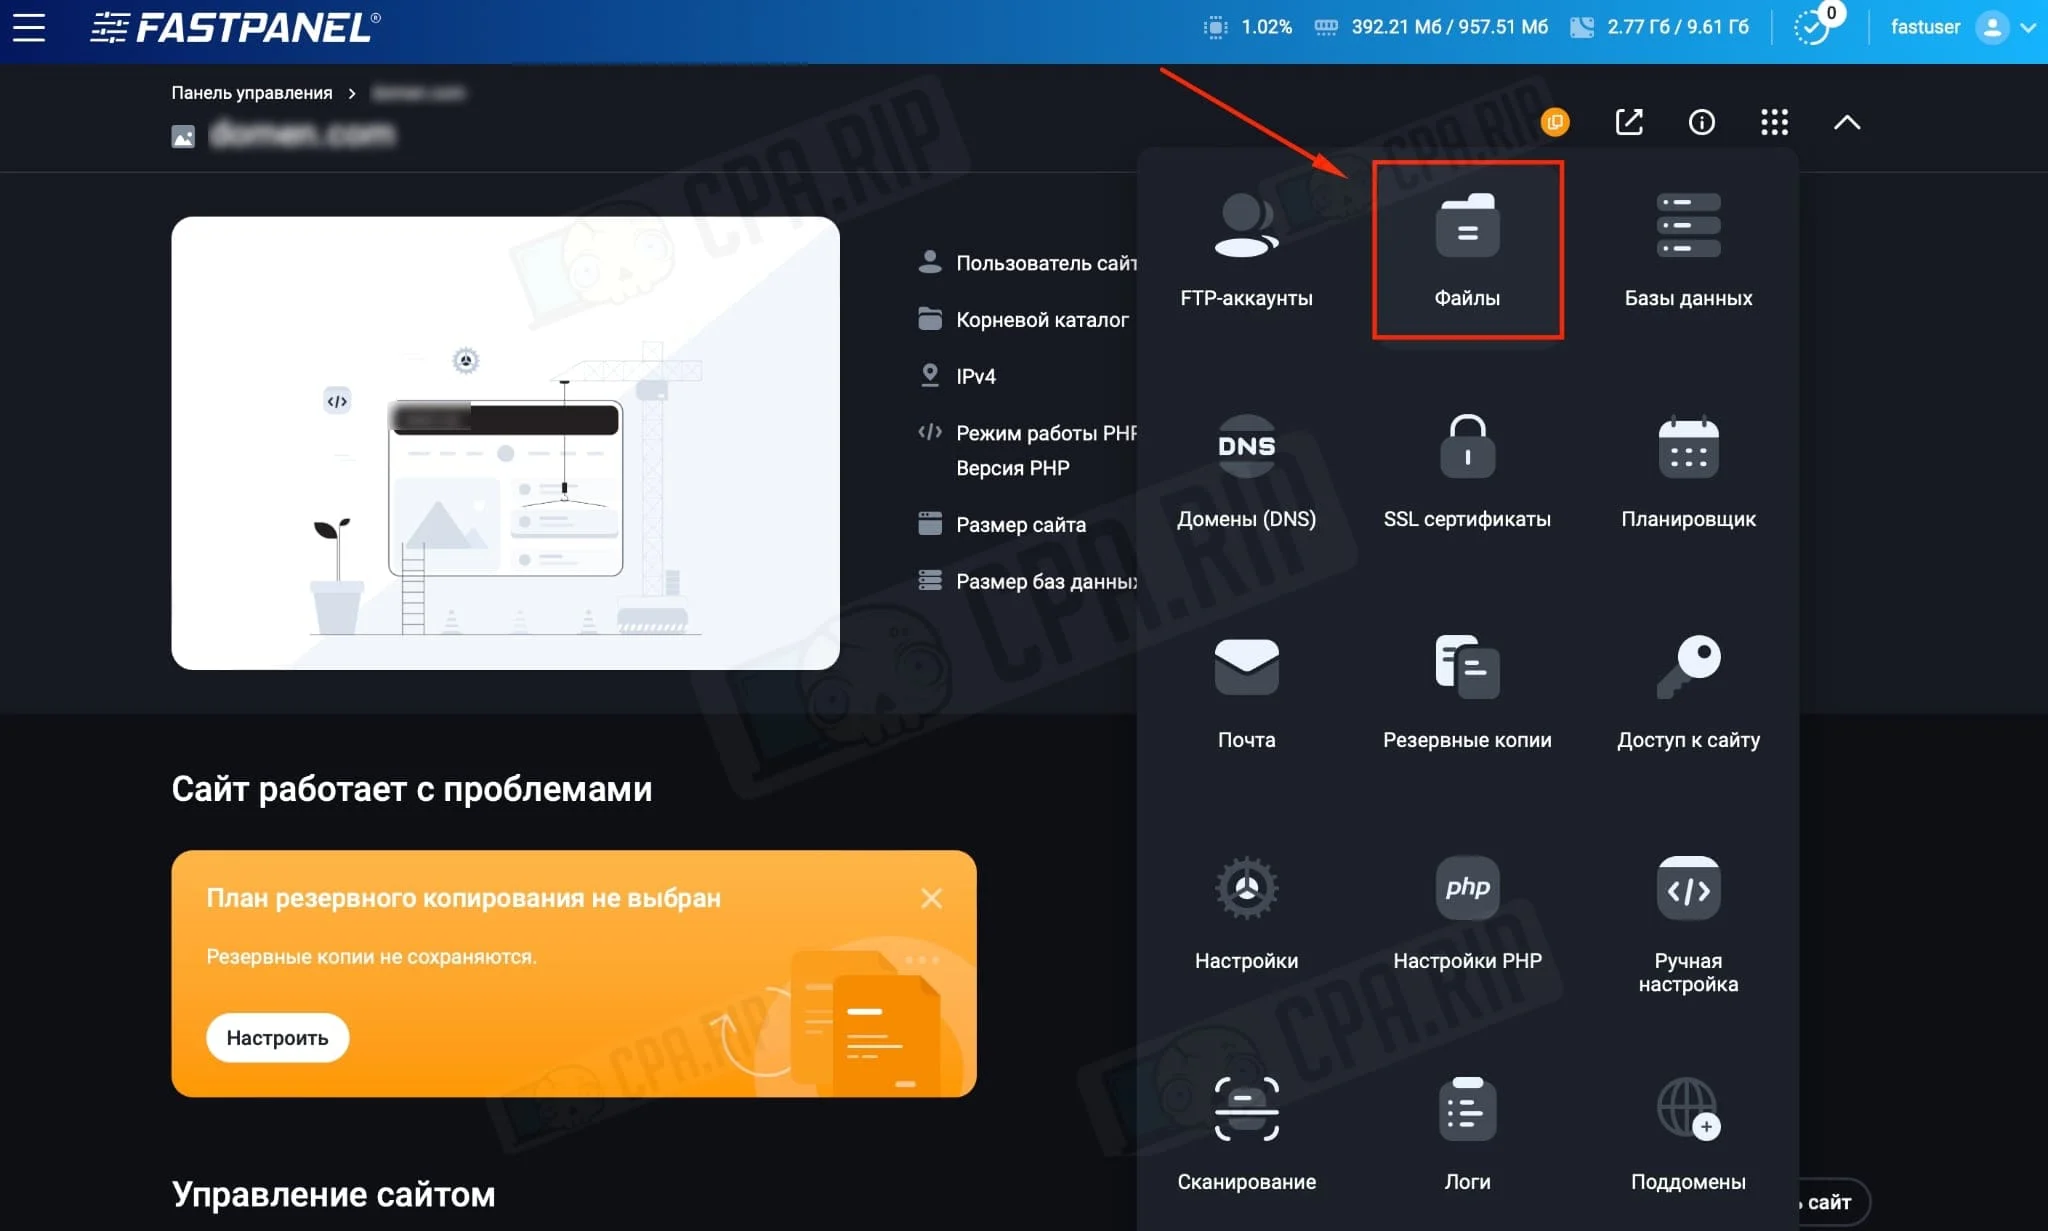
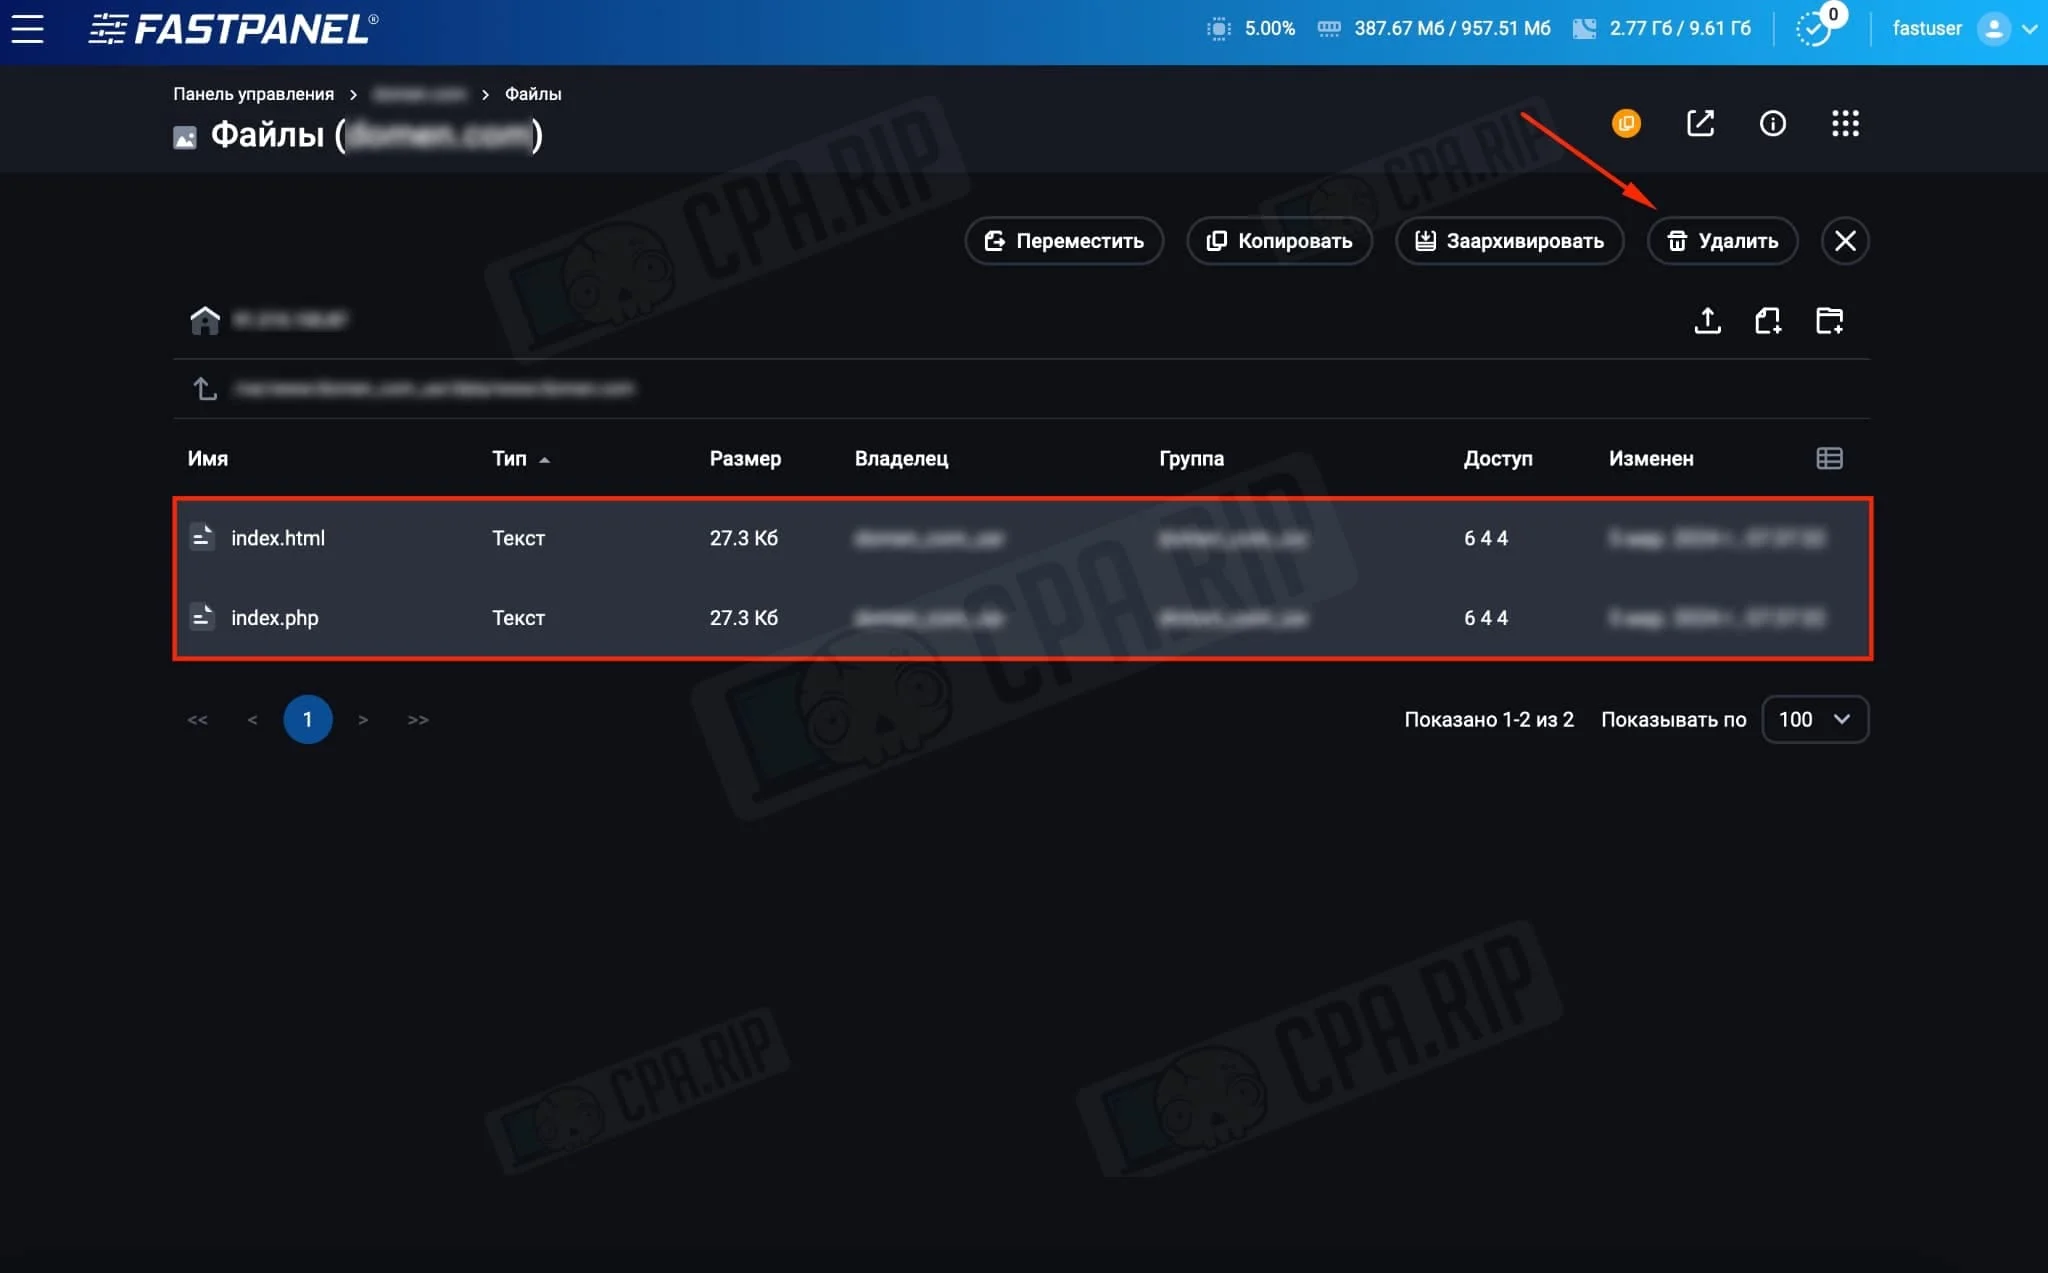
- Select and delete the existing files in the root directory:
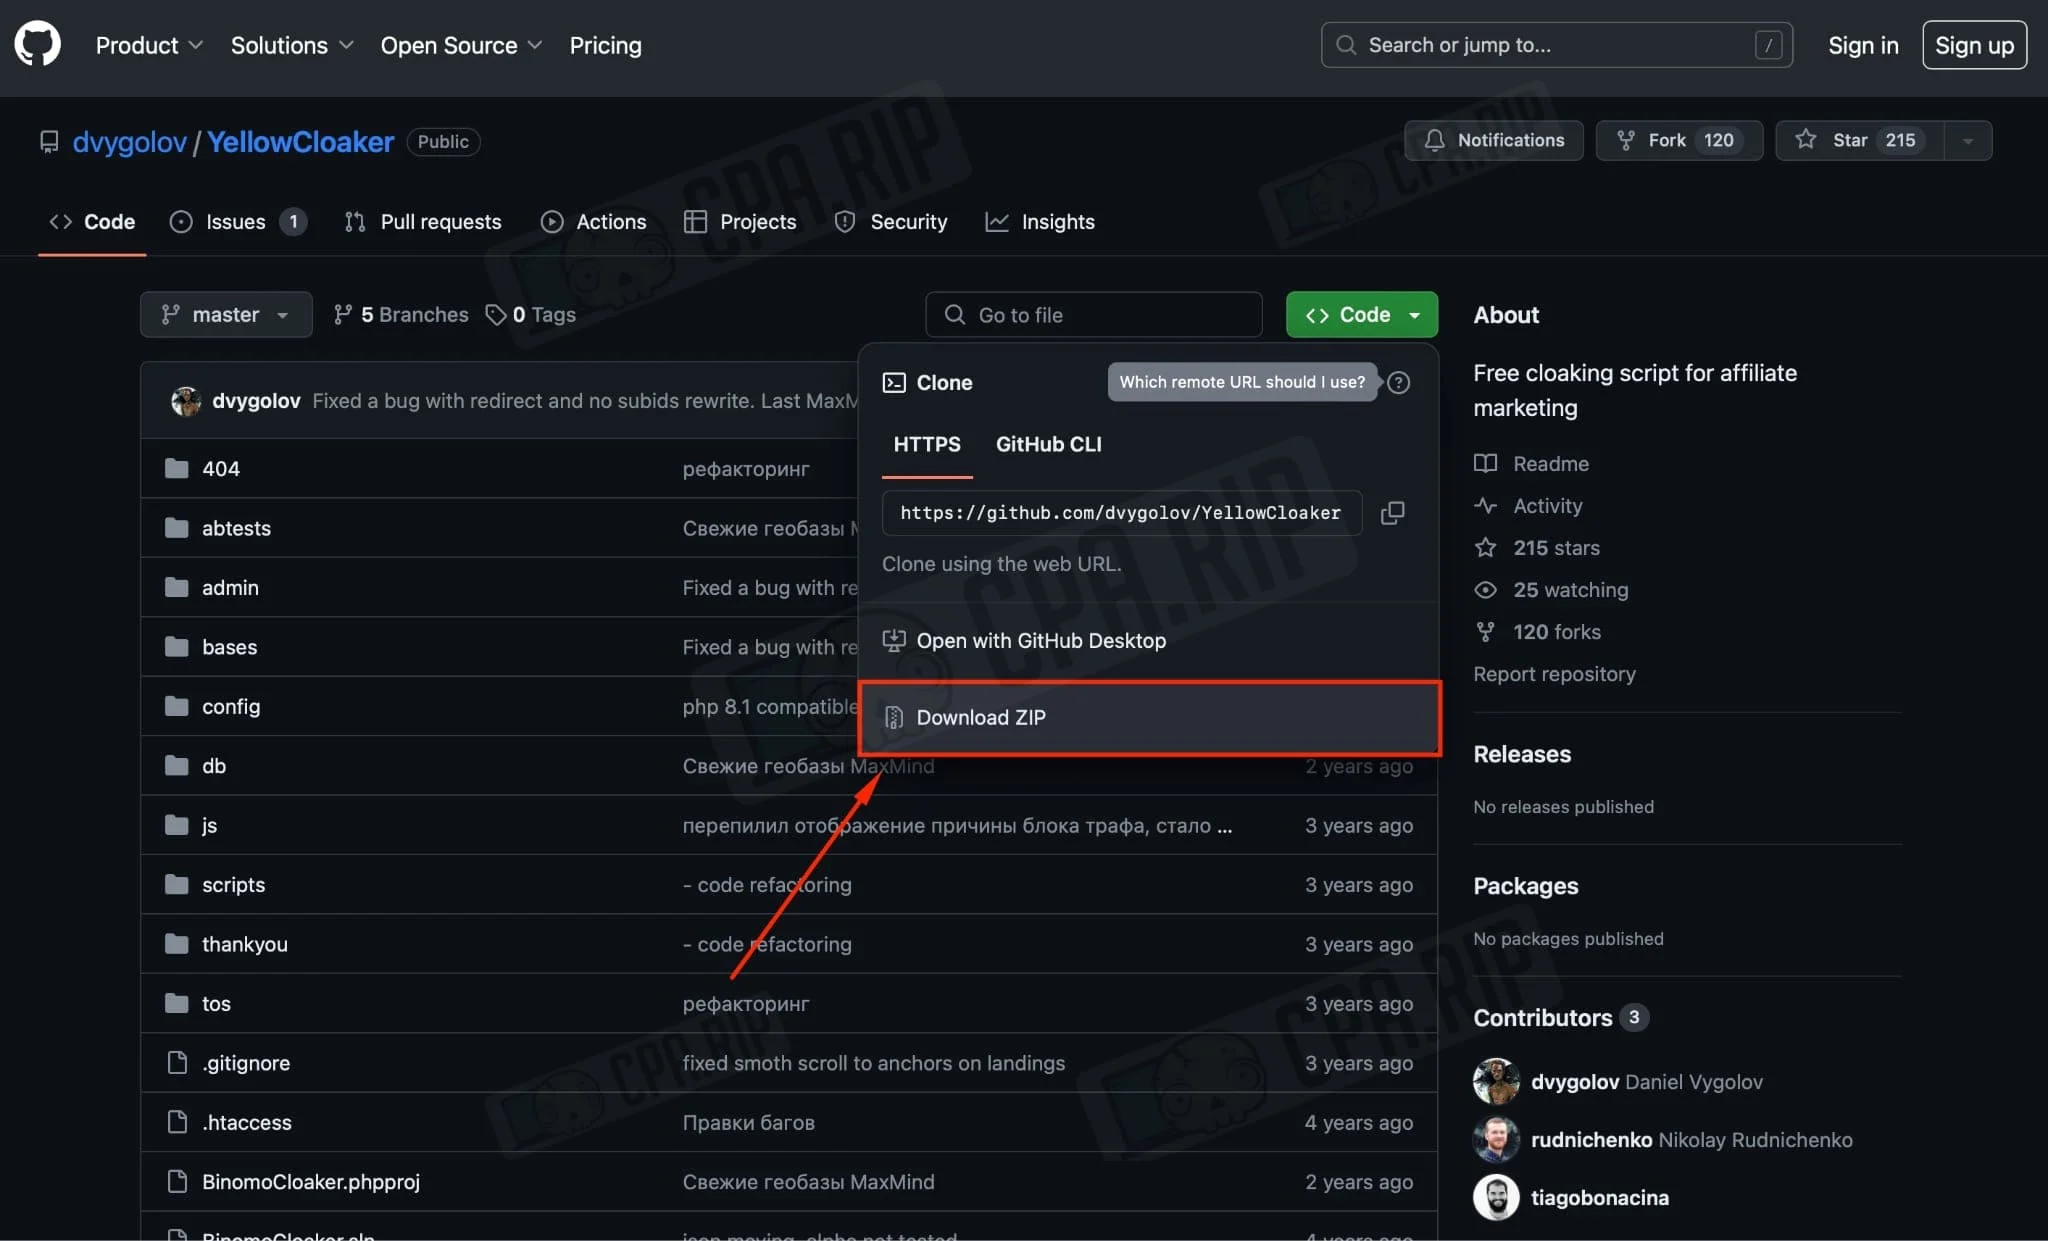
- Download Yellow Web’s cloaking by following the GitHub link. “Code” → “Download ZIP”:
- Upload the downloaded archive to the server by clicking “Download File”:
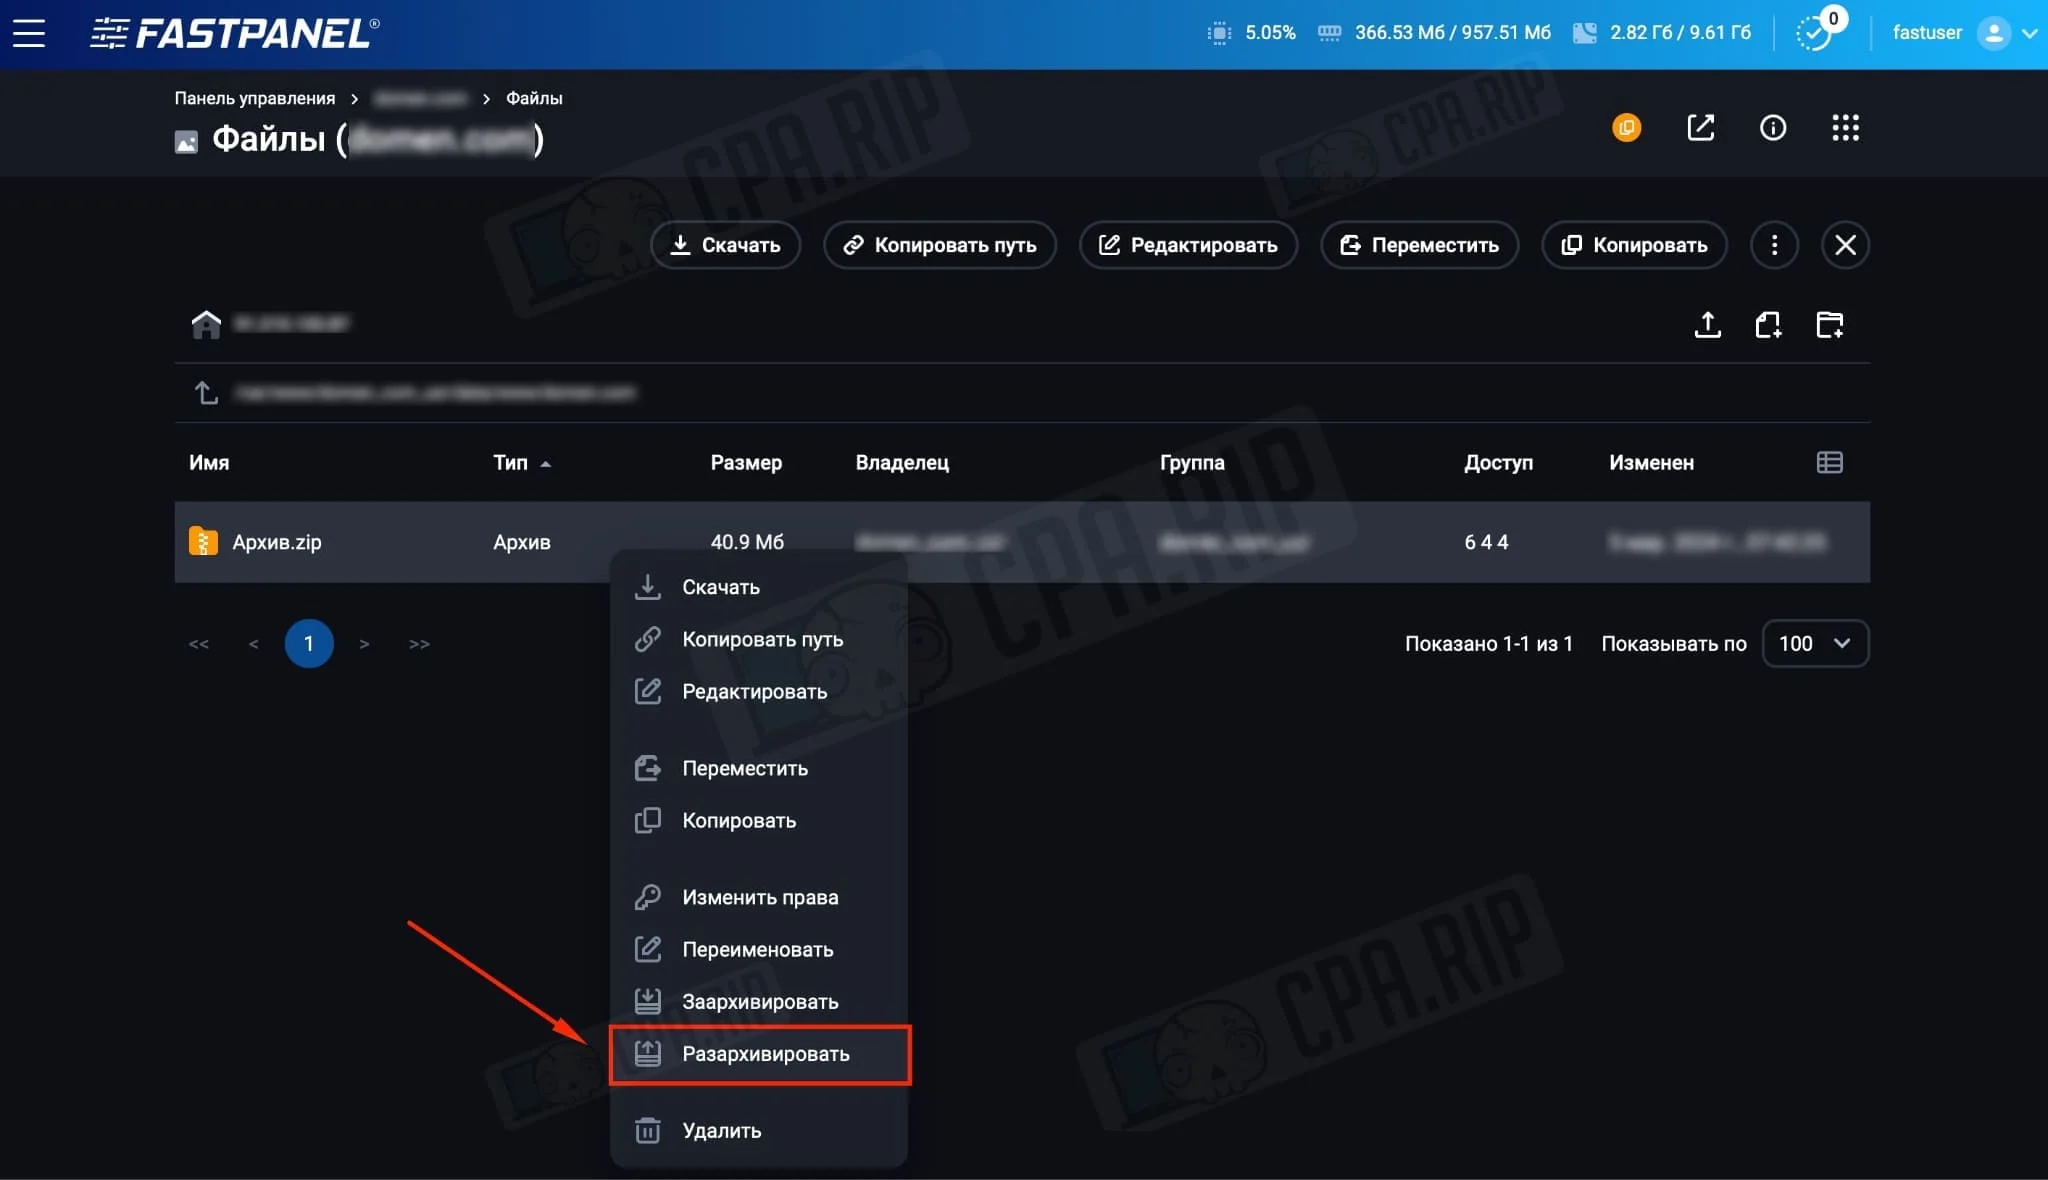
Right-click on the archive and unzip it:
Generate SSL certificate for the domain
You need to generate an SSL certificate for the domain so that the script works correctly.
Important: The SSL certificate from CloudFlare will not work.
On FriendHosting you can generate an SSL certificate in a couple of clicks:
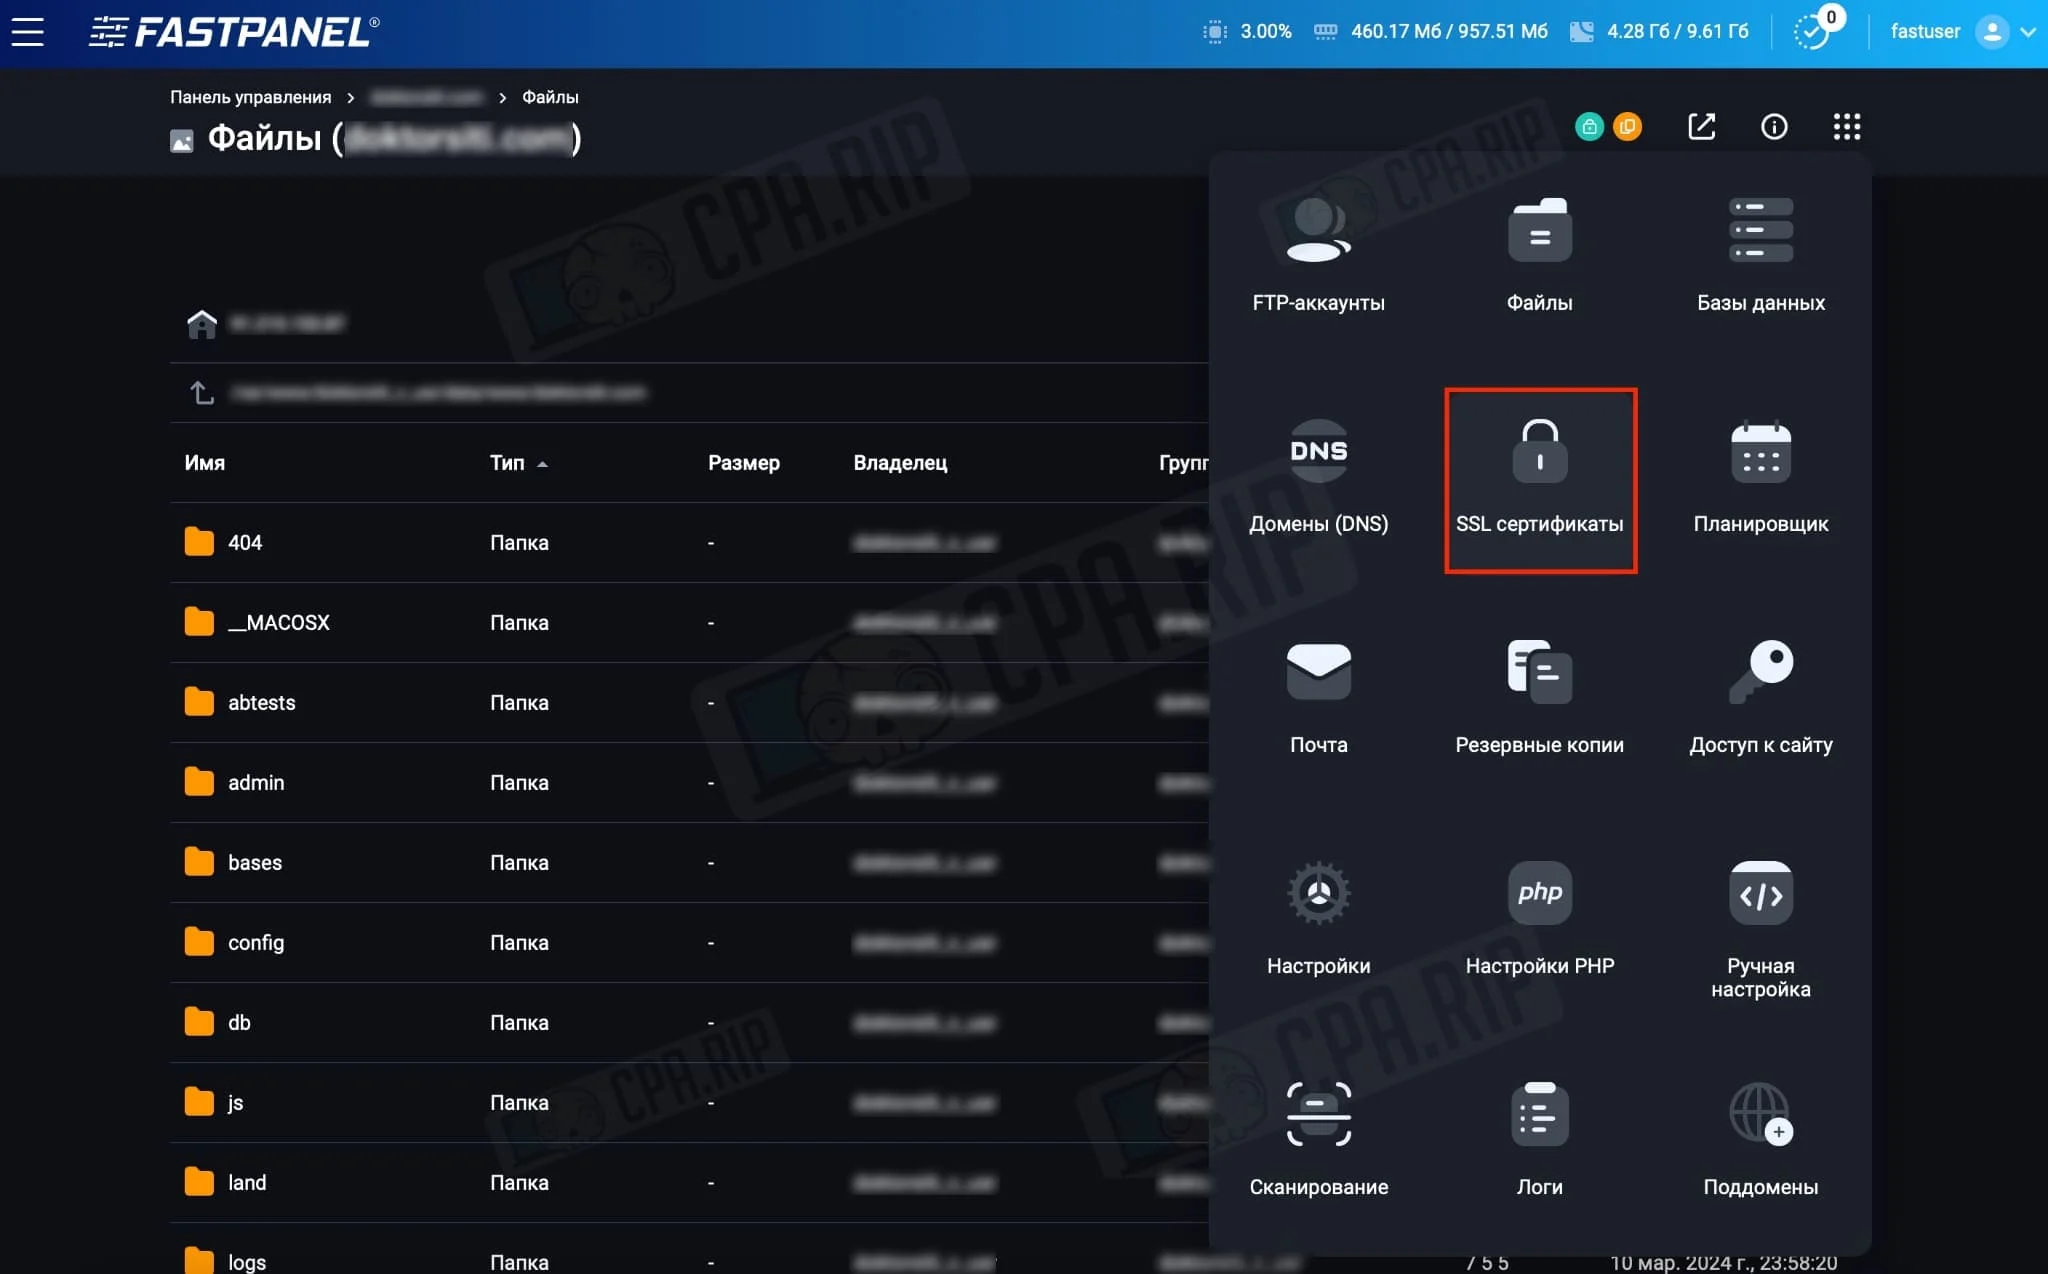
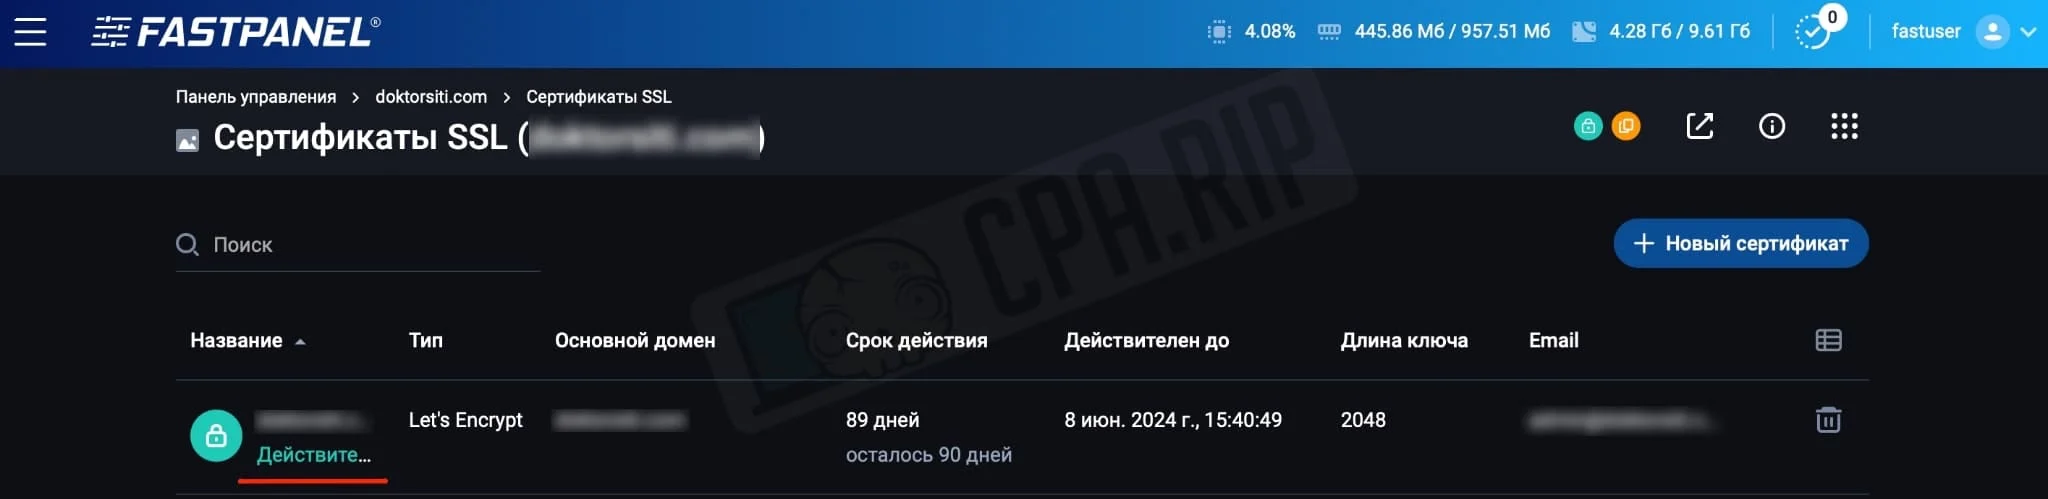
- In site management, click on “SSL Certificates”:
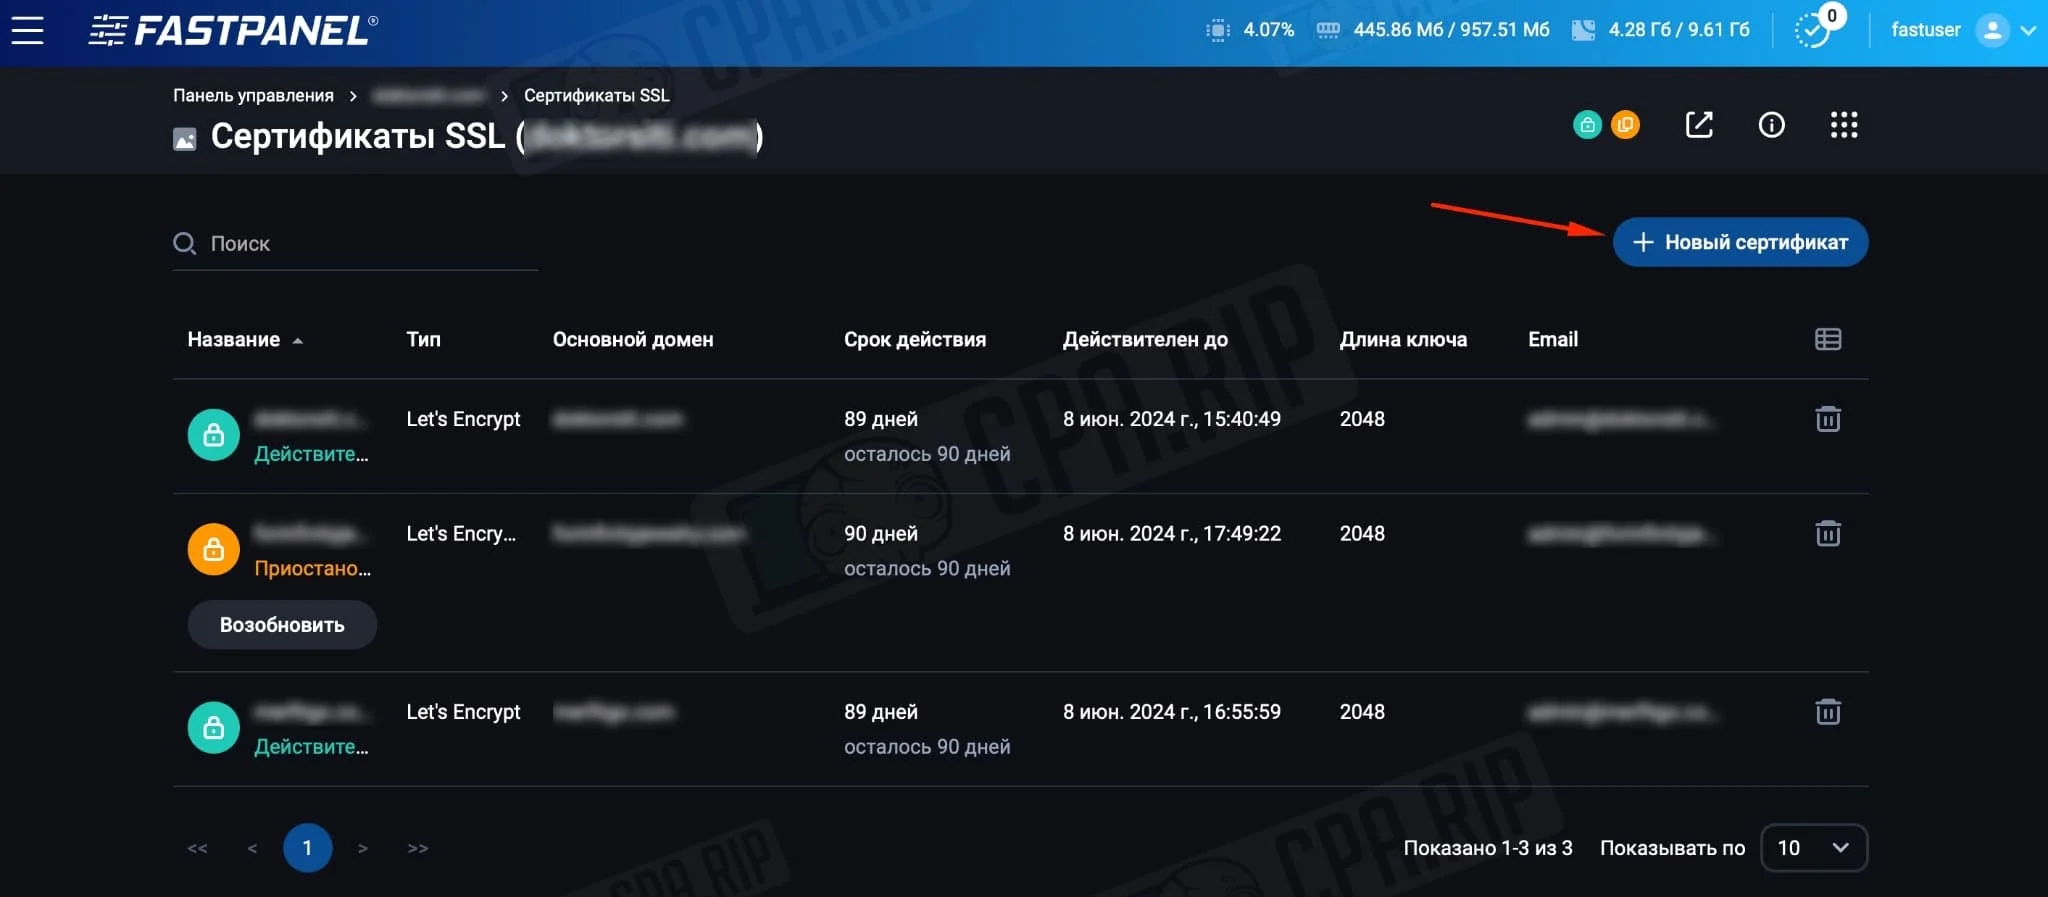
- Click on “New Certificate”:
- Select a certificate from Let’s Encrypt “Regular Certificate” (generates in a couple of seconds) or Wildcard (generates in a few minutes).
- Click “Save”:

- Wait for it to become valid:
Cloaking setup
- Follow the link by substituting our domain:
https://your.domain/admin?password=12345
The link contains the standard password “12345” to access the admin panel, don’t forget to change it in the Yellow Cloaker settings.
Local landings uploading
Let’s see how to upload landings locally on the example of a white page and a black page.
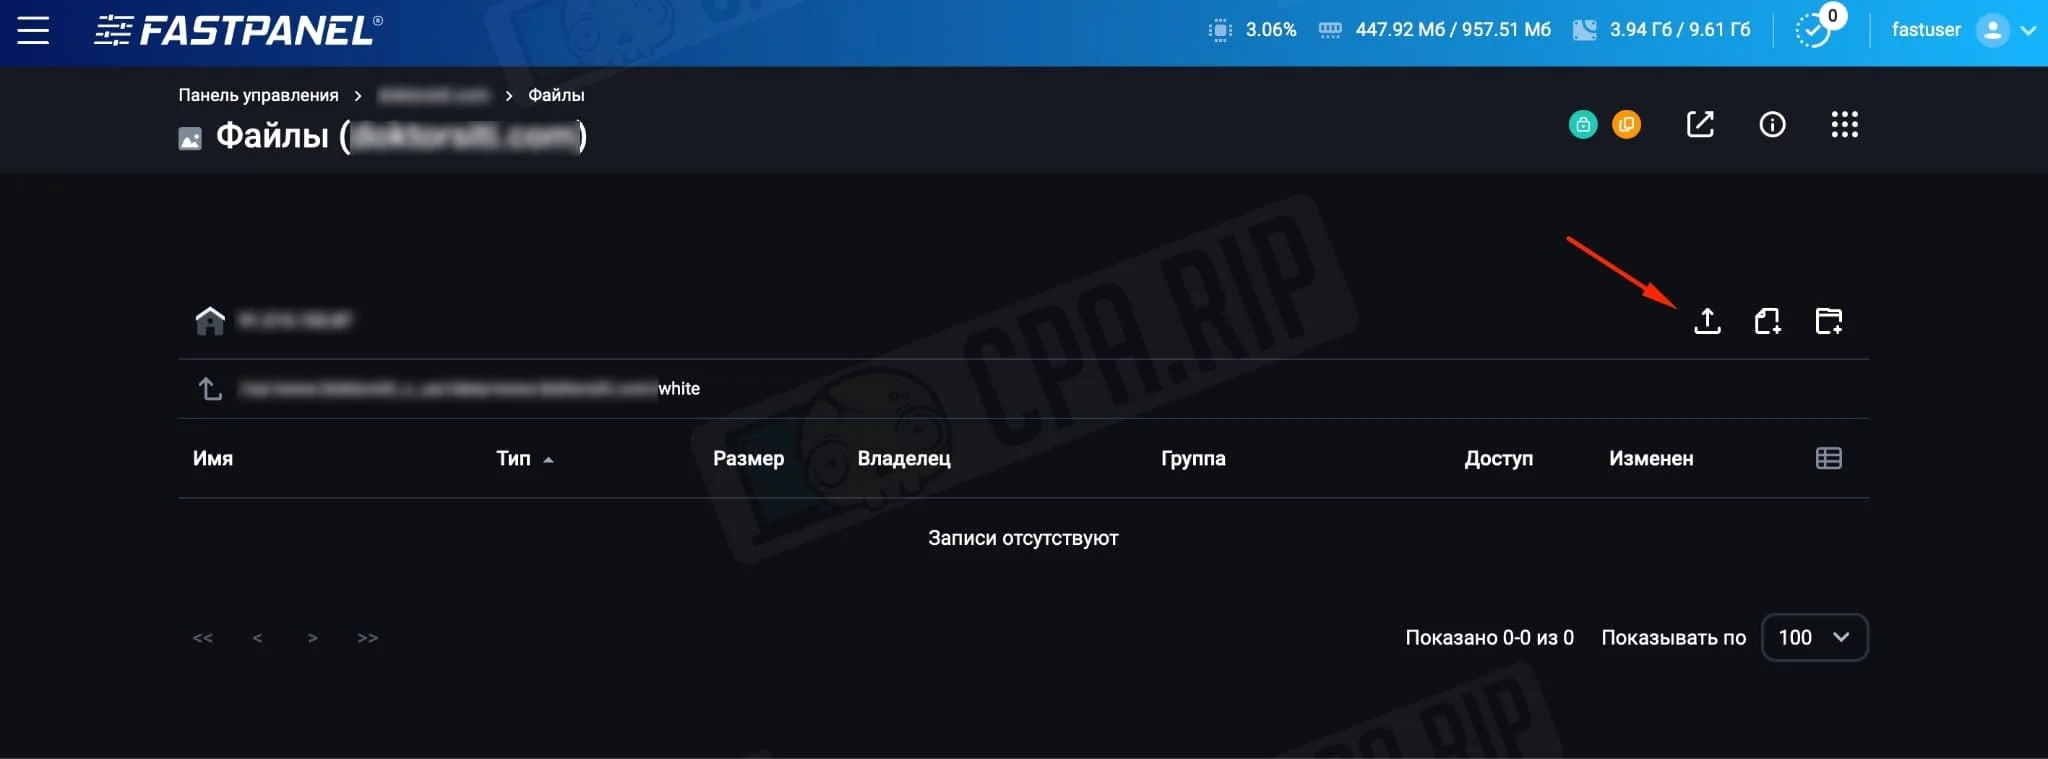
- In your cloaking files create two folders. For convenience, we will use the names “white” and “land”.


- In the “white” folder upload the white-page archive;
- In the “land” folder upload the offer archive (black-page).
- Unzip the white-page and black-page files:

If you have multiple local pre-landings and landings, create one folder for each pre-landing and landing. For example, if you have two pre-landings and two landings, create two folders for the pre-landings, “p1” and “p2”. Also create two folders for the landings, “land1” and “land2”. Then move the corresponding files to the folders. Next, comma-separate the folder names in the cloaker settings:

Setting up a white page
Now you need to configure the white page for unwanted visitors. Yellow Cloaker can:
- show local whites,
- redirect to any other site,
- load content from any other site via CURL,
- return any HTTP code (for example, error 404 or just 200)
Let’s look at the example of showing a local landing page:
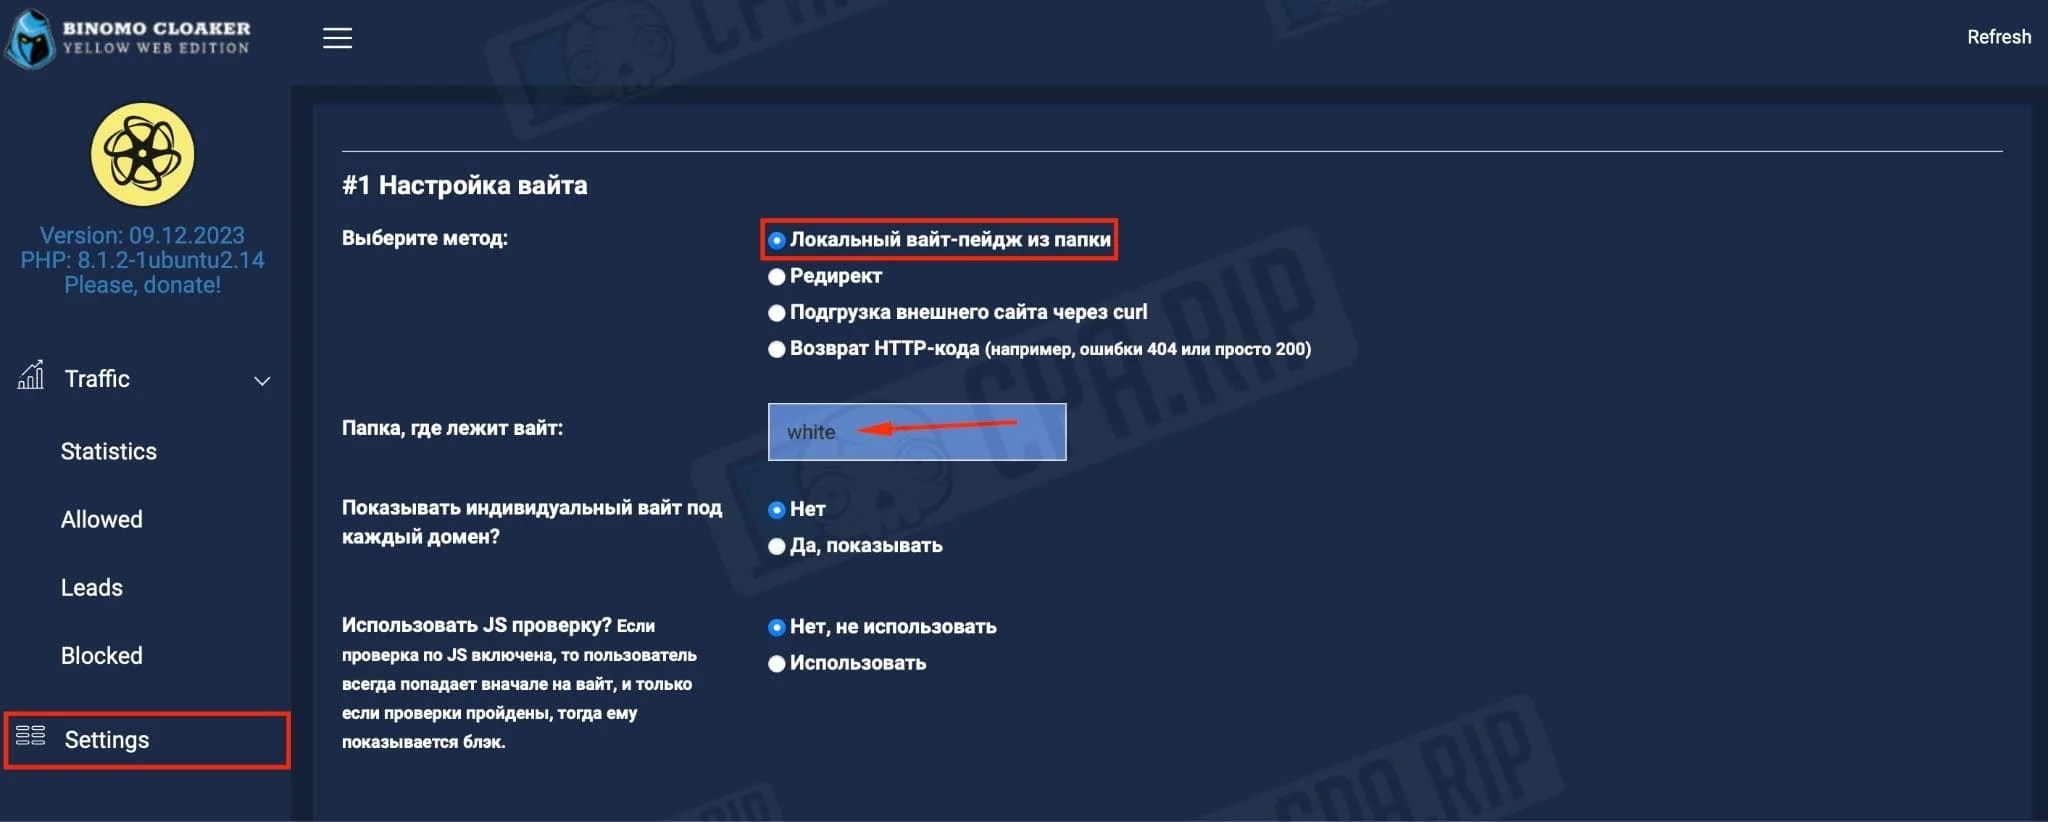
- Go to the cloaking settings by clicking “Settings” in the side menu.
- Select the method: “Local white page from the folder”;
- The folder where the white page is: type the name of your white page folder (by default it is “white”). Here we’ve added our white page files.
Setting up black page
In Yellow Cloaker you can set up the following funnels for the target traffic:
- local land (or multiple land)
- local pre-land(s) -> local lands
- local pre-lands + redirect to a land on another site
- immediate redirect to another site
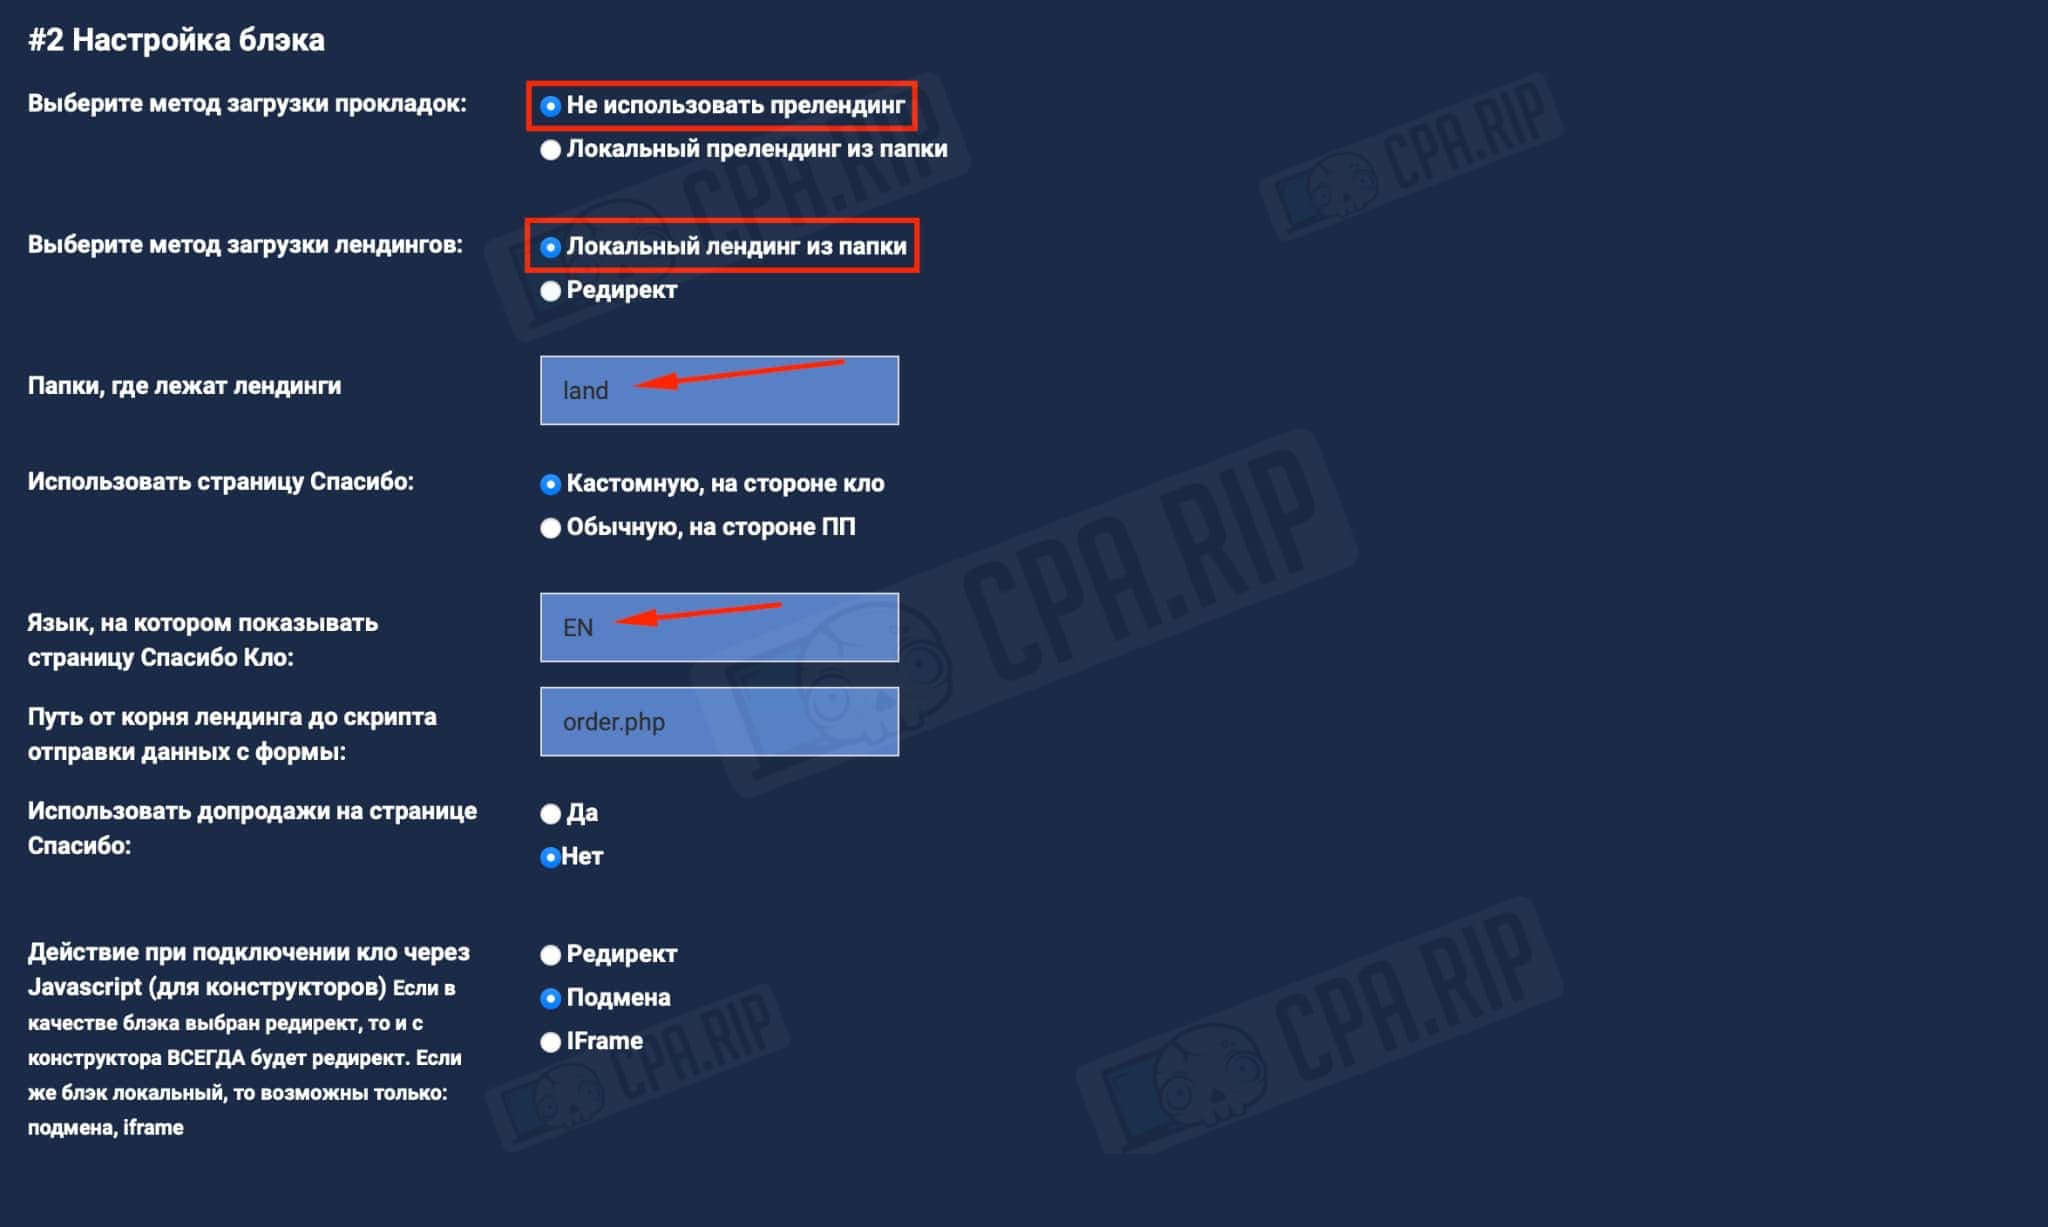
We’ll be driving traffic to pre-land, so we’ll use the first option “Local land” and set up a black page:
- Select the pre-landing loading method: “Don’t use pre-landing”;
- Select the method of loading the landing pages: in our case “Local landing from folder”;
- Folders where the landings are located: we left the default folder with the name “land”, where we had previously uploaded our black page files;
- Use Thank you page: in our case “Custom, on the side of clo”;
- Language in which to show the Thank you Clo page: default language – RU, in our example we changed it to EN;
The following languages are available: EN, PT, RU, SI, and SK. You can upload other languages or your own Thank you page to the “thankyou” folder.
- The path from the root of the landing page to the form submission script: here specify the Thank you page file. In our case, it is “order.php”. The required name can be found in the index file of the landing page in the action attribute of any submission form.
If your submission script is not in the root directory of the landing page, type a relative path to it, for example: ‘folder/order.php.
Setting up metrics and pixels
You can add the following pixels to pre-landings and landings:
- Yandex Metrika
- Google Tag Manager
- TikTok Pixel
- Facebook Pixel
Let’s take Facebook Pixel as an example:
- The name of the parameter that contains the Facebook pixel ID: by default, it is “px”, we will use it to pass the pixel when driving ads to Facebook Ads. Example:
https://domen.com/?px=123456789 - What event we will use for conversion on Facebook: in our case we will drive ads with the Lead event. So leave it as default. You can change it to Purchase or any other.
There is no need to manually type the Javascript code of the Facebook pixel – if the transition address has the px parameter, the cloaker will add the required code to the “Thank you” page automatically.
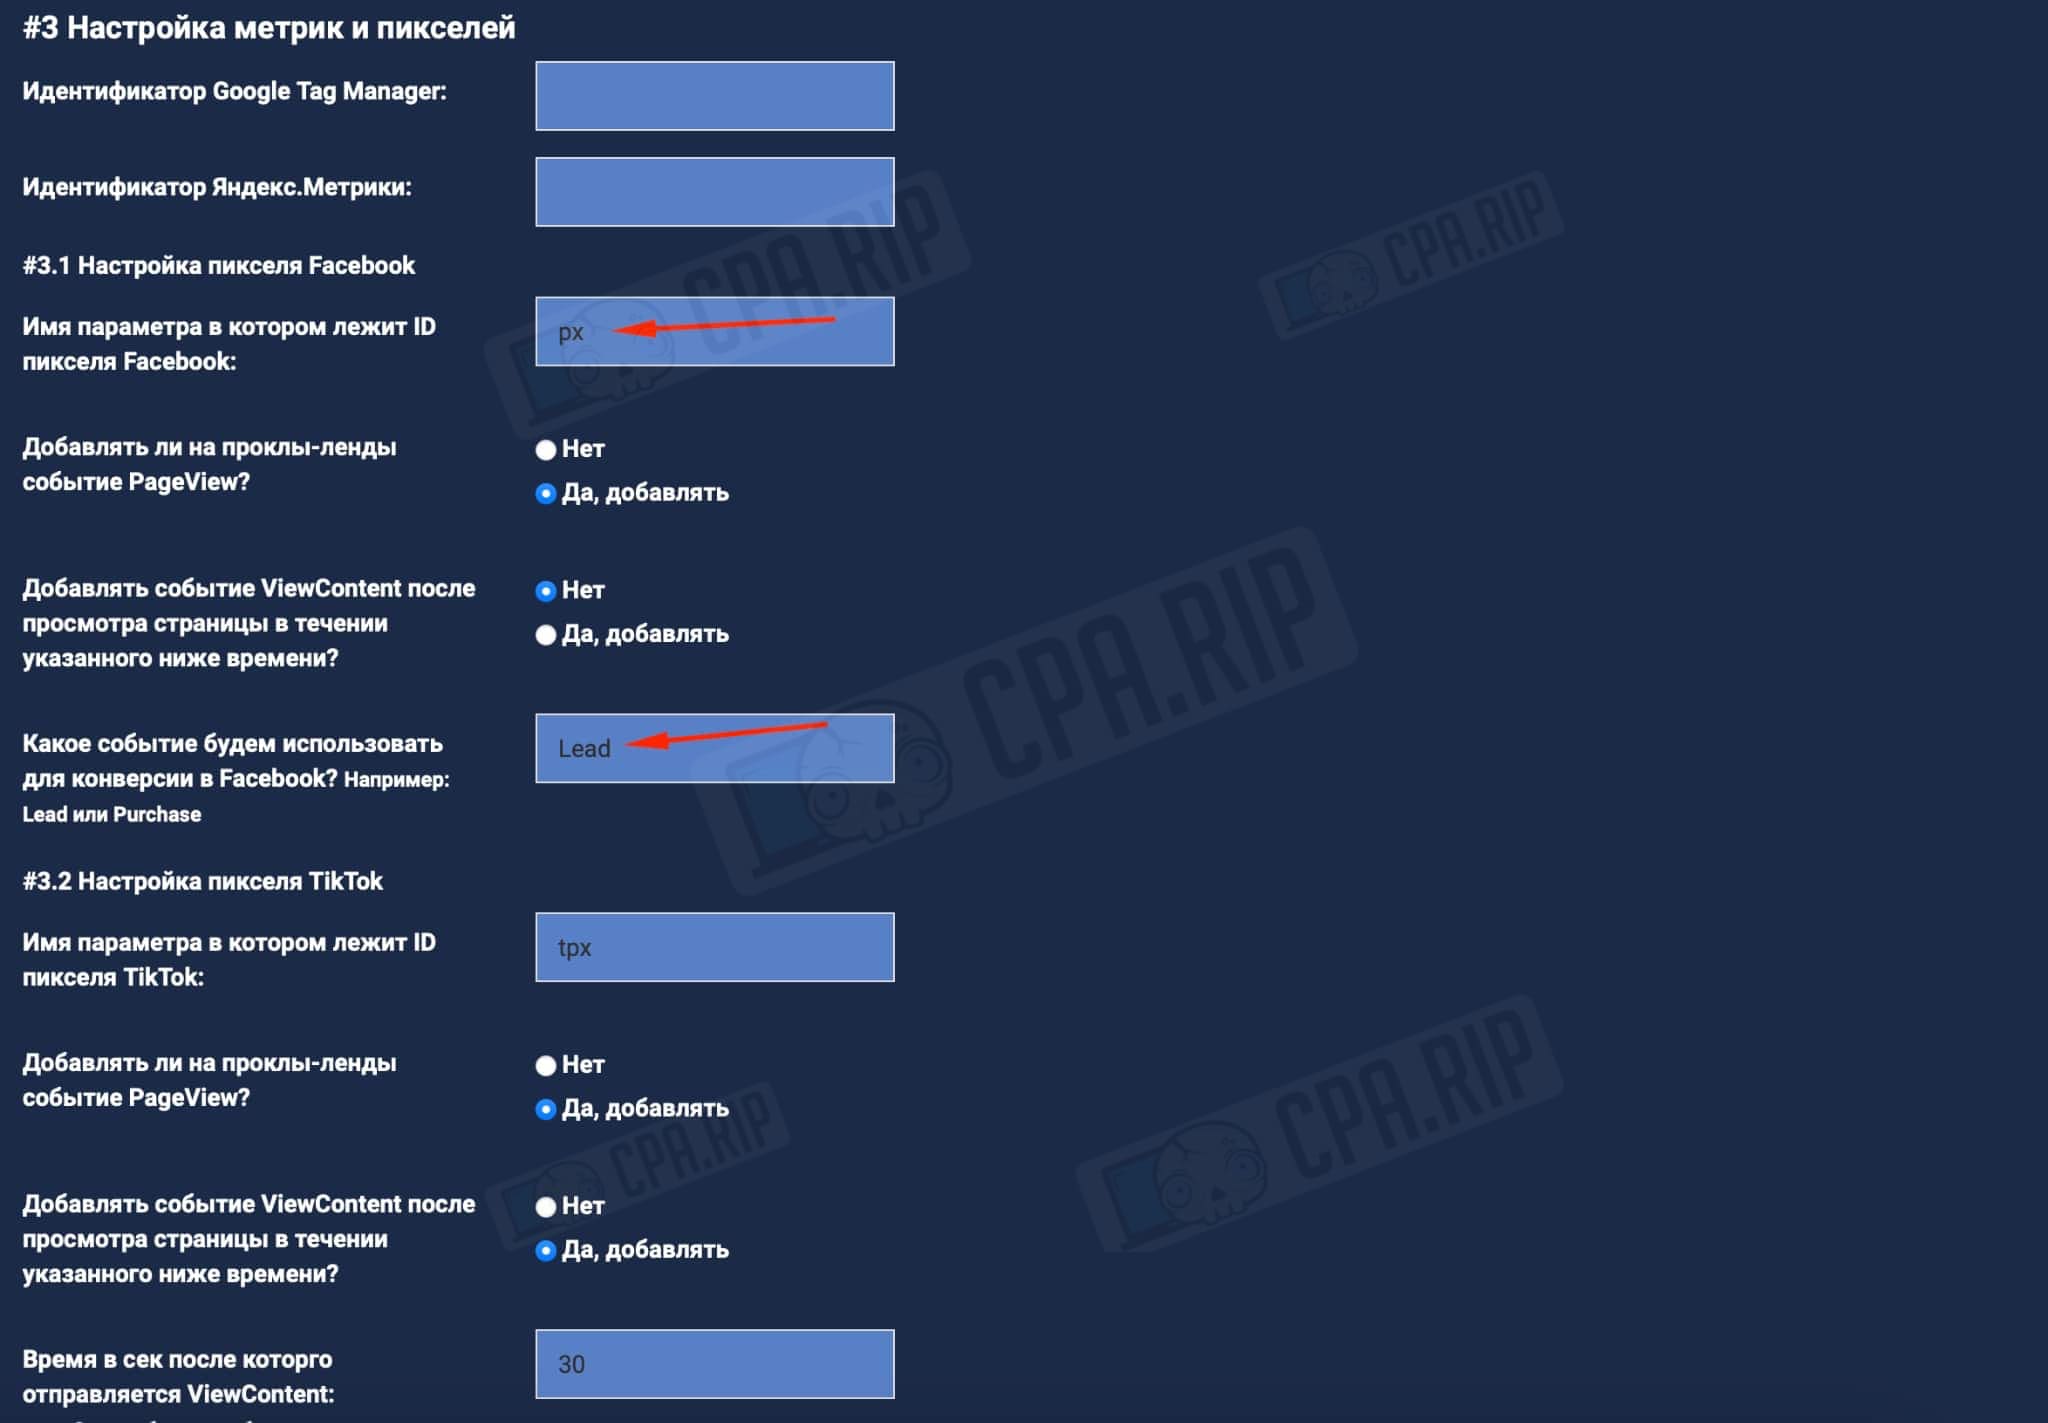
Use the Meta Pixel Helper extension for the Google Chrome browser to make sure events are being sent correctly.
Setting up TDS
- TDS mode of operation: default is “Normal”, leave it as it is:

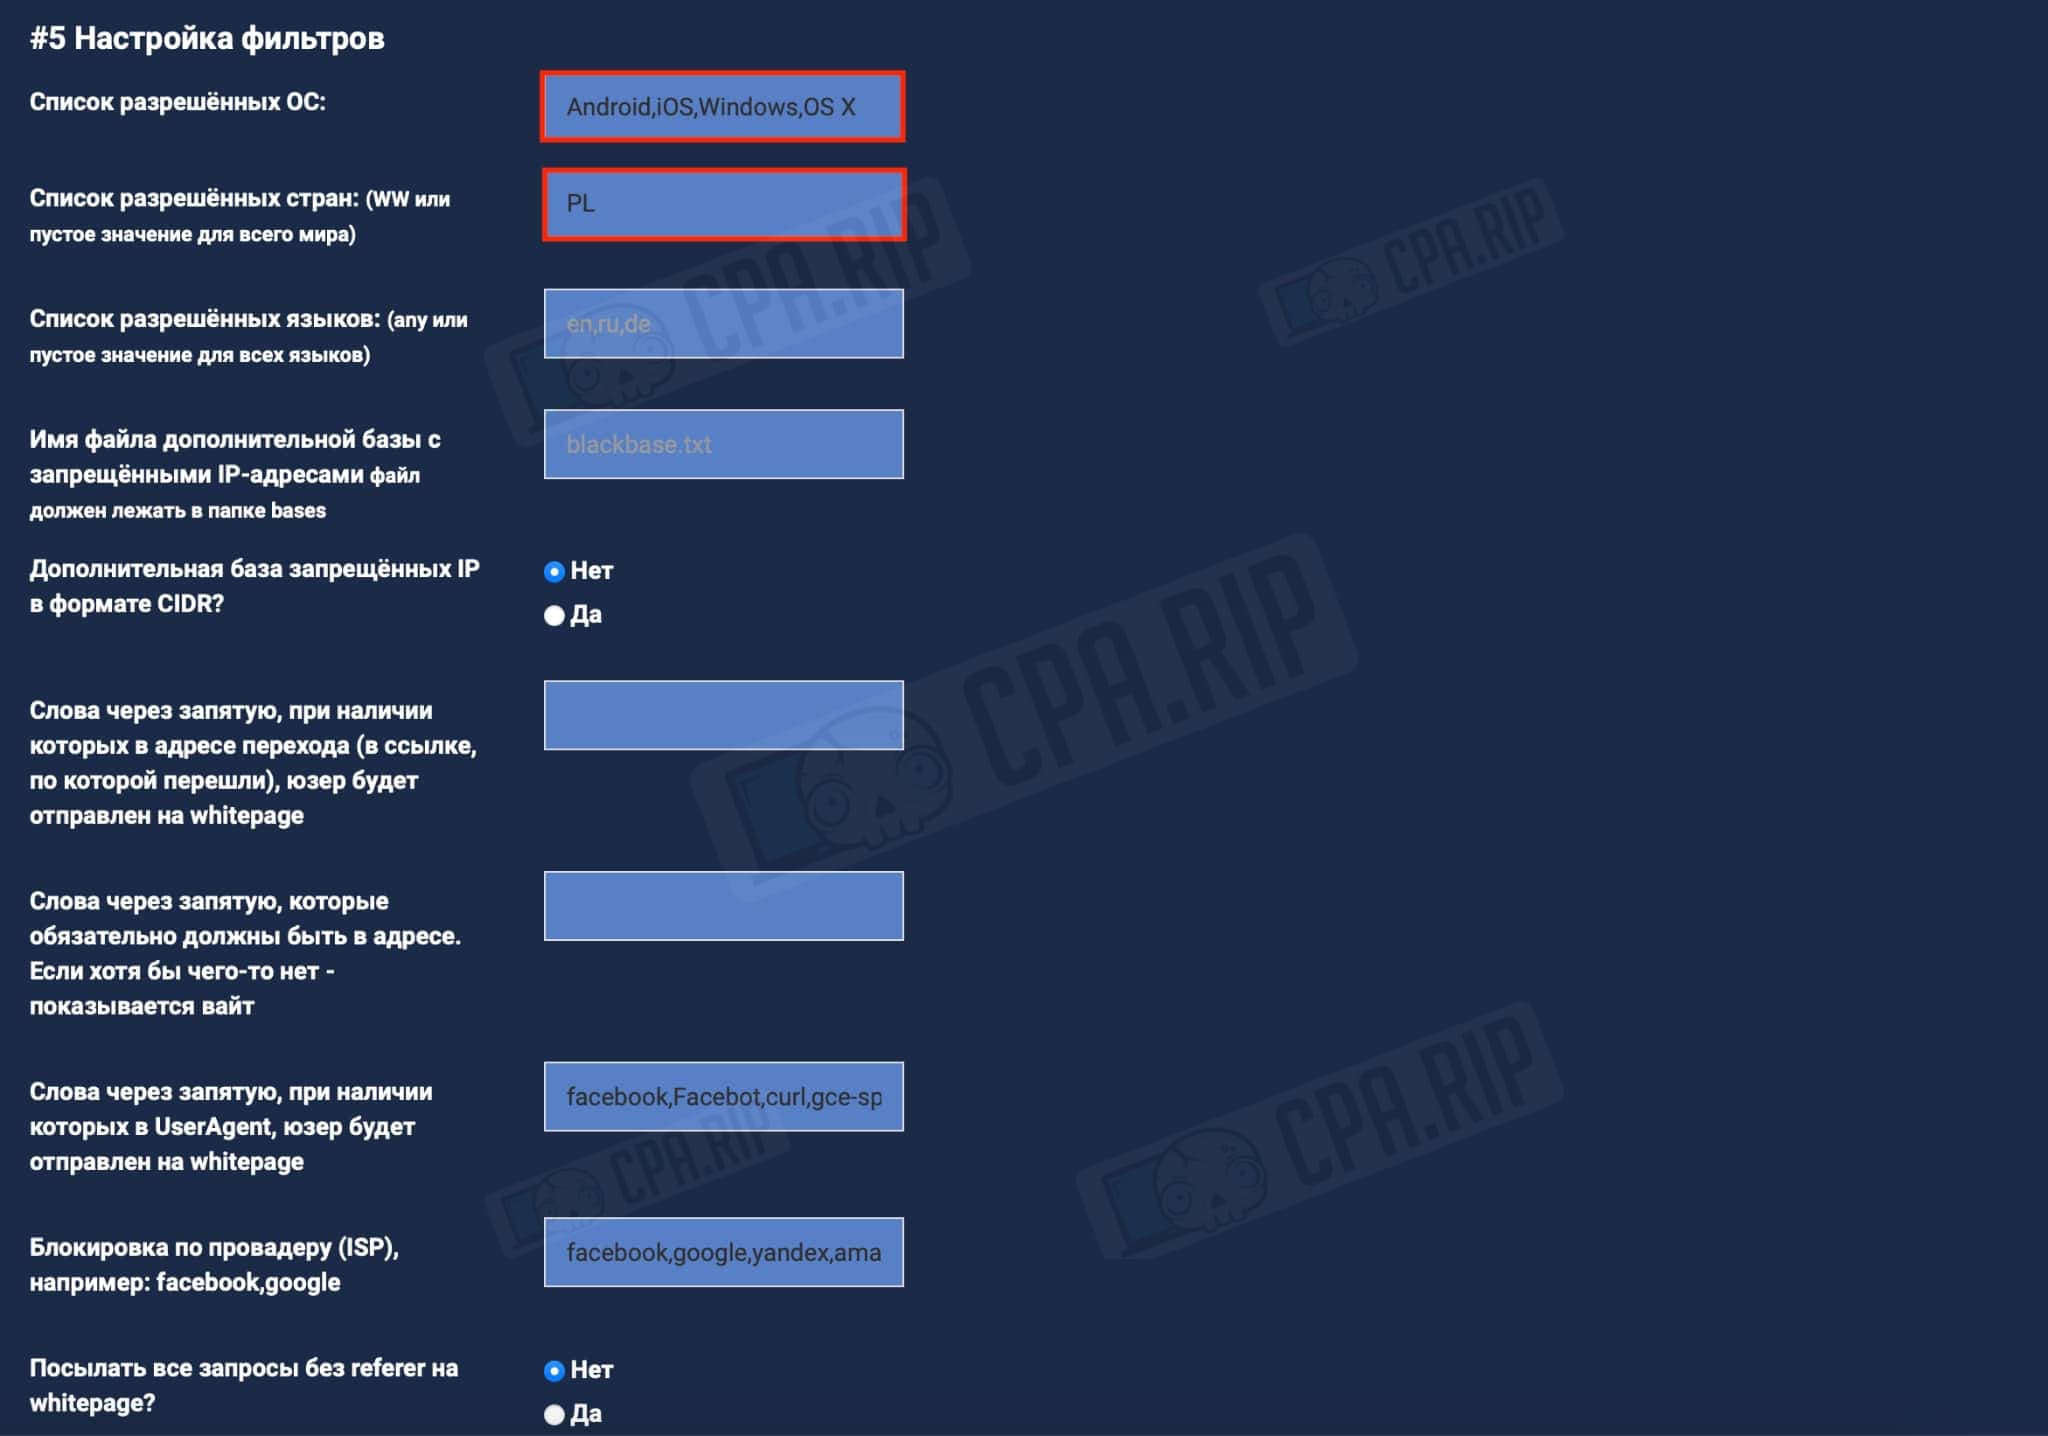
Filter settings
You can filter traffic based on the following criteria with Yellow Cloaker:
- Built-in IP database
- Visitor’s OS
- Visitor’s country
- Visitor’s User Agent (browser)
- Visitor’s ISP
- Referer presence
- Any part of the link that was clicked on
To run Facebook ads we used the following filters:
- List of allowed OS: here list the OS you need using commas. We left the standard ones – “Android, iOS,Windows,OS X”;
- List of allowed countries: specify the country you want to use for Facebook Ads.
- The rest is by default:
Setting up additional scripts
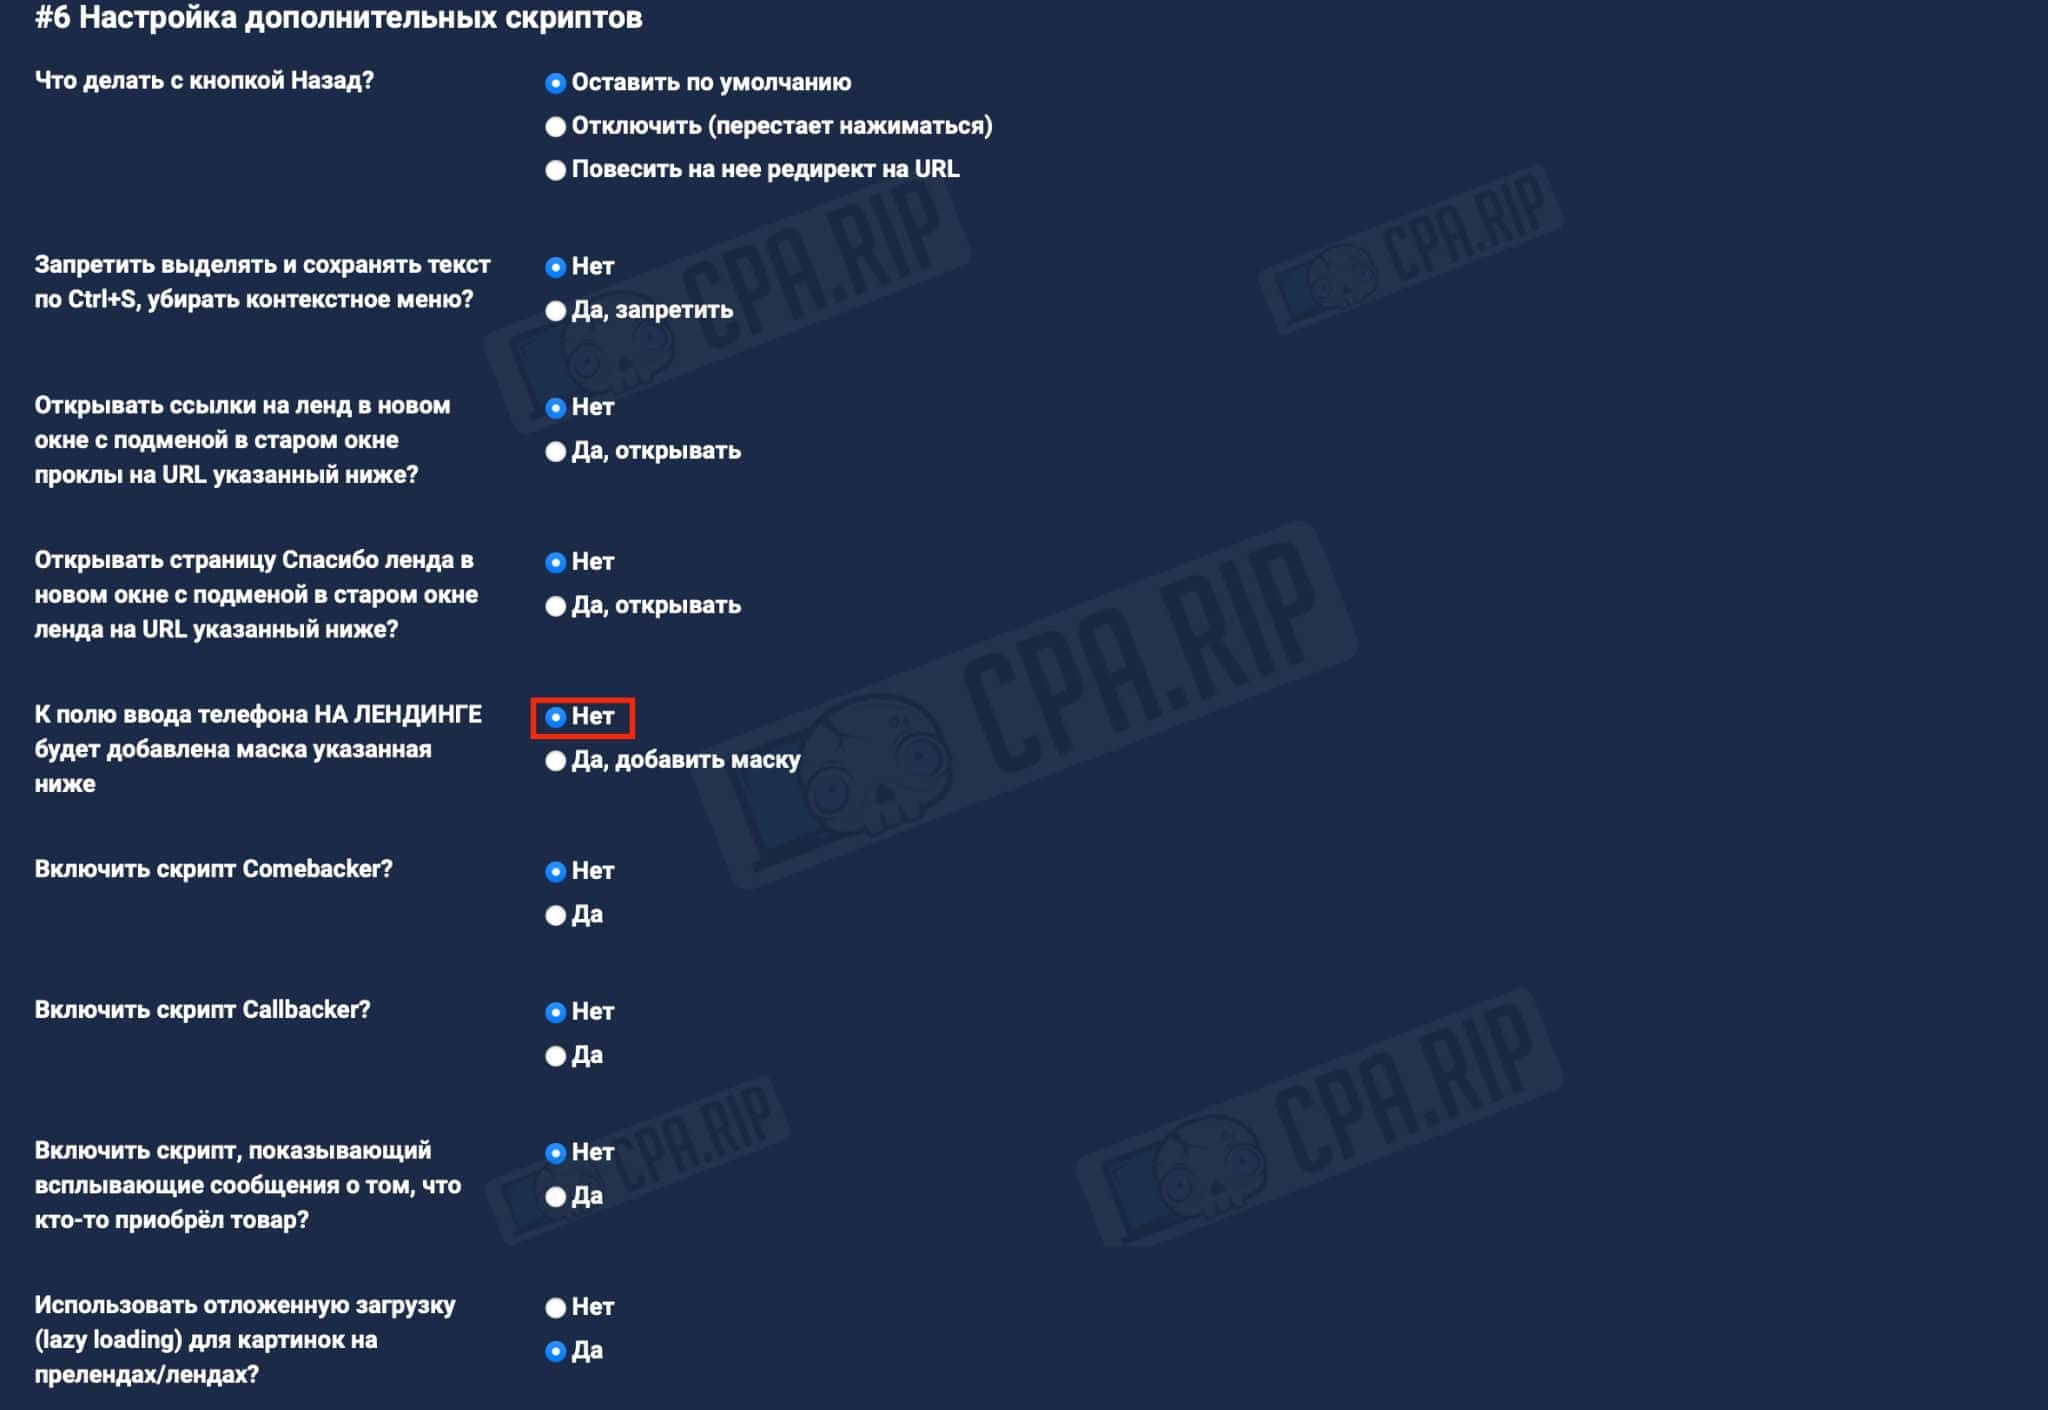
Yellow Cloaker has built-in scripts that you can enable:
- Disabling the “Back” button
- Replacing the “Back” button
- Block context menu, text selection, and saving by Ctlr+S
- Replacing pre-landing with another site
- Phone Masks – adds a specified mask to the phone entry field ON LANDING. We disabled it since we already have such a script on our landing.
- and other scripts:
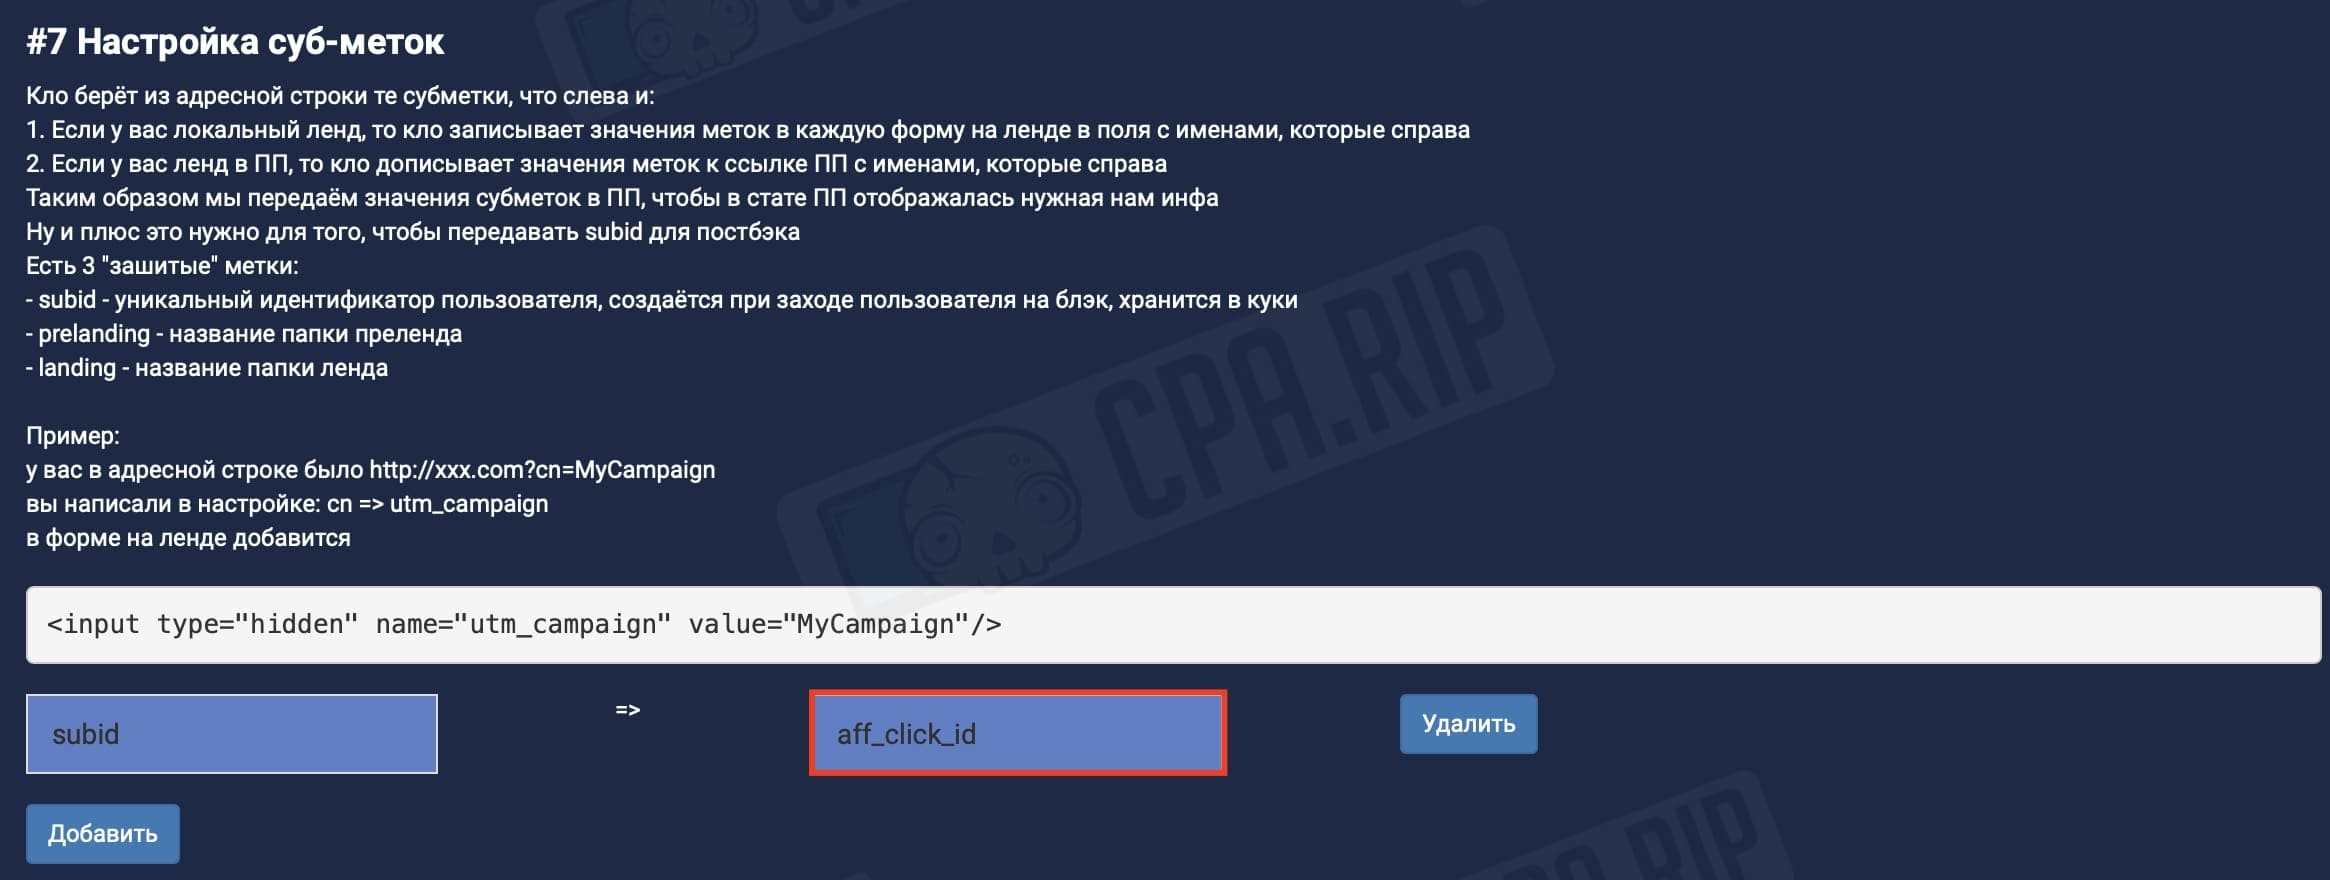
Настройка sub-меток
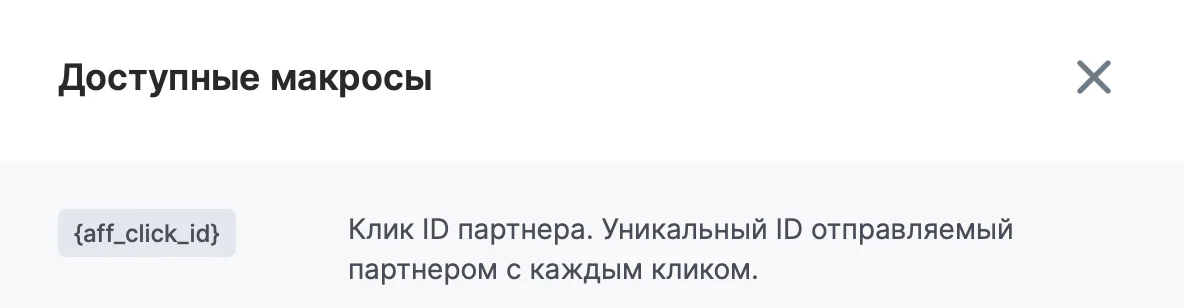
subid – a unique user identifier that is created when the user visits the black page and is stored in cookies.
This identifier is further transferred to the affiliate. Different affiliate programs use different names of the identifier parameter. Ask your manager/support about it and add it in the field opposite to subid.
For example, for Partners.CPA.RIP the aff_click_id parameter is used.
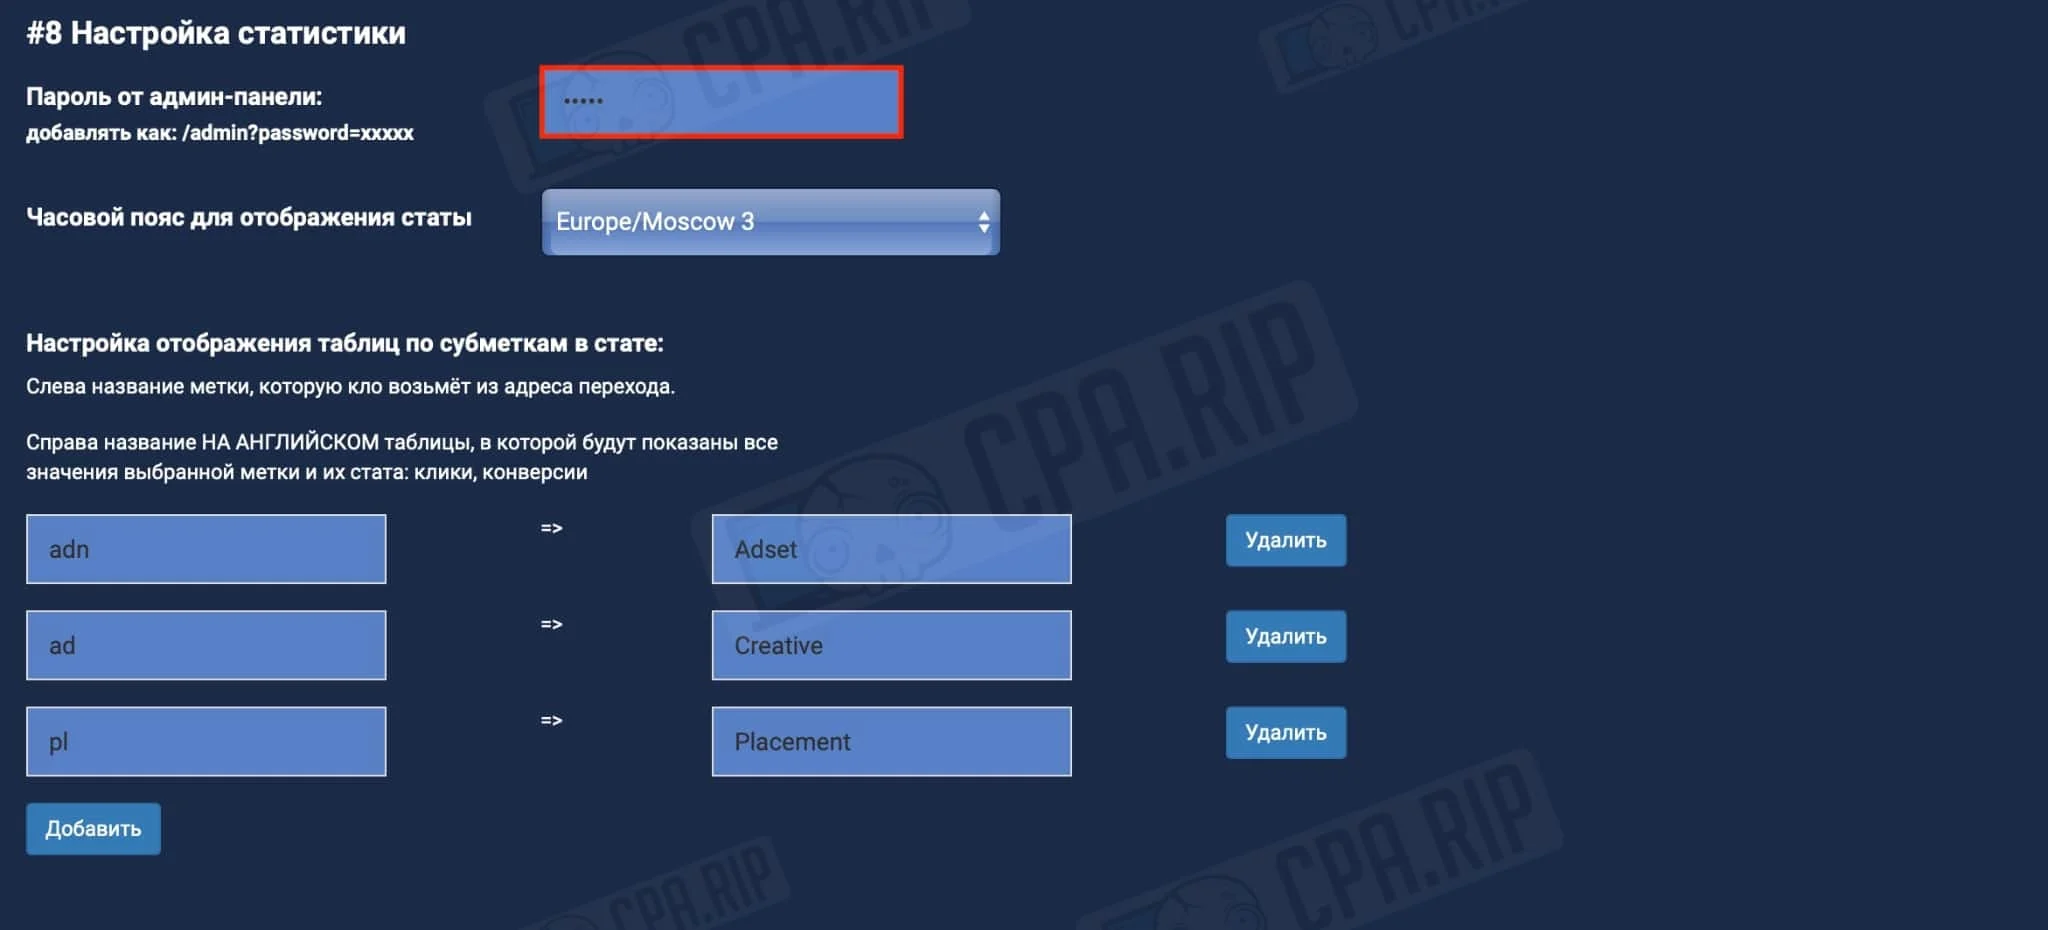
Setting up statistics
Viewing statistics is protected by a password, it must be changed in the settings.
- Password from admin panel: type your password.
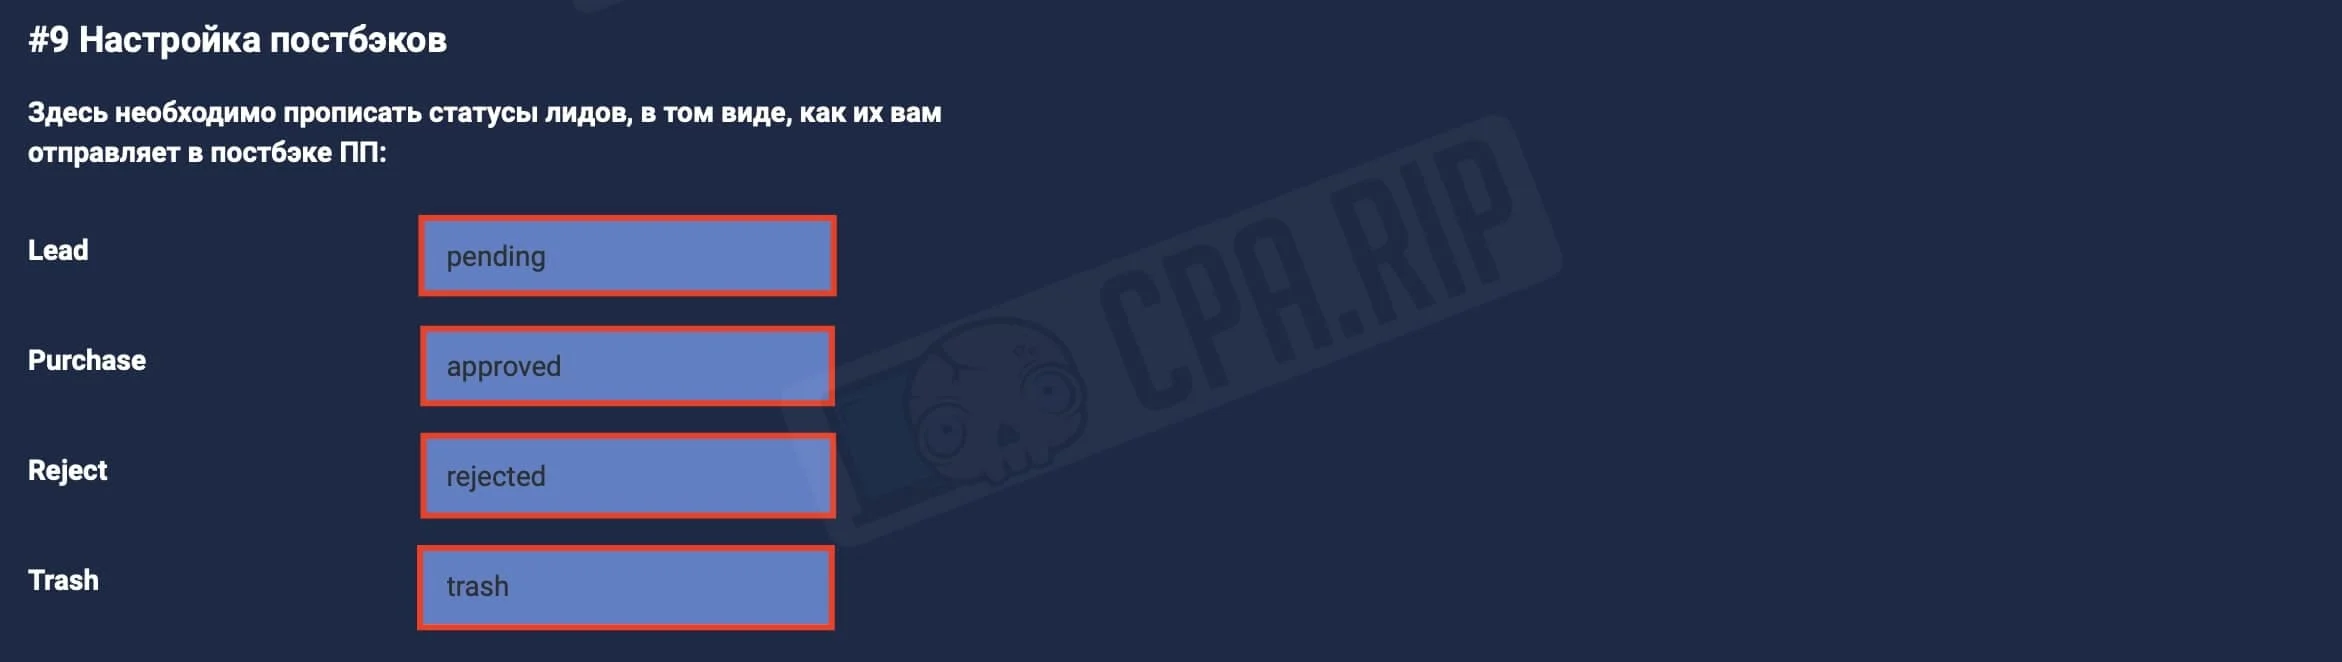
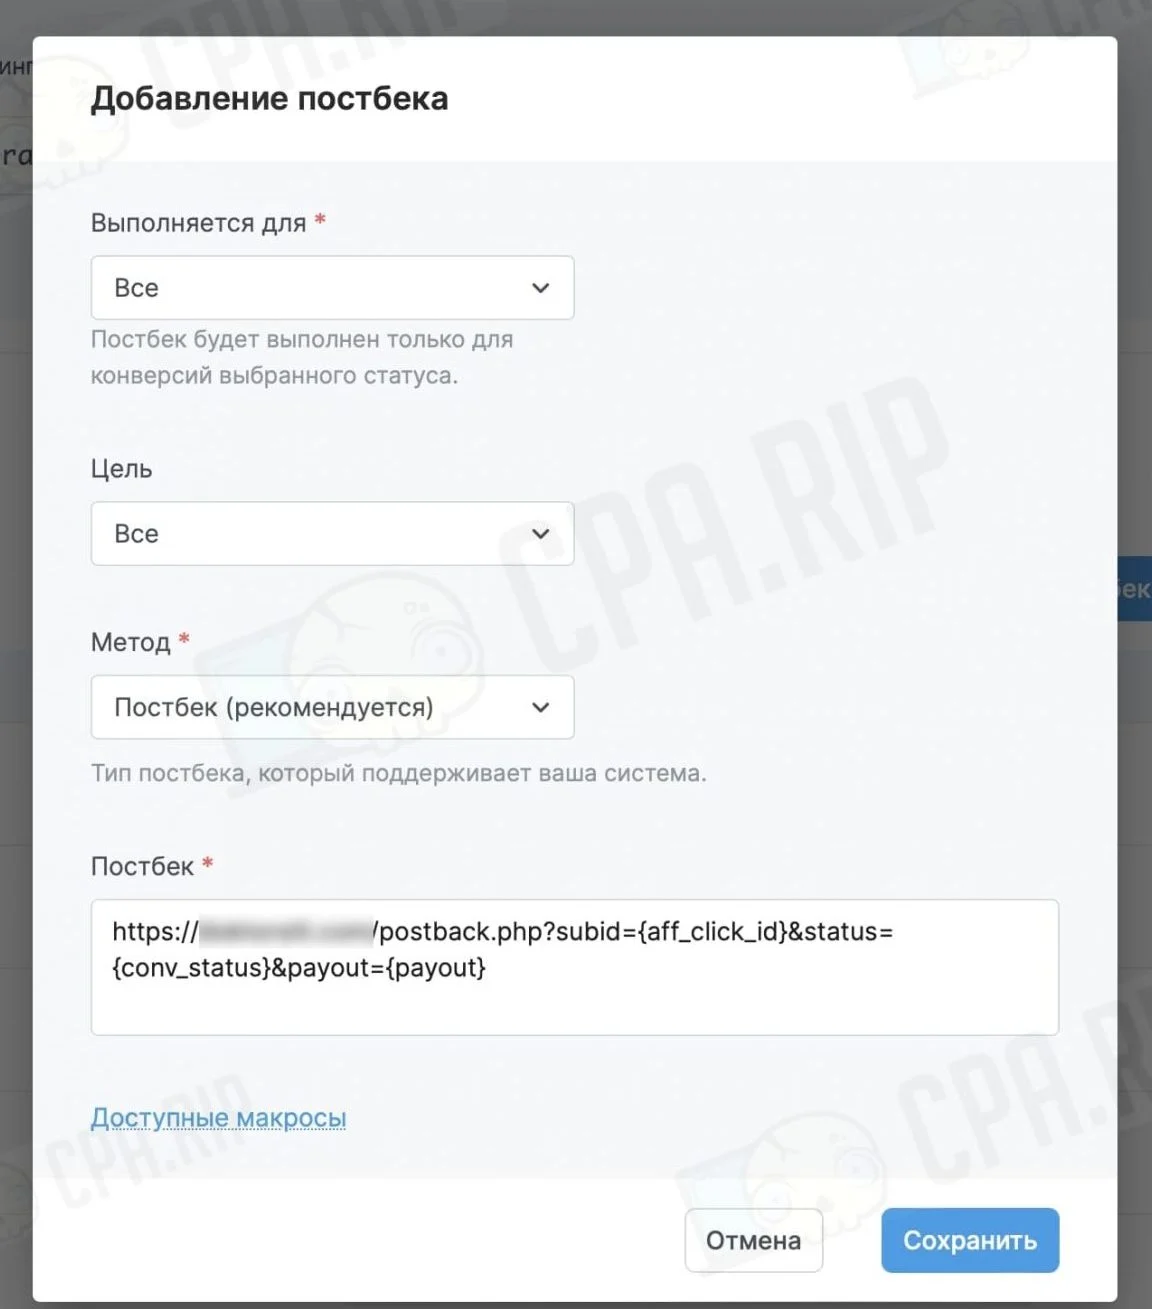
Setting up postback
Let’s consider the example of the Partners.CPA.RIP affiliate network.
- In special fields it is necessary to specify the statuses of leads as they come to clo from the affiliate:
Lead → pending;
Purchase → approved;
Reject → rejected;
Trash → trash.
The further configuration is done on the affiliate’s side, where the postback link: https://your.domain/postback.php?subid={aff_click_id}&status={conv_status}&payout={payout} should be added.
Read more about postback naming in our article: https://cpa.rip/en/services/keitaro-tracker/#Kak_rabotaet_Postback.
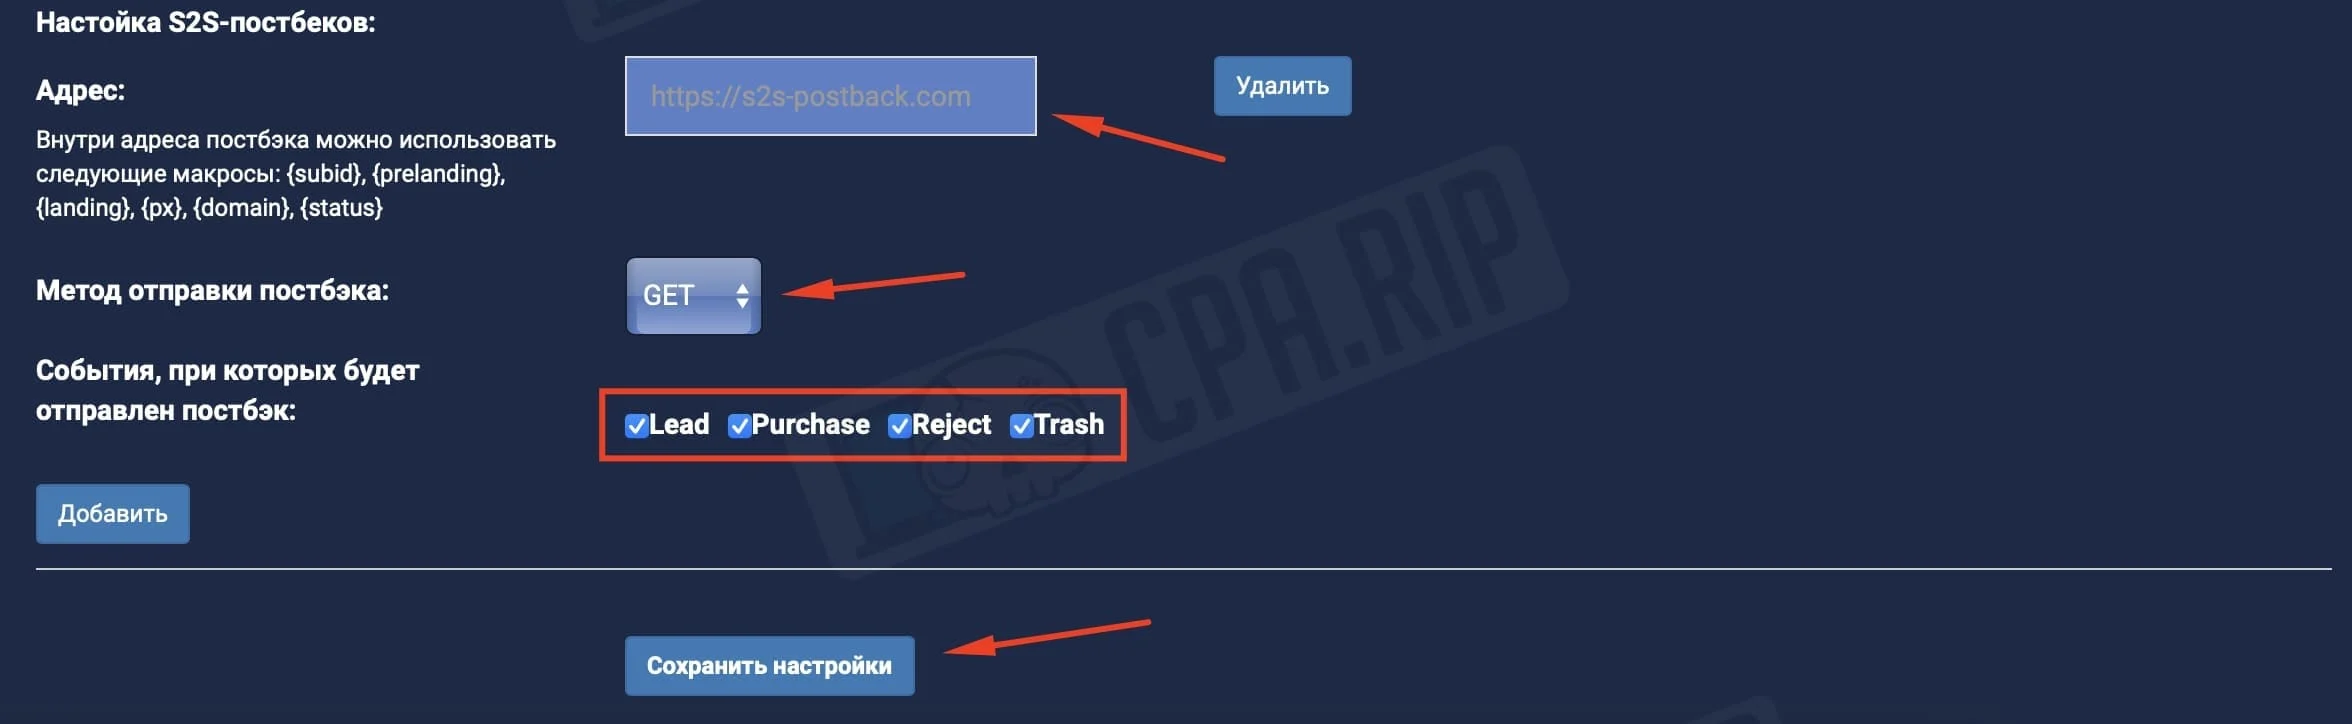
S2S postback transmission is also implemented in Yellow Cloaker. The following settings are available:
Running ads on Facebook Ads
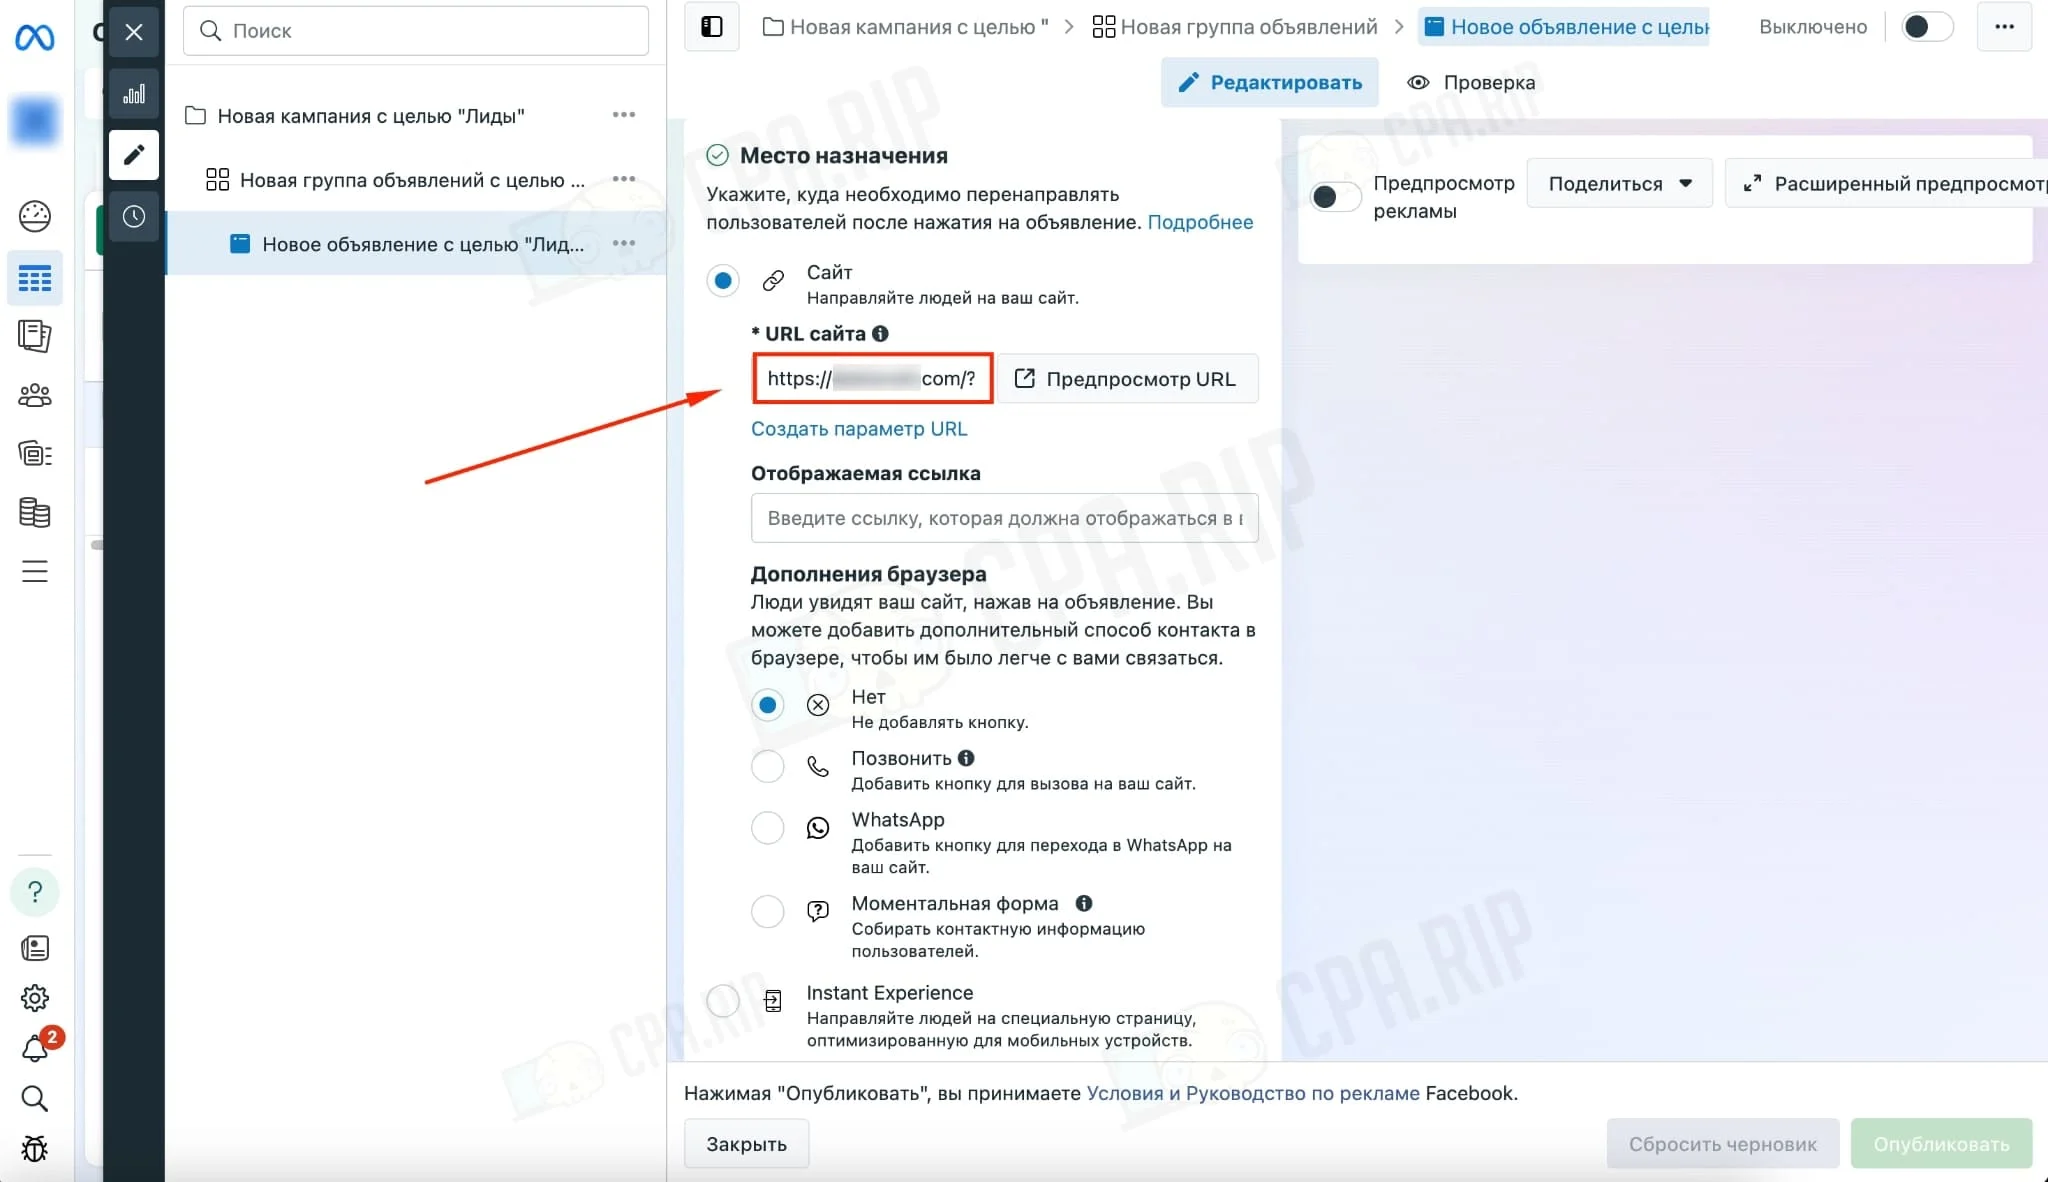
On Facebook Ads create a campaign for “leads”, create a pixel, and specify a link in the format:https://your.domain/?px=PIXEL.
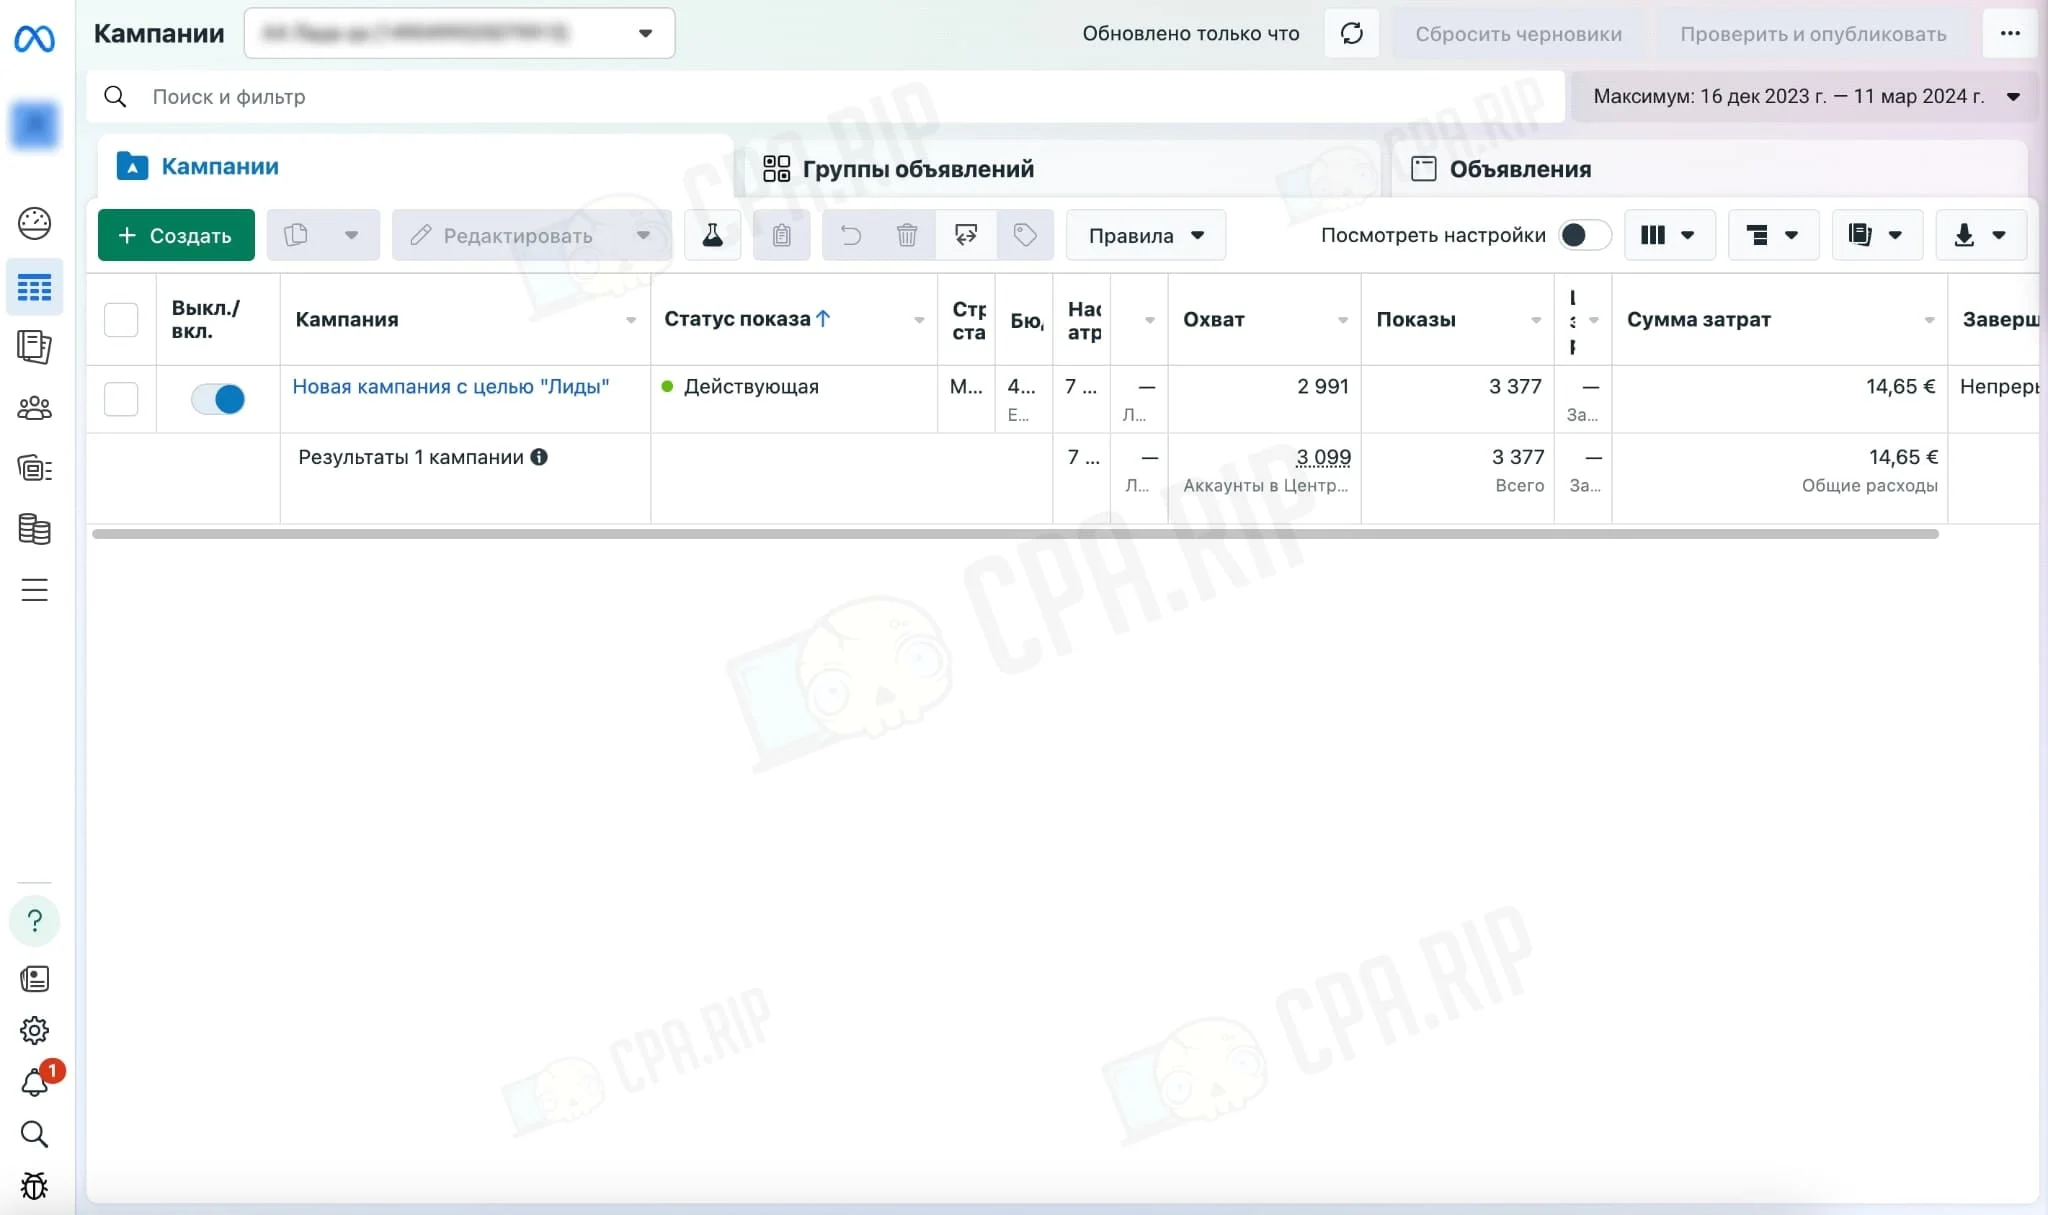
The campaign has been successfully launched:
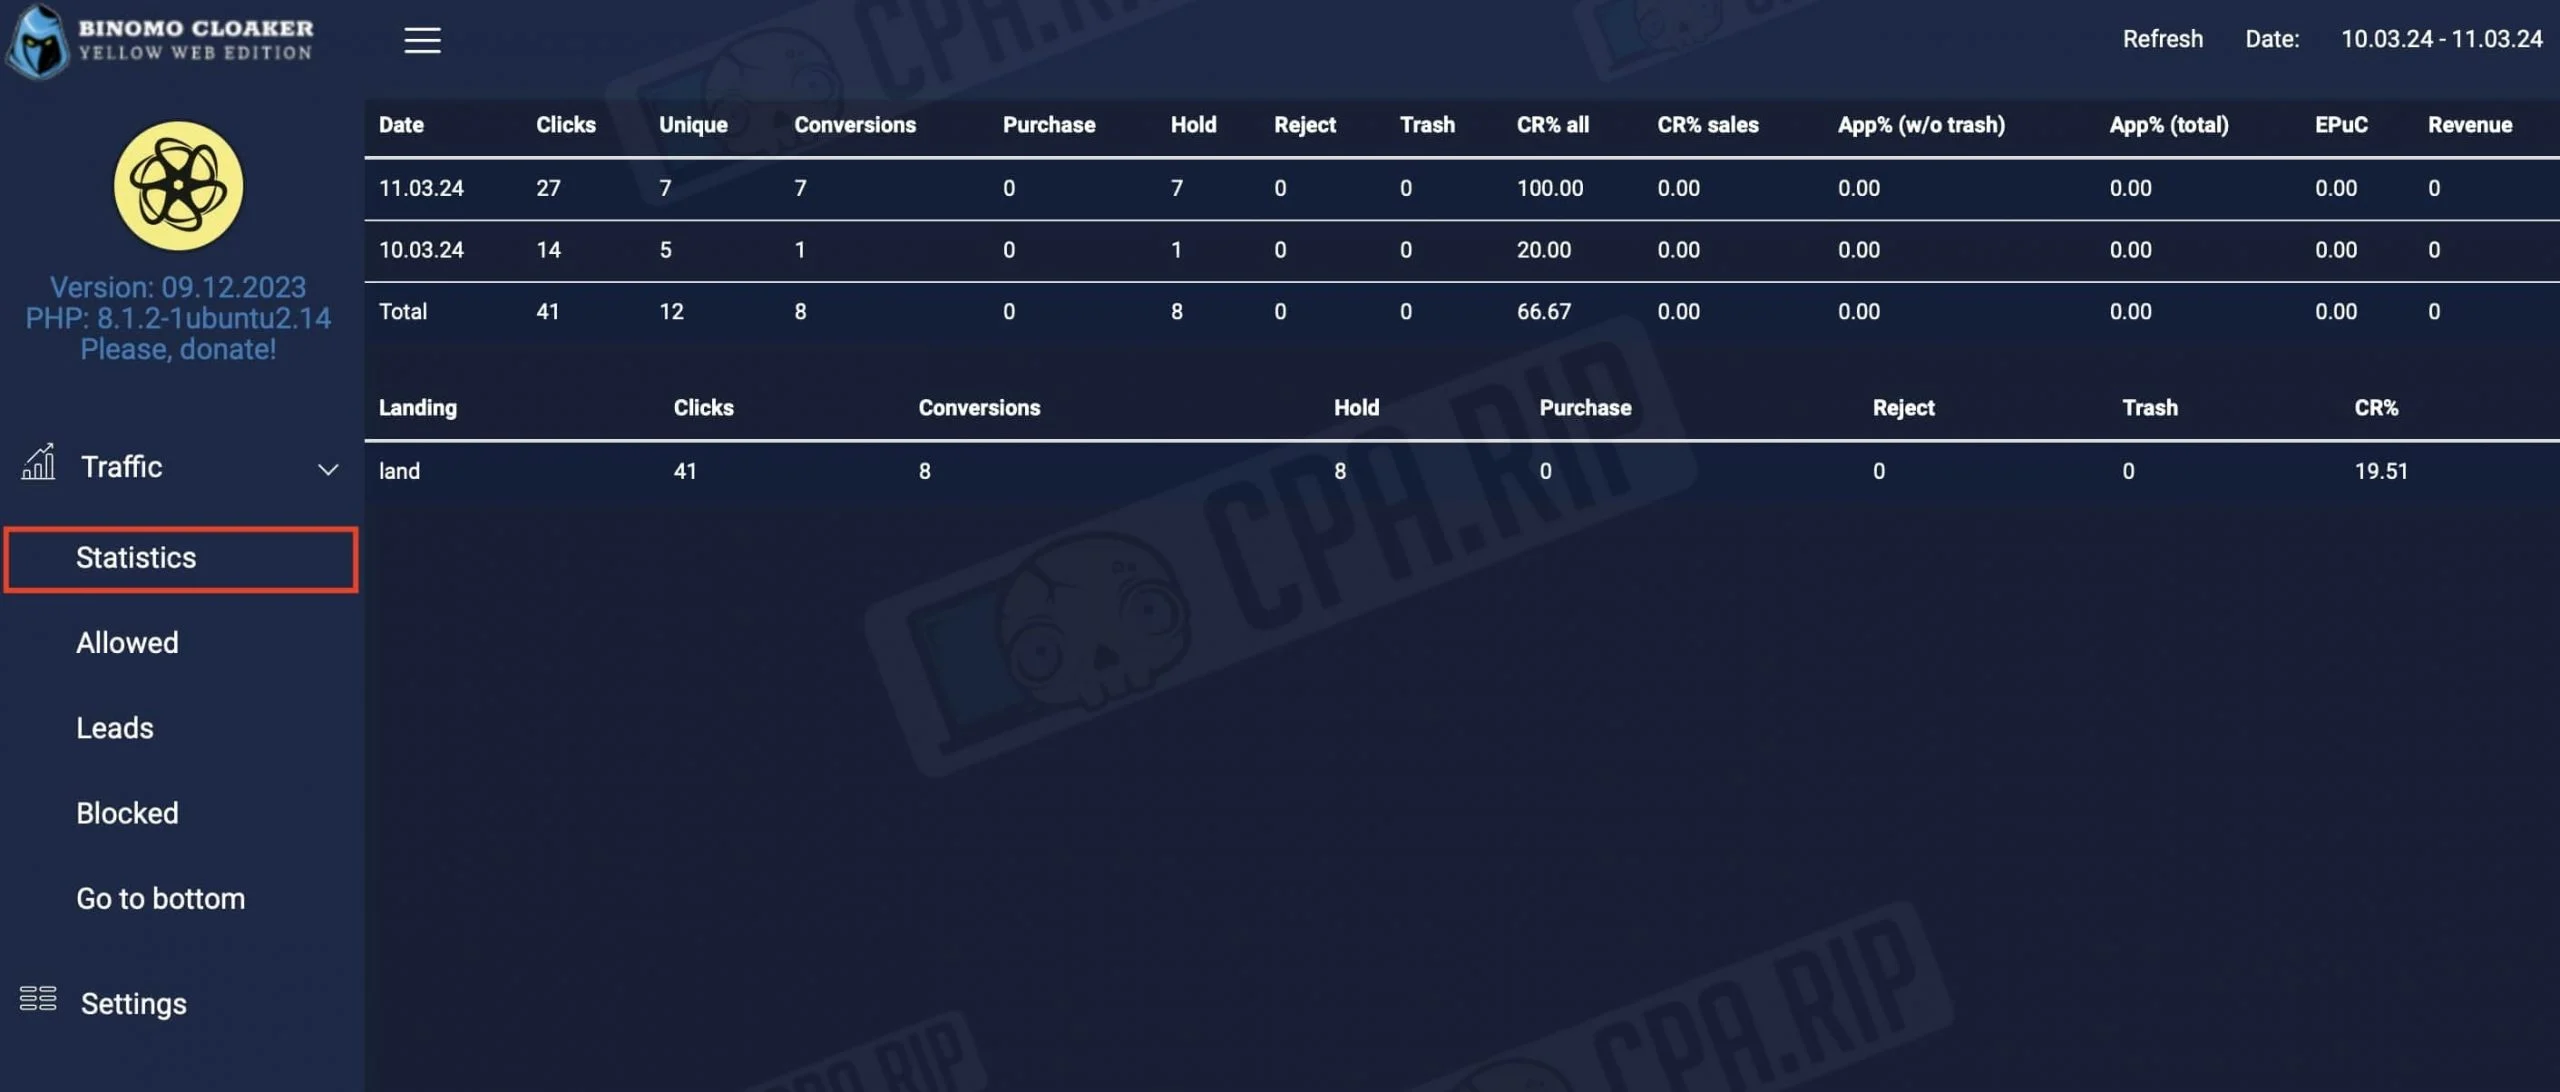
Yellow Cloaker statistics
The “Statistics” tab allows you to view statistics on the following parameters: Date, Clicks, Unique, Conversions, Purchase, Hold, Reject, Trash, CR% all,CR% sales, App% (w/o trash), App% (total), EPuC, Revenue:
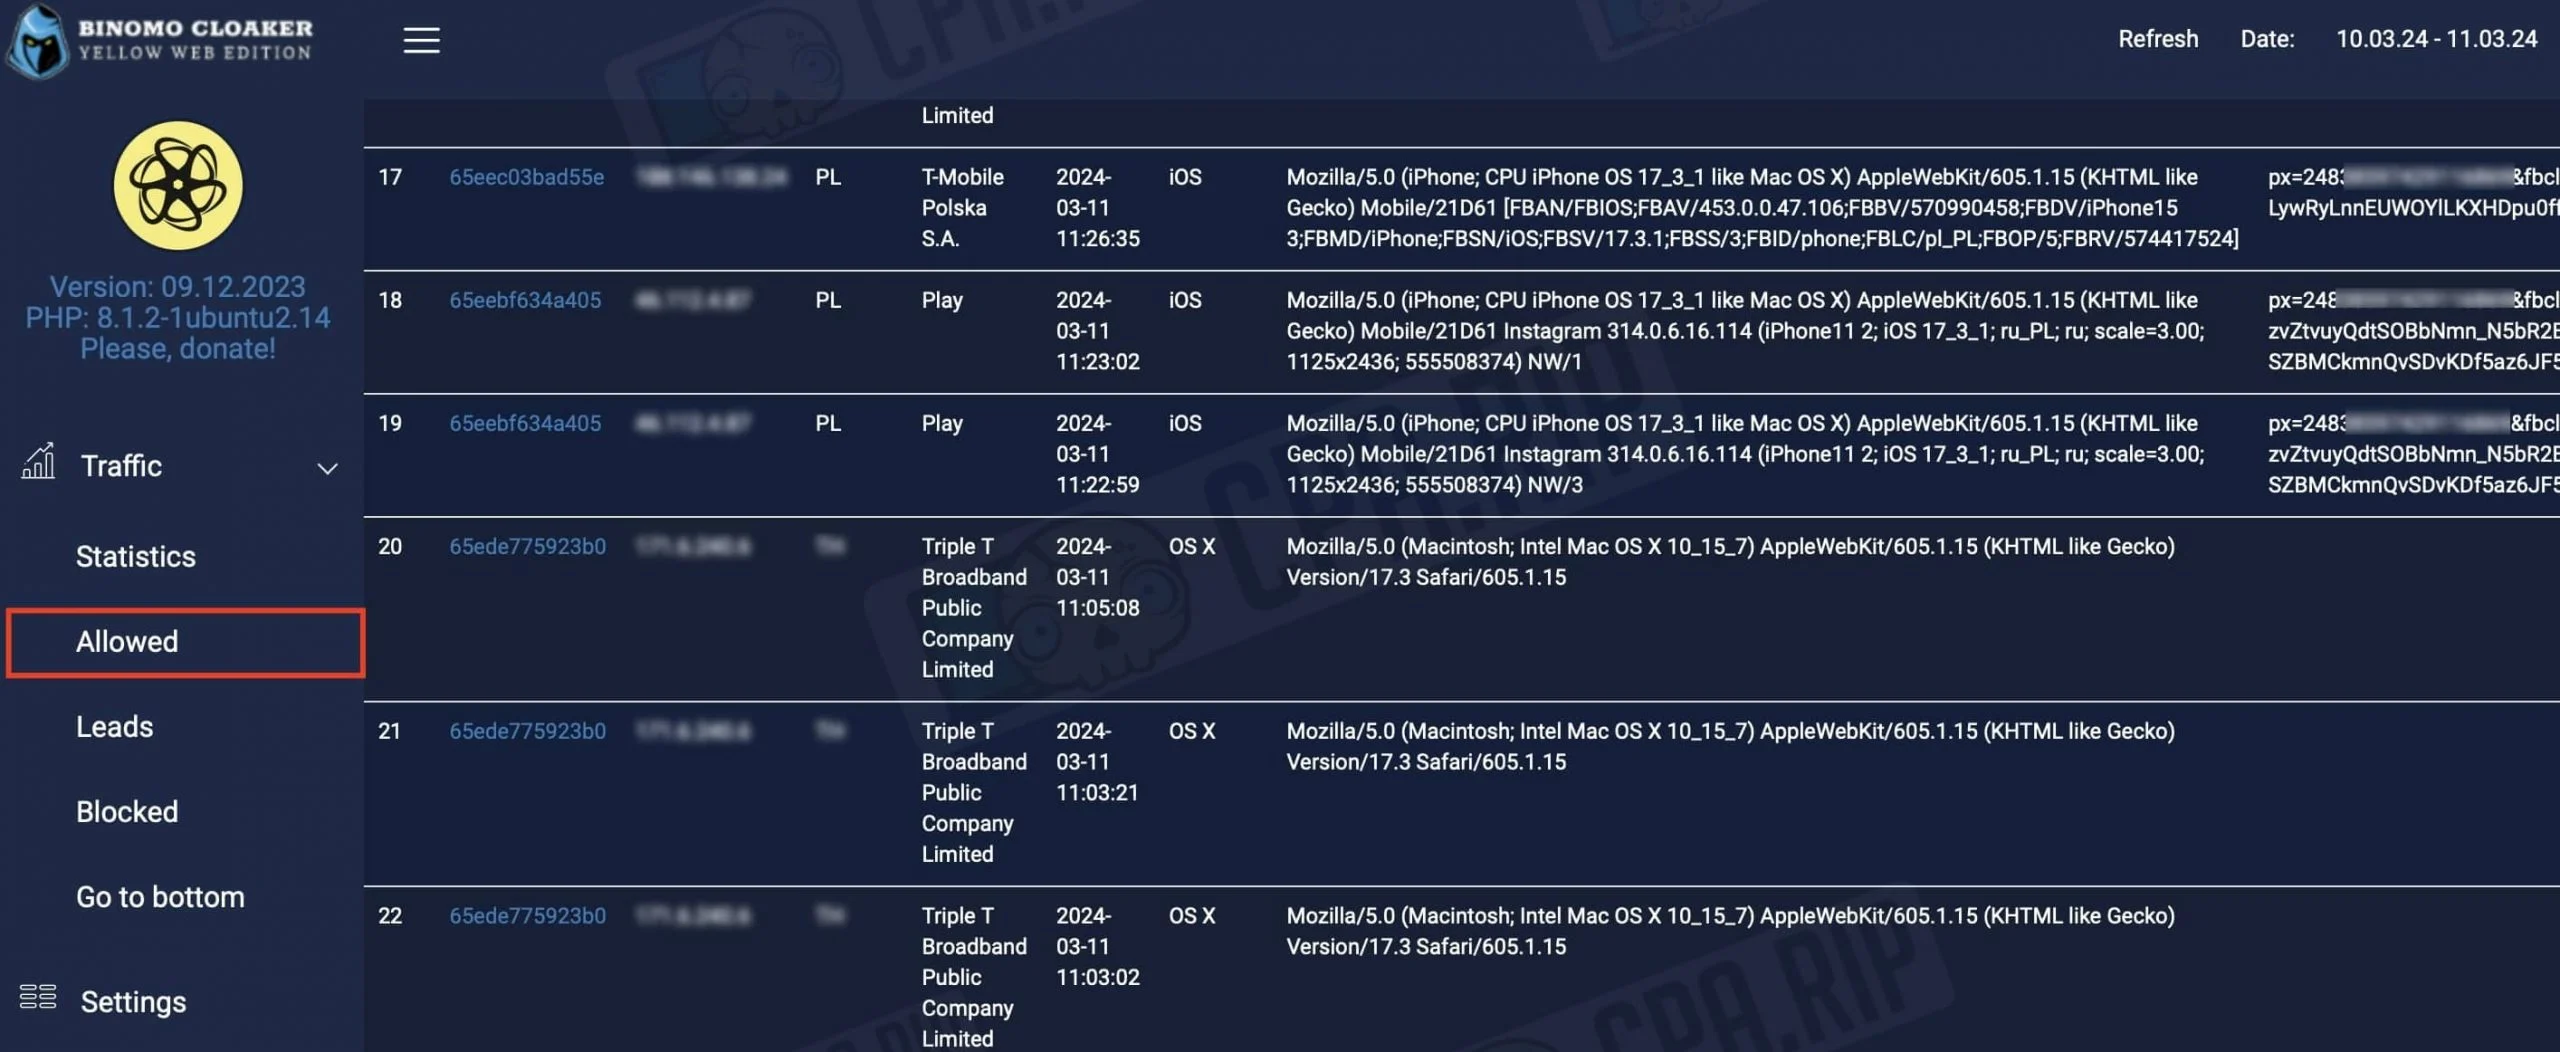
The “Allowed” section displays clicks that have been allowed on Black-page:
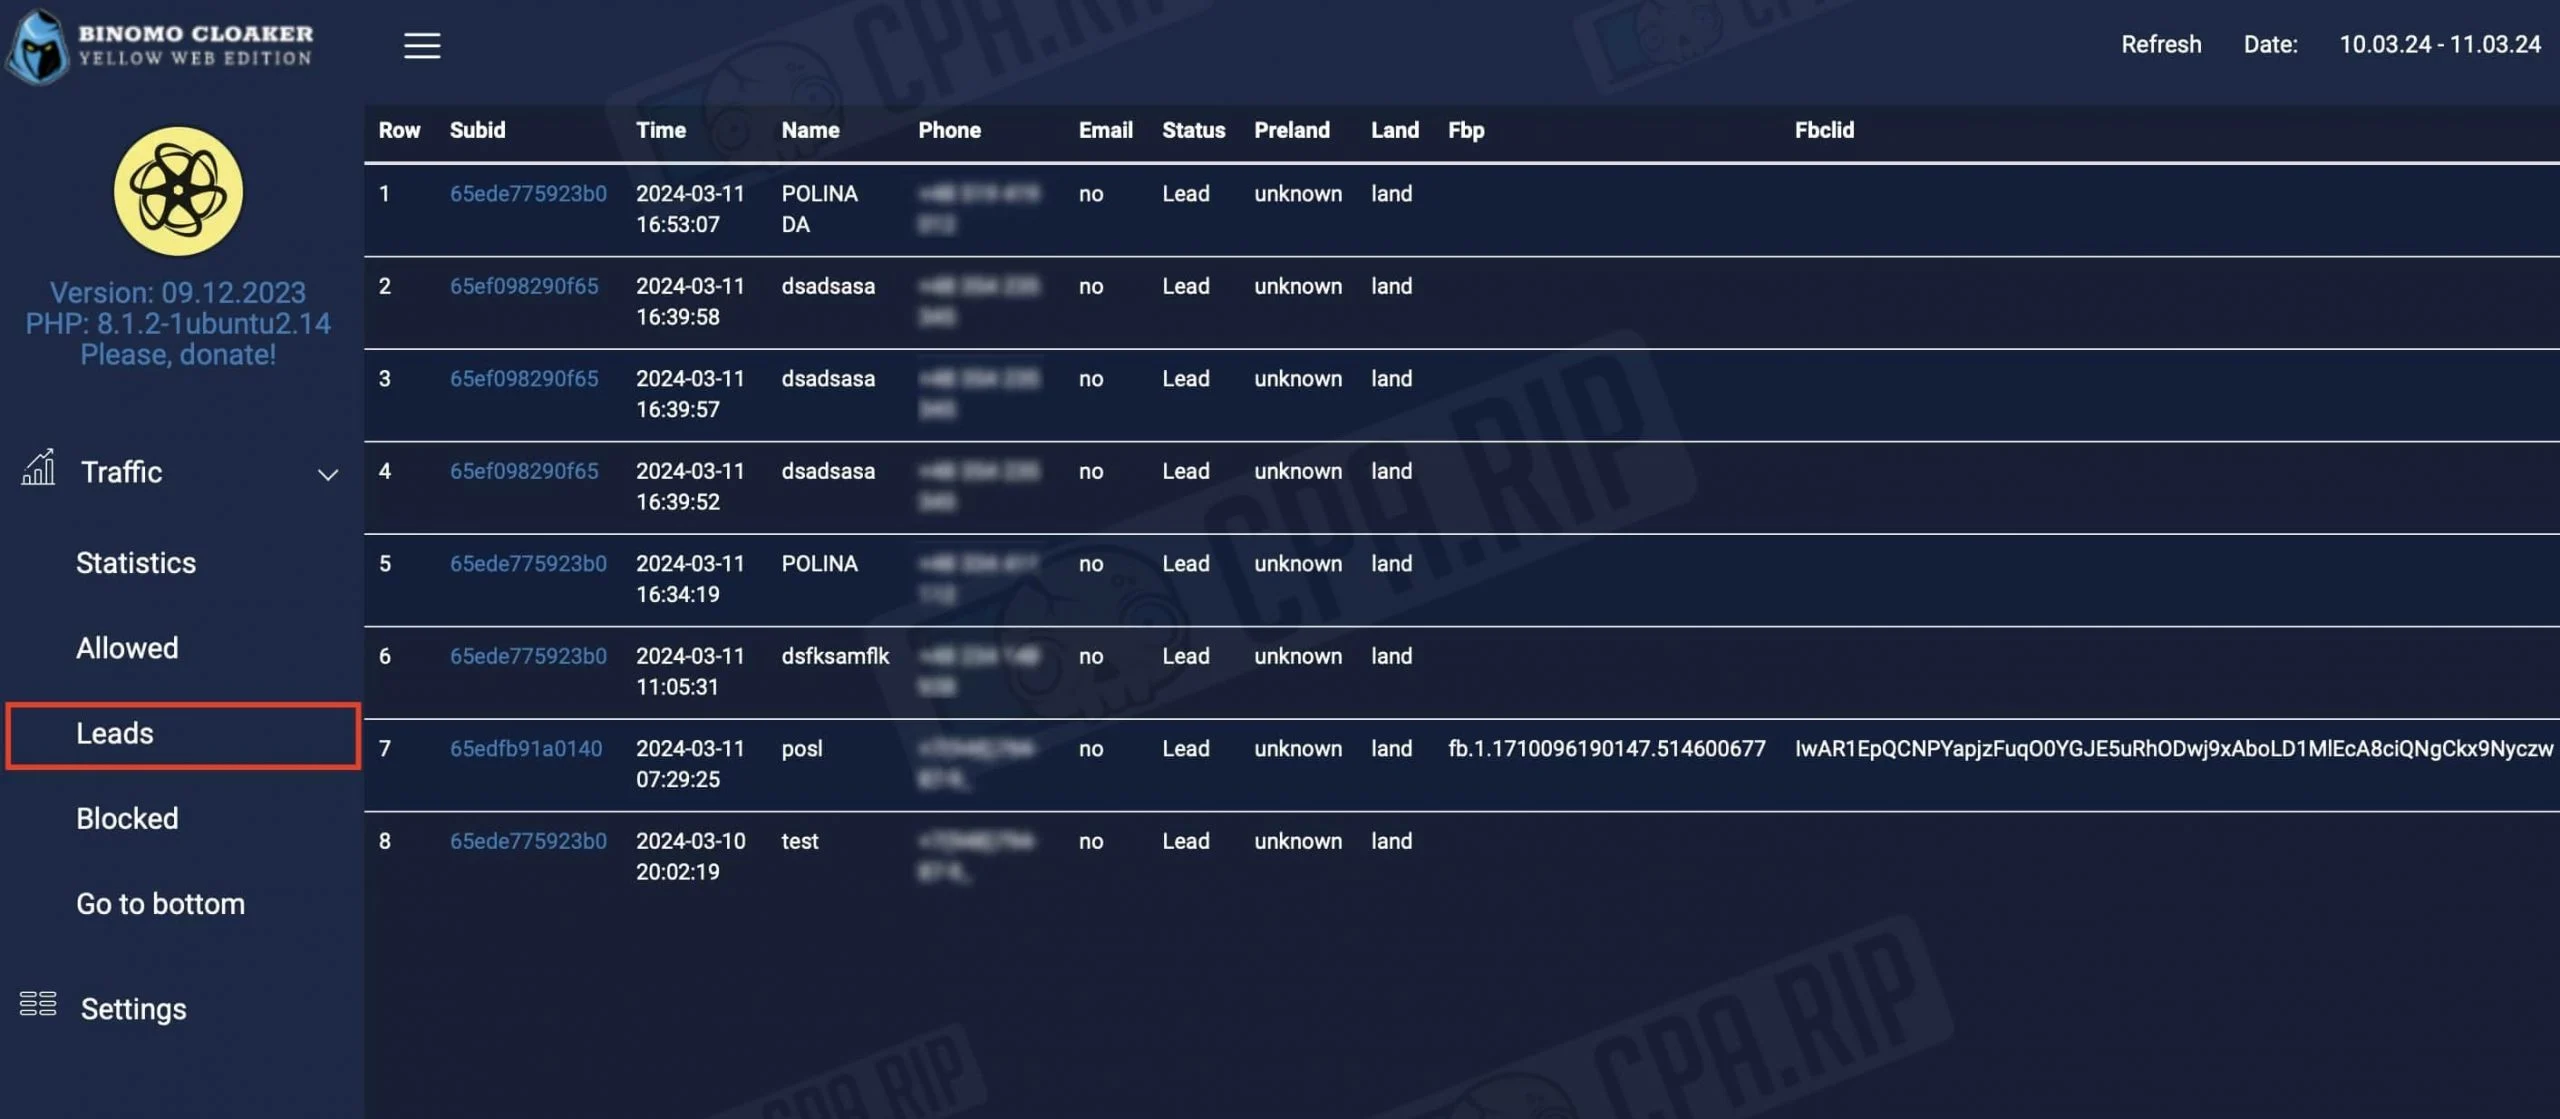
The “Leads” section allows you to view details of leads:
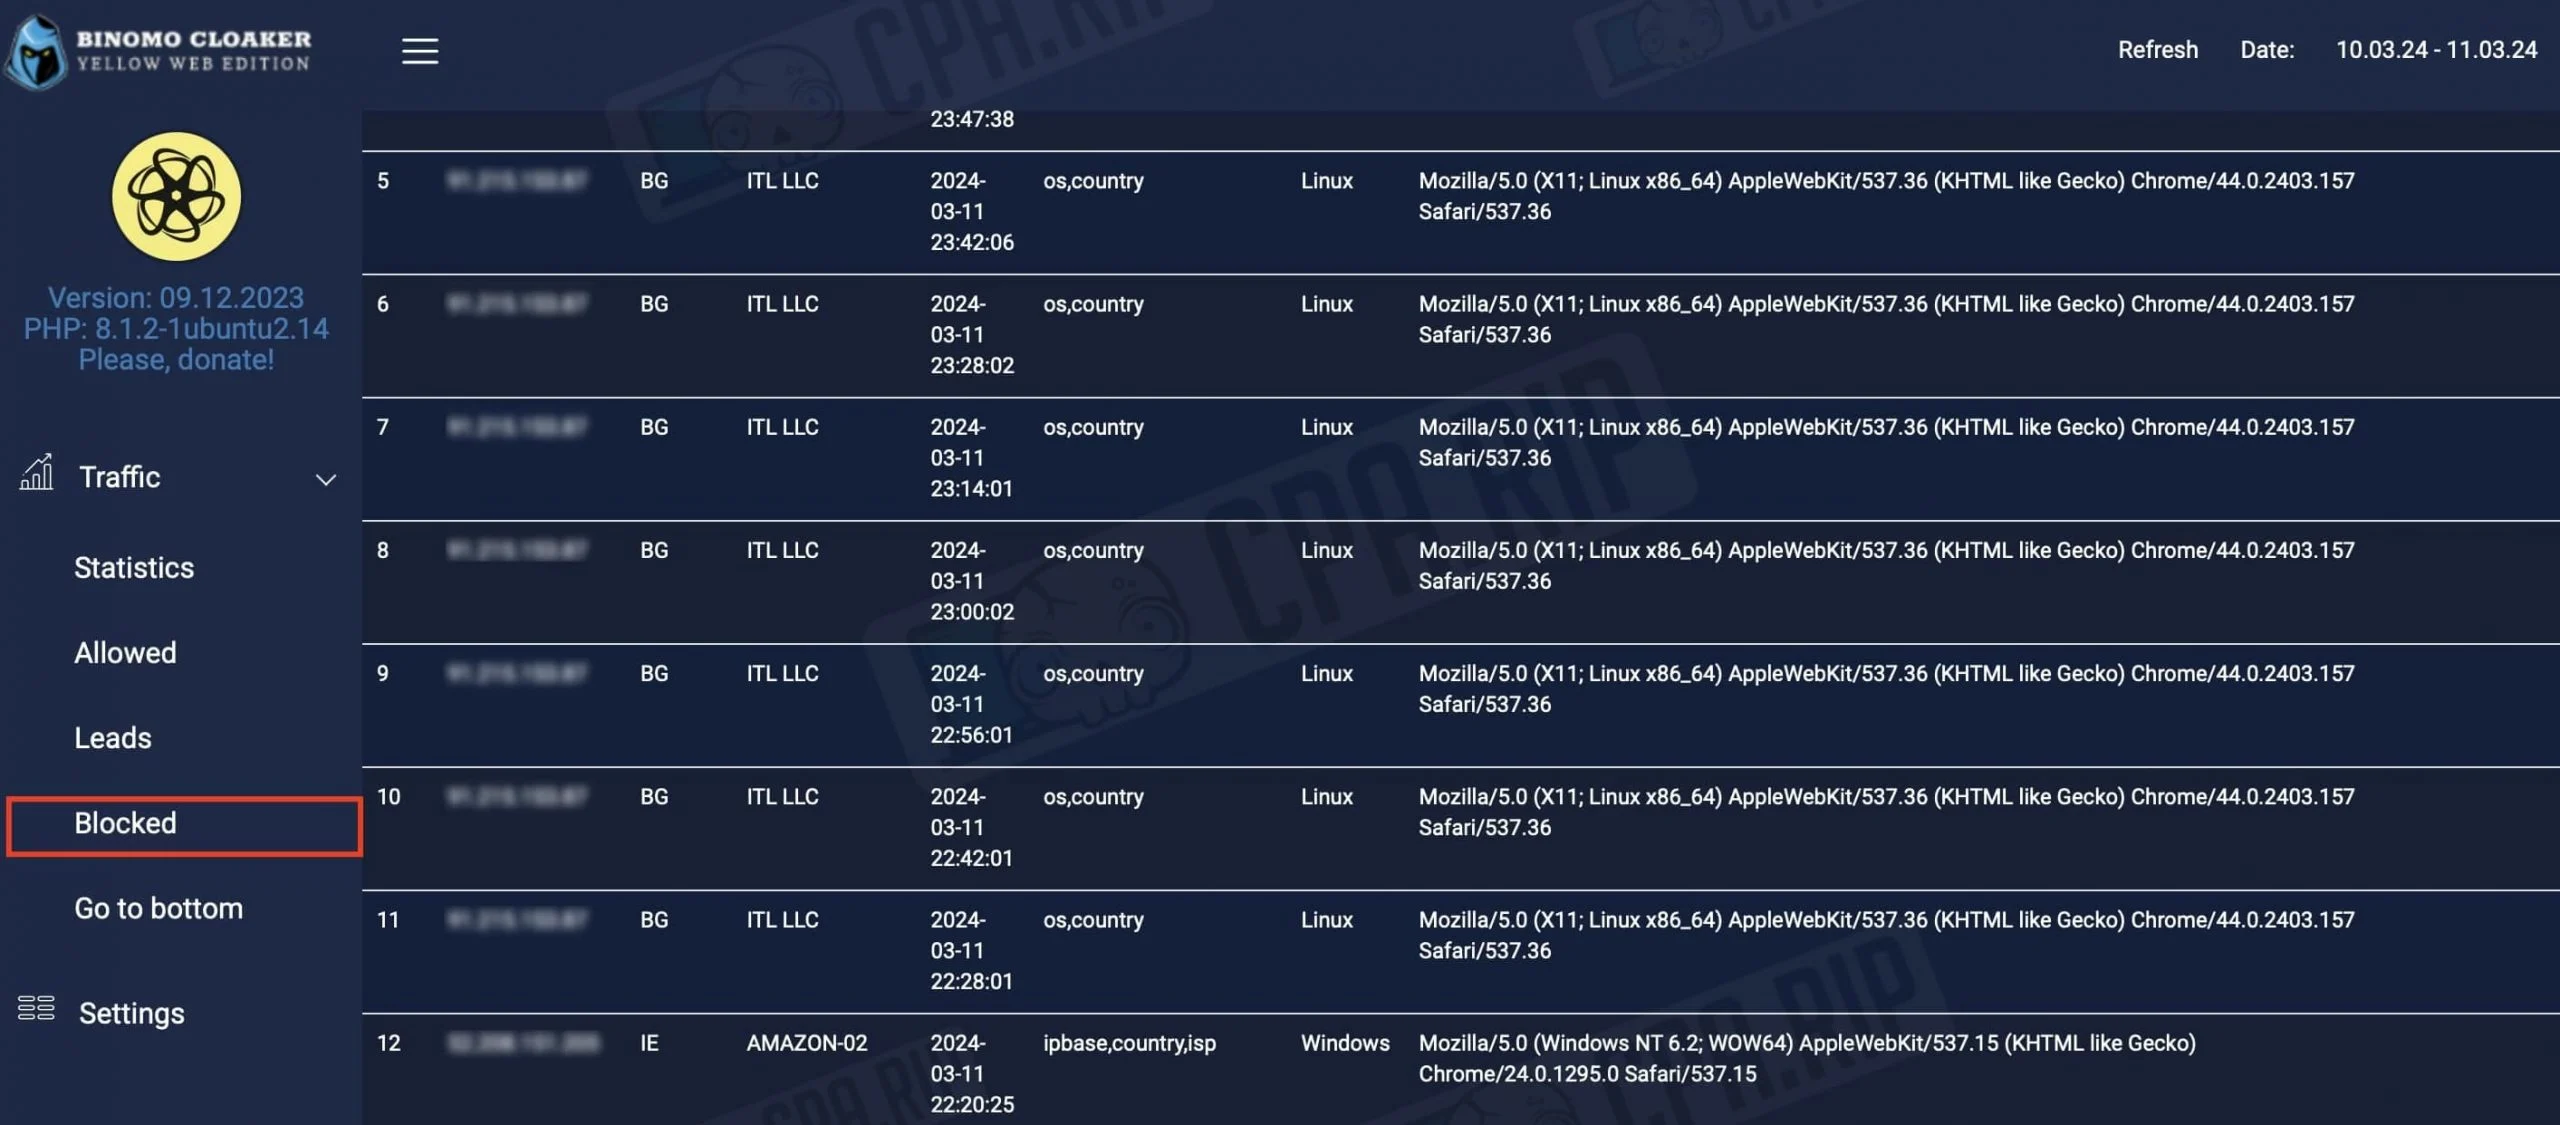
The “Blocked” section displays all clicks that have been blocked and redirected to White-page: