Instruction on setting up and working with Keitaro tracker when driving gambling, nutra и and commodity verticals. We have reviewed the steps from adding an affiliate network and setting up postbacks on the example of Partners.CPA.RIP affiliate program to create a campaign on Facebook Ads.
All further steps are made using the updated version of the Keitaro v10 tracker. You can read about new features and tools in detail here: https://cpa.rip/en/services/keitaro-v10-updates/ and here: https://cpa.rip/en/services/keitaro-10-1-update/.
? Keitaro promo code for 22% off – CPARIP ?
Preliminary setup of your Keitaro tracker
After installing Keitaro you should make changes to some settings. This will allow the tracker to filter bots and distribute traffic more accurately.
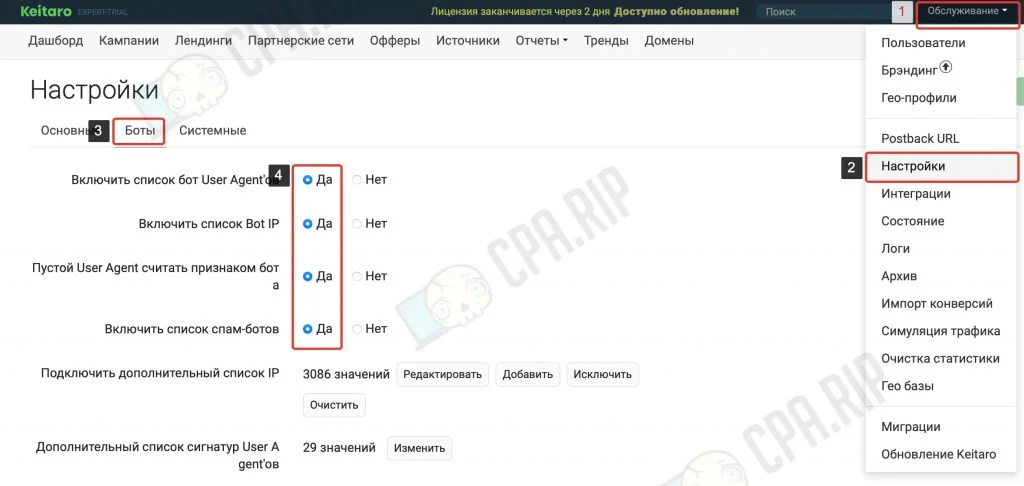
Setting up bot detection
- Click Maintenance
- Select the Settings menu item
- Then go to the Bots tab
- Switch on all the toggle switches as shown in the screenshot:
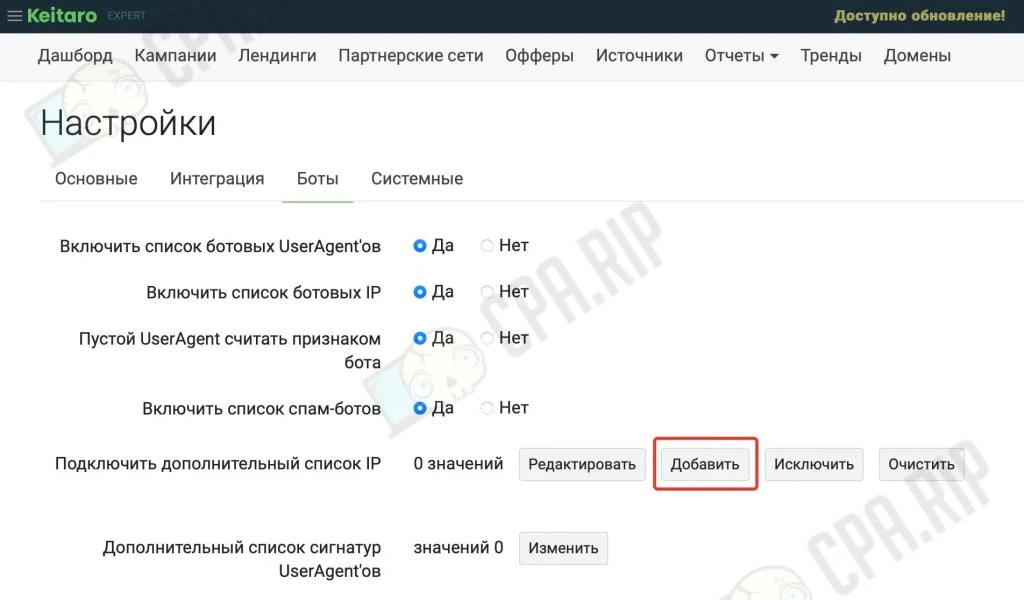
Then add the list of bots’ IP addresses to the tracker.
- In the same Bots tab click Add next to “Connect an additional IP list”.
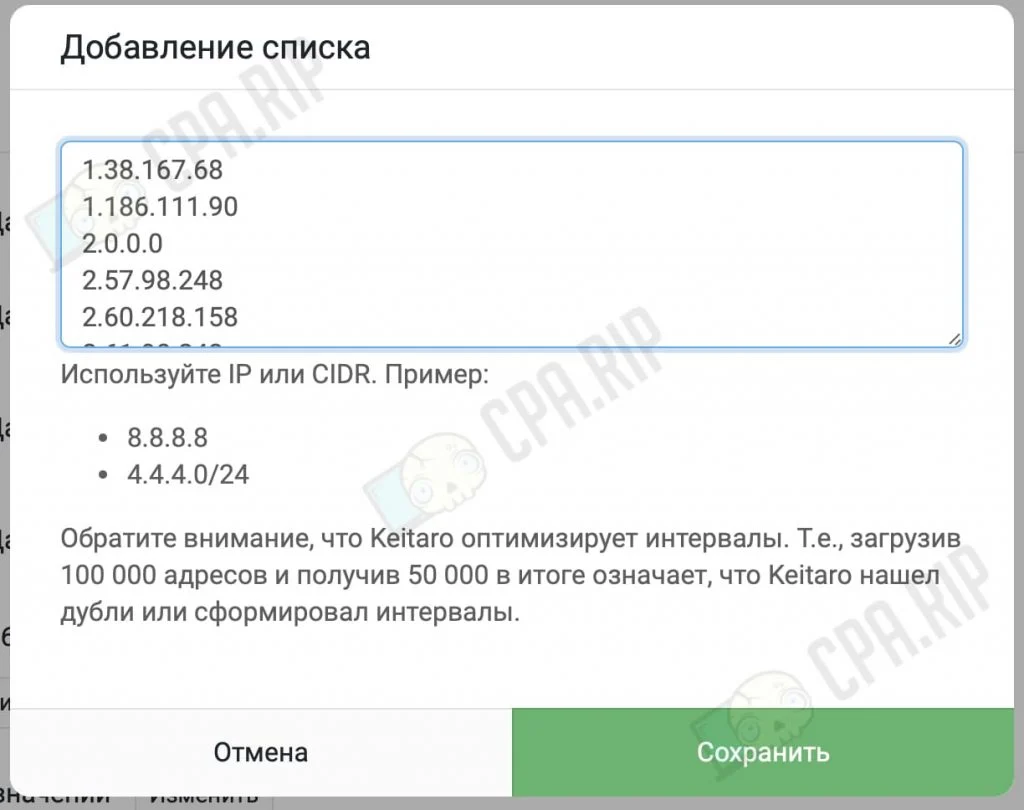
- In the modal window enter the list of Facebook bots’ IP addresses from this article: https://cpa.rip/en/blogs/facebook-ip-addresses-for-cloaking/:
- Click Save
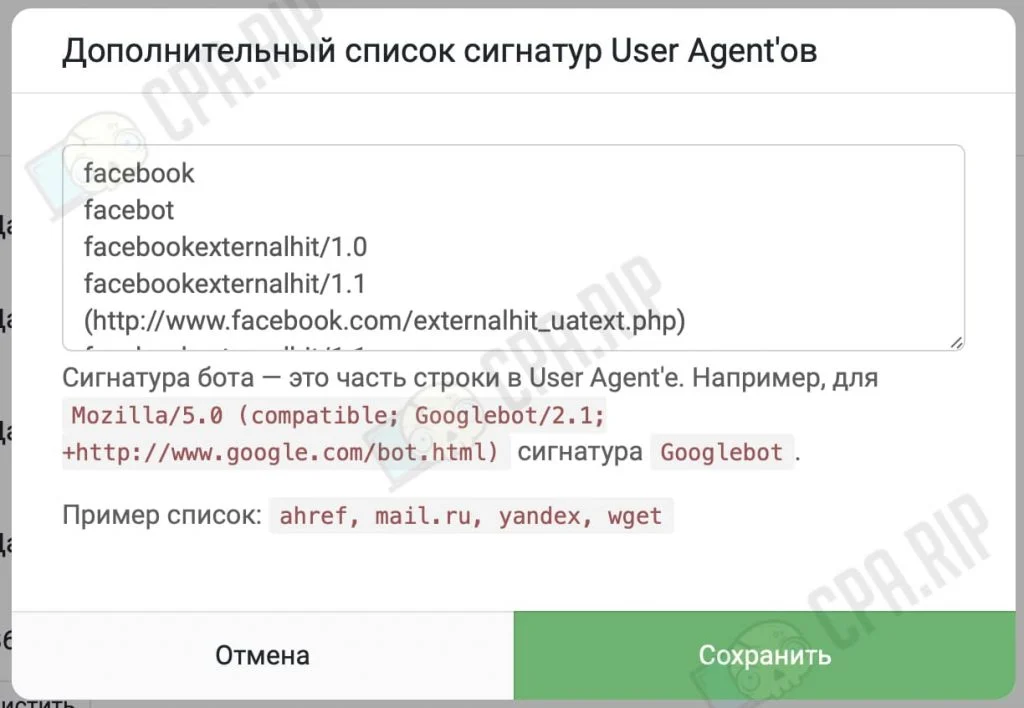
You can also add this list of User Agent signatures to work with Facebook Ads:
facebot
Python-urllib
python-requests
zgrab/0.x
Wget(linux)
facebookexternalhit/1.1 (+http://www.facebook.com/externalhit_uatext.php)
facebookexternalhit/1.1 (http://www.facebook.com/externalhit_uatext.php)
Go-http-client/1.1
Go-http-client/2.0
Python/3.6 aiohttp/3.4.4
CheckMarkNetwork/1.0 (+http://www.checkmarknetwork.com/spider.html)
nadesiko
Jetty/9.4.15.v20190215
facebook
facebot
facebookexternalhit/1.0
Jersey/2.25.1 (Apache HttpClient 4.5)
Mediapartners-Google
Surf/1.0 (Linux 4.4.0-116-generic; go1.12)
SafeDNSBot (https://www.safedns.com/searchbot)
Mozilla/5.0 (compatible; YandexBot/3.0; +http://yandex.com/bots)
Mozilla/5.0 (compatible; BomboraBot/1.0; +http://www.bombora.com/bot)
dianomi bot / 1.0 (dianomibot@dianomi.com)
Ruby
Jetty/9.4.15.v20190215
weborama-fetcher (+http://www.weborama.com)
ShortLinkTranslate
bitlybot/3.0 (+http://bit.ly/)
facebookexternalhit/1.1 ( http://www.facebook.com/externalhit_uatext.php)
facebook
facebookexternalhit/1.0
proximic
facebookexternalhit/1.1
- Click the Edit button next to “Additional User Agent Signature List”
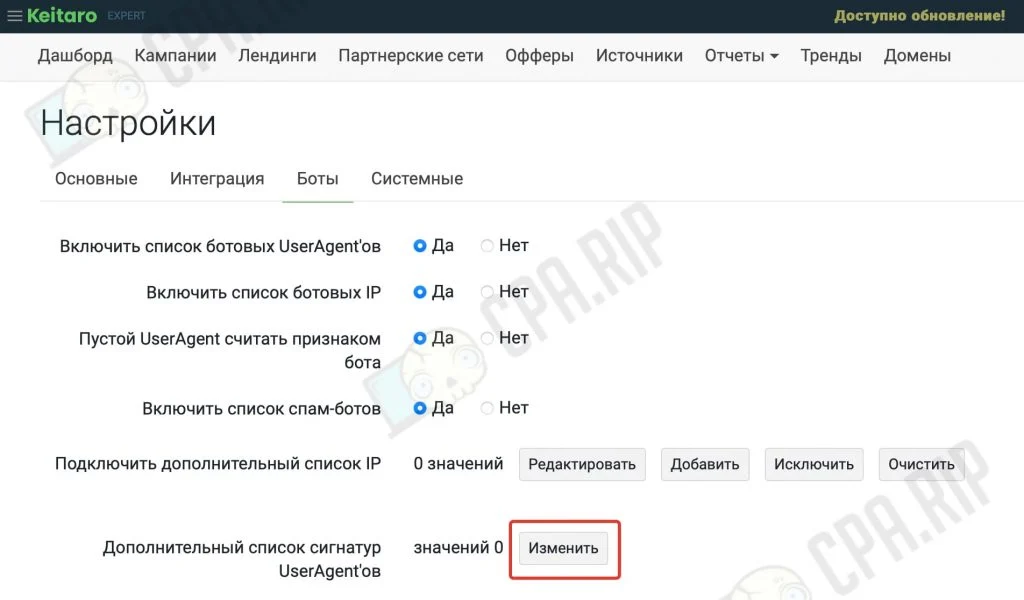
- Enter the list in the new modal window
- Click Save
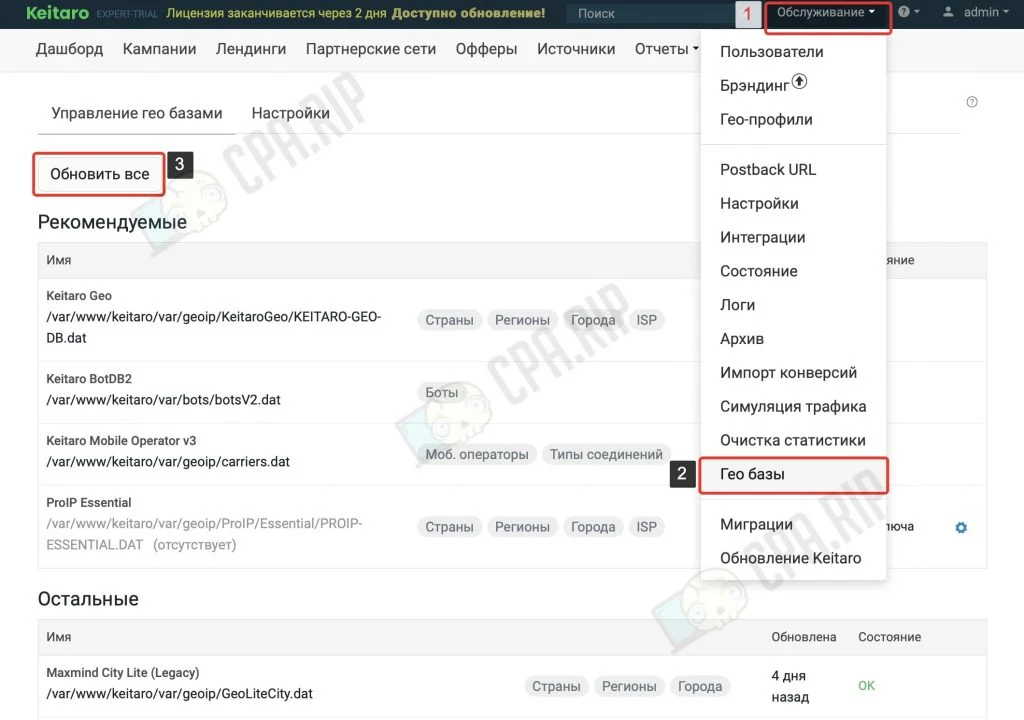
Updating databases
You should also update the GEO, operator, and bot databases.
- Go to Maintenance
- Select the Geo Bases menu item
- On the new page click Update All. The update will run in the background and take some time.
Adding an affiliate network to the Keitaro tracker
Keitaro has a function of adding affiliate networks with their settings and datasets (utm parameters). This is required for further customization of conversion tracking from affiliate networks using Postback. The tracker has a large list of ready-made templates for different popular affiliate networks.
If there is no required affiliate network in the templates, you can add and configure it. Just ask your manager to give you data on the parameters used to transfer statuses.
Now on the example of the Partners.cpa.rip affiliate network let’s see how to add the required affiliate using the template and get the Postback URL.
- In the Keitaro tracker, go to the Affiliate Networks tab and click Create
- In the modal window select Partners.cpa.rip in the From template field.
- Copy the contents of the Postback URL field
- Click Create

There is a brief instruction on how to set up postback in the affiliate network in the same window:
Setting up Keitaro Postback
Keitaro Postback must be properly configured for the tracker to receive information from the affiliate program about leads, deposits, etc., and to be able to analyze and optimize campaigns.
How does Postback work?
The tracker assigns a unique identifier to each click, which is passed via the link to the affiliate network using the {subid} parameter. In the case of Partners.cpa.rip the aff_click_id={subid} macros from the template is used:

When a user following the link performs a targeted action (request, purchase, deposit, etc.) or when the lead status changes, the affiliate network sends a GET or POST request to the Postback URL with information about this action (with the click ID). This way the tracker gets info about what exact click brings the lead, its status, and cost.
Set up Postback for CPA nutra/commodity offers
Let’s go to the Partners.cpa.rip affiliate program and configure data transfer via Postback for CPA offers using the Postback URL received in the tracker.
Usually, there are 2 types of postback in affiliate networks: a global – valid for all the offers/flows and a configured postback for each separate offer/flow. Let’s start with the global one.
Global postback
Global postback will work at the account level, i.e. for all offers with the appropriate target type.
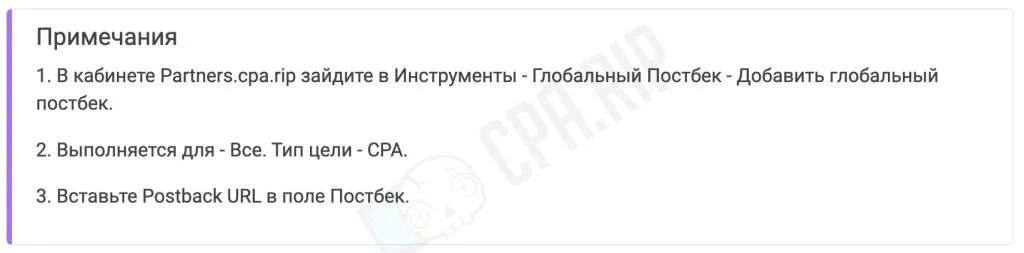
- Go to partners.cpa.rip affiliate program.
- Then to the Tools page
- In the Global Postback tab, click + Add Global Postback button.

In the opened modal window you should select the conversion statuses and types of purposes postback will work for.
- In the Run for list, select All
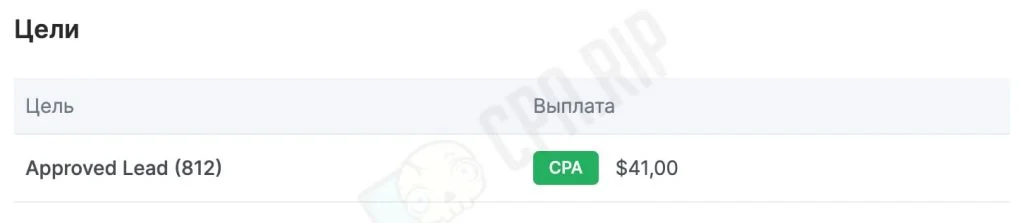
- In the Target Type list, select the target type used in the offer. For CPA-offers – CPA, for CPL-offers – CPL.
You can check the type of the offer with your manager or see it on the page of the offer in the Goals section.
- In the Postback field, paste the Postback URL previously copied from Keitaro.
- Save the changes
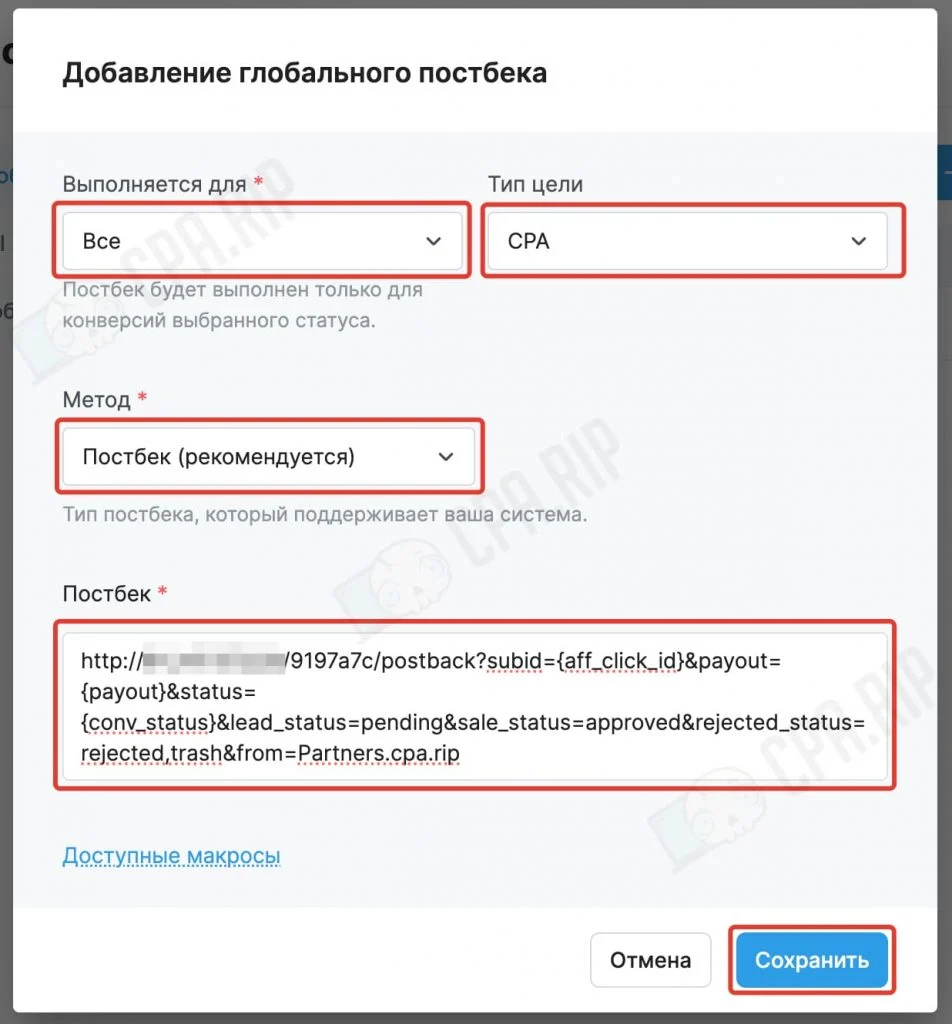
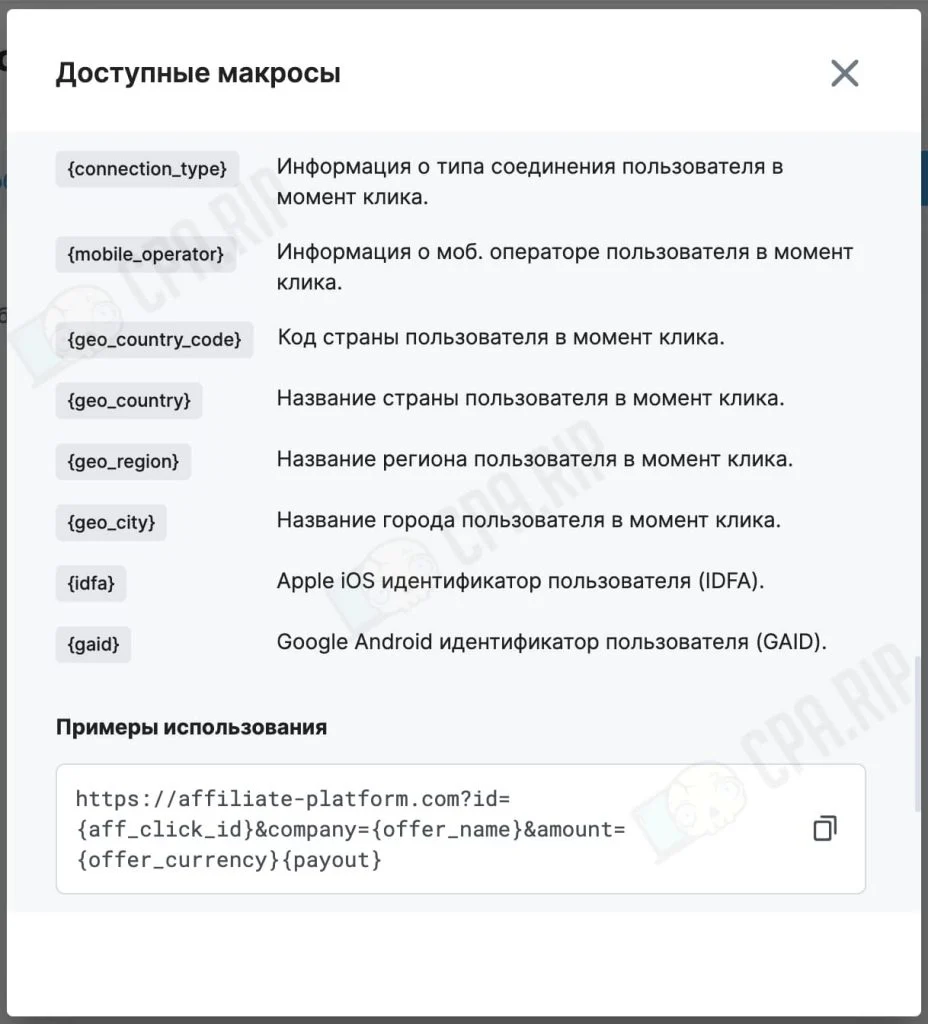
Click Available Macro to get info about all supported macro using which you can customize the postback settings to fit your needs:
Postback for Offer
To set postback on an offer, go to the offer page and click + Add Postback at the bottom:

Further postback settings are similar to the global postback settings.
Important! After completing the postback settings, be sure to test its functionality by sending a test lead which should be displayed in the tracker. If the conversion is not counted within half an hour after sending the lead – contact your manager.
Setting up Postback for Gambling Offers
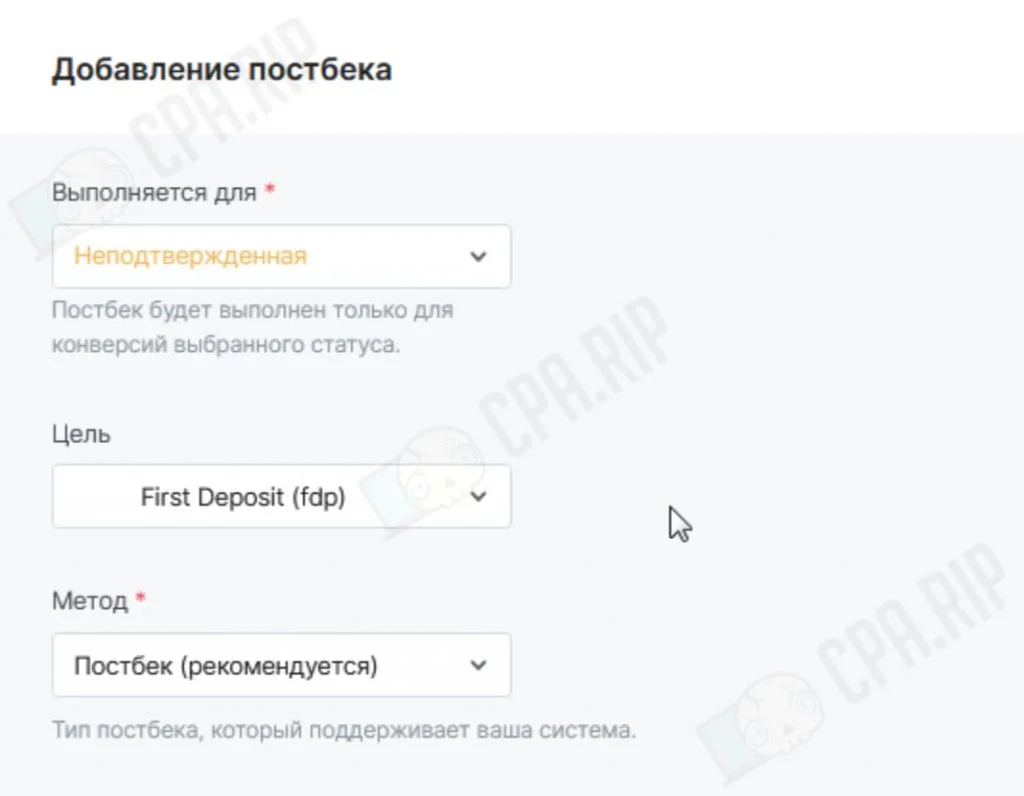
Next, let’s see how to set up postback in Partners.cpa.rip for gambling offers. In the pop-up window, configure the necessary parameters depending on the purpose of the postback
Global postback
- For registration postback you need to select “Run for”-> “Confirmed”-> Target type ->REG
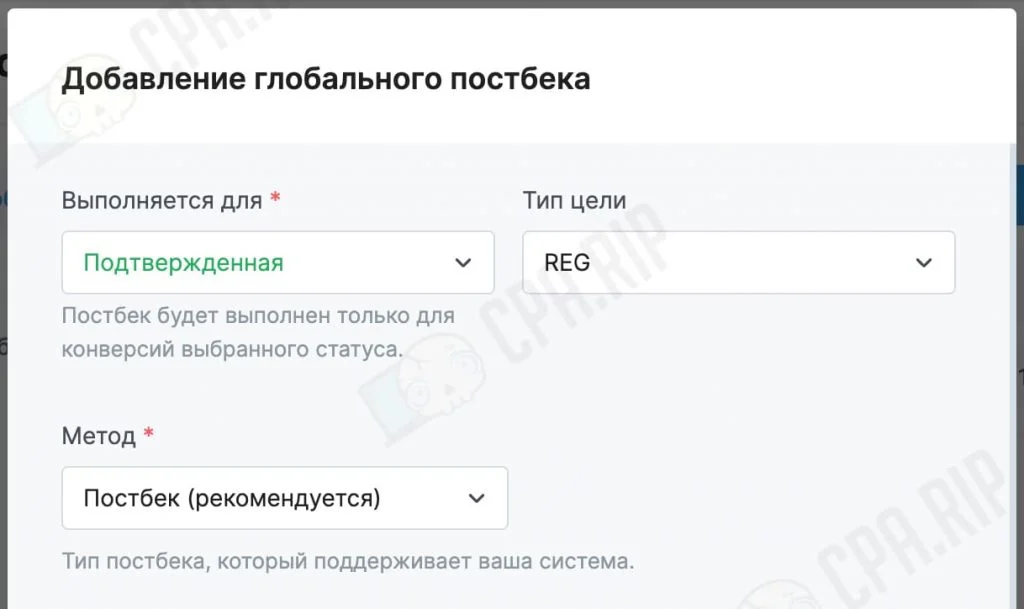
- In the Postback field, paste the Postback URL you’ve received from the tracker and add
?subid={aff_click_id}&status=leadto it. - For deposit postback, select Unconfirmed in the “Run for” section and DEP in the Target Type section
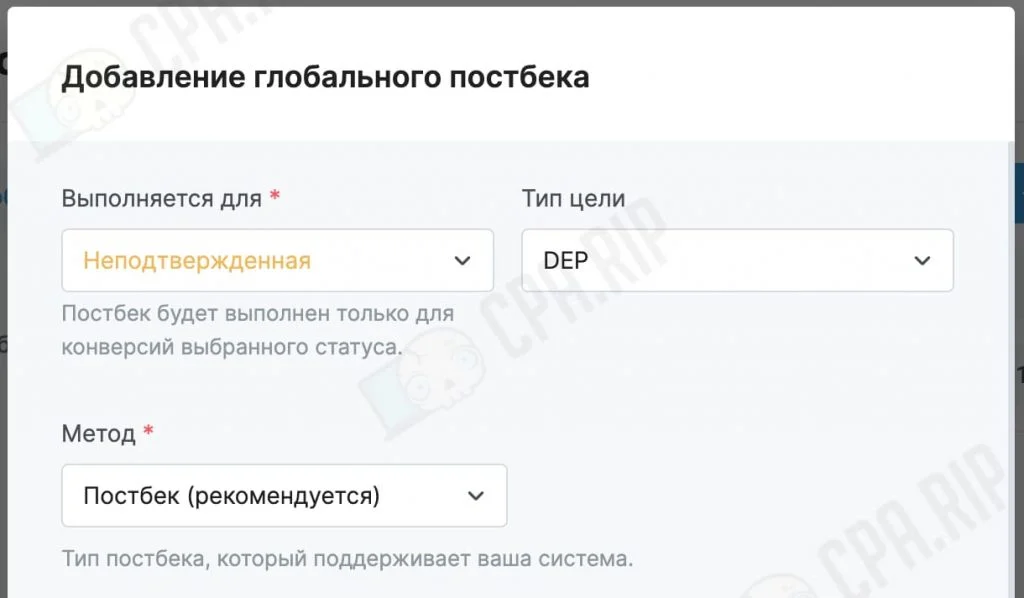
- In the Postback field, paste the Postback URL you’ve received from the tracker and add
?subid={aff_click_id}&payout={payout}&status=sale¤cy={offer_currency}to it.
Registration will be displayed in the tracker as a lead, deposit will be displayed as a sale.
Postback for offer
For registration postback fill in all the fields as it is shown in the screenshot:

- In the Postback field insert the link you have received after creating an affiliate network and add ?subid={aff_click_id}&status=lead to it
For deposit postback, fill everything out as in the screenshot:
In the Postback field insert the link you have received after creating an affiliate network and add ?subid={aff_click_id}&payout={payout}&status=sale¤cy={offer_currency} to it.
Registration will be displayed in the tracker as a lead, deposit will be displayed as a sale.
Customising Landings and Offers in Keitaro
Although it is not necessary to use local offers or landings, if you work with well-known advertising networks it’s better to choose local ones and without redirects. That’s why we will further analyze the creation of local landings and offers.
Local Landing
The function of uploading a local landing page is usually used to upload a White page for bots and moderators or a Black page/prelending which is used for bringing users to the offer or local offer.
Let’s see how to upload a local landing page to the Keitaro tracker.
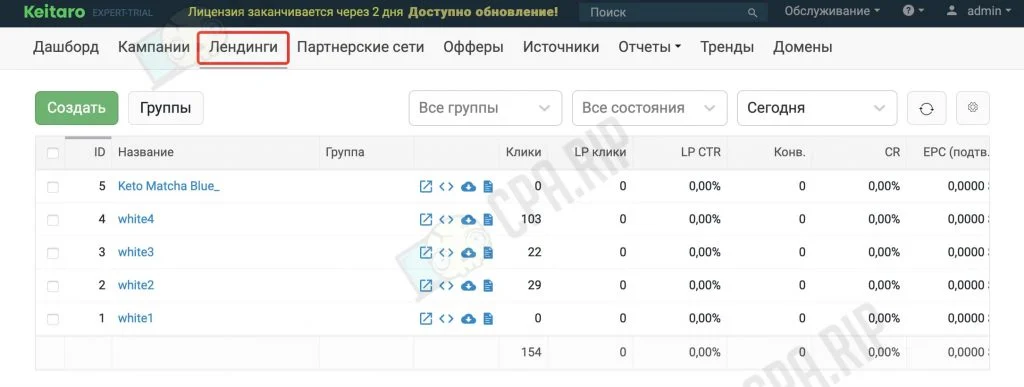
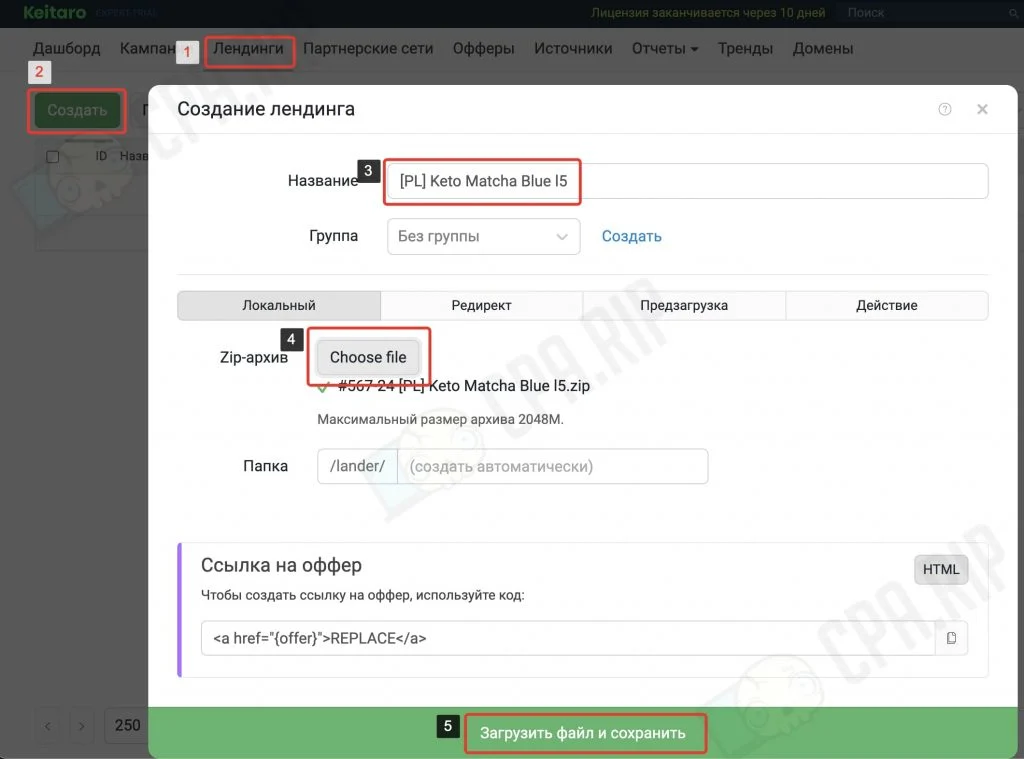
- Go to the Landing tab and click the Create button
- Then set the name of the landing page
- Next, upload a Zip archive with the landing page files by clicking the Choose file button.
- Click Upload file and save
The archive with landing page files must be in a .zip format and weigh no more than 2048MB. There must also be an index.html or index.php file (without the <base> tag).
Important! If the local landing page is used as a pre-landing, first replace the links leading to the offer with the {offer} macro. In the code, it should look like this <a href="{offer}">Link_text</a>

Using this macro, the tracker will automatically insert a link to an offer or a local offer into the landing page.
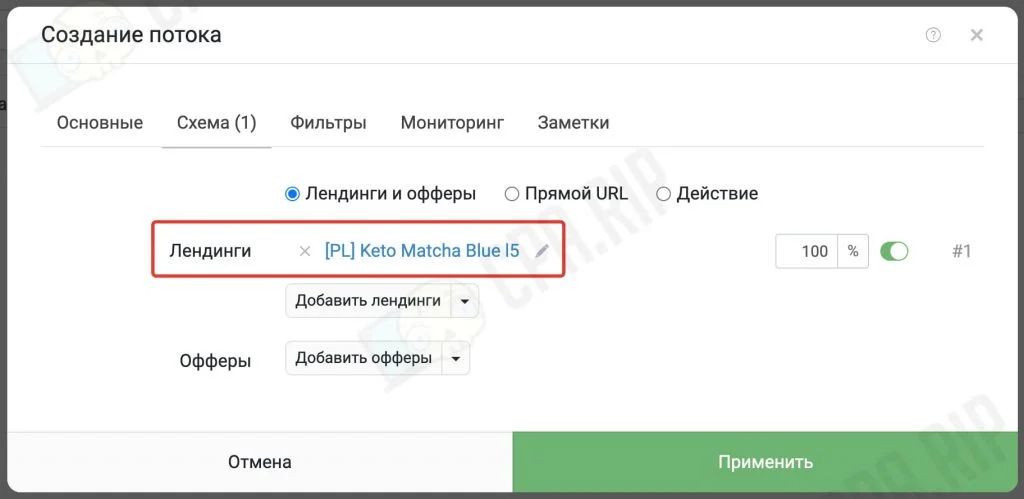
Now the landing page is uploaded locally and you can select it in the campaign flow settings:
When using a local landing page, the LP CTR indicator will appear in the statistics — it shows how many people came from the landing page to the offer.
In this article https://cpa.rip/en/services/keitaro-landing-without-base-tag/ we’ve considered the option of using a local landing page, which allows you to hide the use of the Keitaro tracker from advertising networks.
Adding an offer to the Keitaro tracker
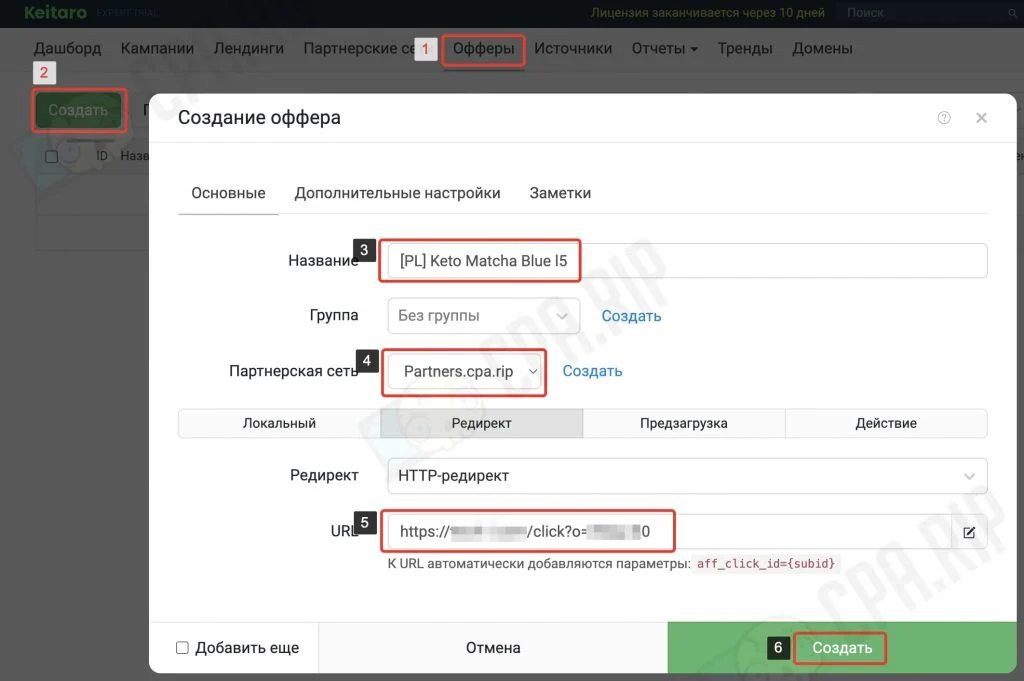
To further set up a campaign in the tracker, you need to create an offer. A simple with a straight redirect option.
- In Keitaro, go to the Offer tab and click the Create button
- In the new window, set the name of the offer
- Select a previously created affiliate network. In our case, it is Partners.cpa.rip.
- The redirect type will remain HTTP
- In the URL field enter the link to the offer received in the affiliate network.
- Click Create
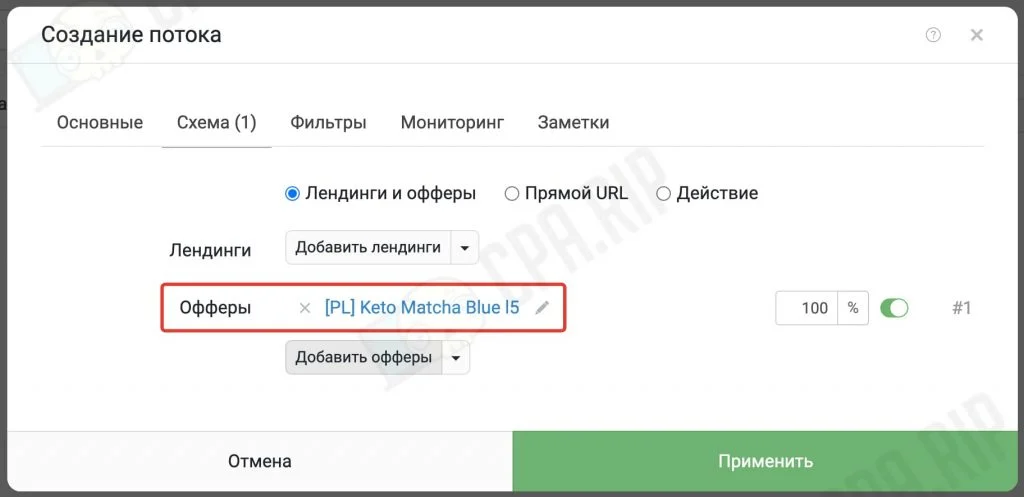
Now the offer is created and can be selected in the campaign flow settings:
Local Offer
In certain cases, it is better to work not via redirects but to direct traffic to a local offer. You can ask your affiliate manager for a ready-made landing page with an offer configured to the affiliate network API.
- In Keitaro, go to the Offer tab and click the Create button
- In the new window specify the name of the offer
- Select a previously created affiliate network. In our case, it is Partners.cpa.rip.
- Select Local
- Next, upload a Zip archive with the landing page files by clicking the Select File button.
- Click Save
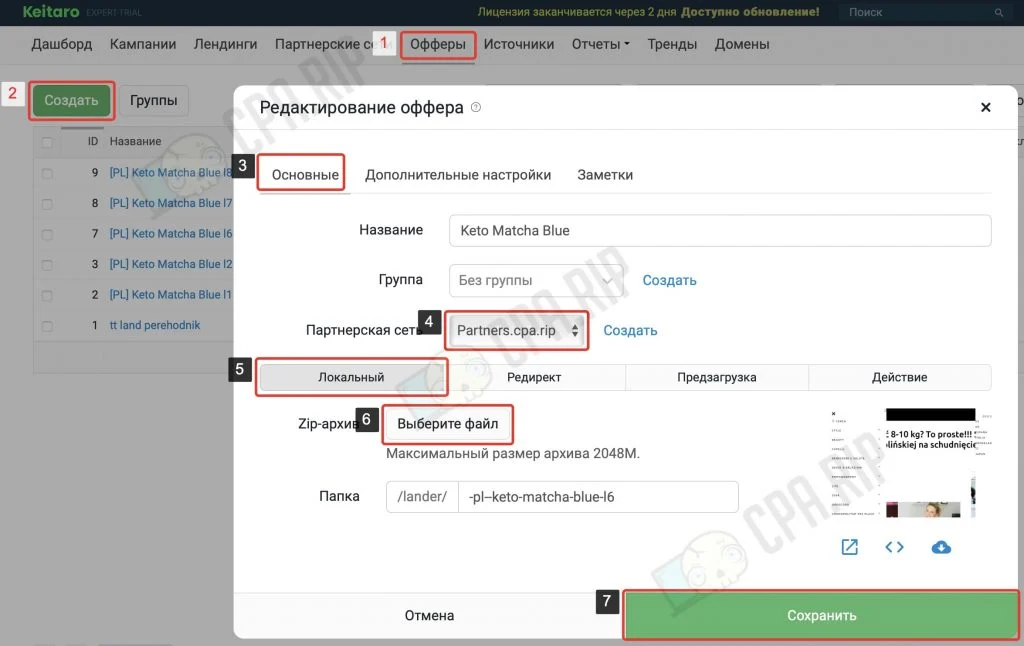
The archive with offer files must be in a .zip format and weigh no more than 2048MB. There must also be an index.html or index.php file (without the <base> tag).
Self-configuration of lead transfer via API
If there is no suitable landing with a configured lead transfer via API for your offer, you can configure any of your landing pages.
Usually, it is made this way: a request form on the landing page is set up. After a user fills in the data and clicks “Send”, the data is transferred to the connected script handler, which sends a request to the affiliate network using a special address.
To understand how it is done, let’s consider the Partners.cpa.rip affiliate network example.
Each affiliate has its API and rules for setting up lead transfer. That’s why please contact your manager for information on how to make the configuration.
Setting up the submission form
Choose your landing page that needs to be configured for sending leads to the Partners.cpa.rip affiliate network. If it doesn’t have a submission form, then add the following form code:
<!-- order.php - имя скрипта, в который отправляются данные из формы -->
<form action="order.php" method="POST">
    <!-- скрытое поле содержащее ГЕО -->
    <input type="hidden" name="country" value="RU">
    <!-- скрытое поле для id клика (если используется трекер)-->
    <input name="aff_click_id" type="hidden" value="{subid}">
    <!-- скрытое поле для id пикселя FB (заполнится автоматически значением из параметра адресной строки fb_pixel) -->
    <input name="pixel" type="hidden" value="<?=$_GET['fb_pixel'];?>">
    <!-- поле ввода имени -->
    <input name="name" type="text" required>
    <!-- поле ввода телефона -->
    <input name="phone" type="tel" required>
    <button type="submit">ОТПРАВИТЬ</button>
</form>
If you already have a form, you can replace it or adjust its parameters as in the code above. You may have to adjust the design of the form to match the design of the landing page.
Let’s see what else is in this code:
- In the “action” attribute you need to add the link to the
order.phphandler script, to which the data will be sent when the user clicks the “Submit” button. - If GEO is written directly in the
order.phphandler script, you can not use the country field. - The aff_click_id field is needed to send a unique click identifier from the tracker. For example, the Keitaro tracker uses the {subid} macro.
- The pixel field can be used to pass the Facebook pixel ID to the handler script. If a FB pixel value was specified in the transition URL via the fb_pixel parameter, it will be substituted into the code
<?=$_GET['fb_pixel'];?>on the “Thank you” page.
Important: This code will only work if the page has a .php extension
Validation of leads
Often users accidentally or intentionally enter incorrect phone numbers into the request form. To ensure that the phone number in the application form is real and suitable for the GEO you need to use a validator of phone numbers.
You can connect the validator from this archive to your landing page:https://disk.yandex.ru/d/-vMonAvZDBW-tA
- Download and unzip the build folder into your landing page folder.
- If you don’t have the jquery library plugged in, add the following code to the head block of the homepage:
<script src="build/js/jquery.min.js"></script> - In the same head block connect the validation library:
<script src="build/js/intlTelInput-jquery.min.js"></script> - At the end of the page, before the closing
</body>tag, add the following script:
<script>
    $("input[name*='phone']").each(function( index ) {
      var inputTel = $(this).intlTelInput({
    allowDropdown:false,
    initialCountry: "KZ",// Двухбуквенный код страны (ISO 3166-1 alpha-2)
    utilsScript:"build/js/utils.js"
     });
     $("form").submit(function () {
      var isValid = inputTel.intlTelInput("isValidNumber")
      if(isValid) {
    return true;
      } else {
    alert("Сообщение о неправильном номере");
    return false;
      }
    })
    });
</script>- In this script in the
initial country(line 5) replace the offer code of the country. - In
alert("Wrong number message");enter the message text in the required language, which will be displayed if the user enters an incorrect phone number.
Important! For the validator to work, the field for entering a phone number in the application form on the landing page must have the
name="phone"attribute.
Sending leads
As we’ve written above, to send leads you need to connect a special script handler. For Partners.cpa.rip you can download a ready script from here: https://disk.yandex.ru/d/ErB9-_LeaTfFww
This script sends requests using a POST method to a special URL of the affiliate network: https://track-l.com/api/v2/affiliate/leads-upon?api-key=YOUR_API_KEY
In which YOUR_API_KEY should be replaced with your API access key from your profile in the affiliate’s account
Mandatory parameters that must be passed to the affiliate network via the handler script:
- affilate_id – webmaster ID
- offer_id – offer identifier
- ip – ivisitor’s ip address
- firstname – name
- phone – phone number
- country – country code in ISO 3166-1 alpha-2 format (e.g. RU, UA, DE, etc).
Additional parameters:
- aff_click_id – click identifier in your CRM / tracker
- sub_id1 – Additional parameter 1
- sub_id2 – Additional parameter 2
- sub_id3 – Optional parameter 3
- sub_id4 – Optional parameter 4
- sub_id5 – Additional parameter 5
Example of the server response:
{
  "status": "success",
  "code": 200,
  "name": "OK",
  "message": "The Lead has been created successfully!",
  "info": {
    "status": "success", // статус запроса
    "message": "Processed. Lead ID: cbdbb7bc-a473-4436-b4d9-3a7dbfe23b57",
    "lead_id": "cbdbb7bc-a473-4436-b4d9-3a7dbfe23b57", // идентификатор лида
    "transaction_id": "cbdbb7bc-a473-4436-b4d9-3a7dbfe23b57",
    "conv_status": "pending", // статус лида
    "affiliate_id": 1,
    "offer_id": 55,
    "goal_id": 101
  }
}
Now you can use your API customized landing page locally on your server.
Important! After preparing and uploading it, make a test request using this landing page.
Setting up the source in Keitaro
Similar to “affiliate networks”, Keitaro has implemented “traffic sources” – a set of templates for various popular advertising networks with already configured data for the transfer of utm-parameters. They allow you to set up data transfer from the traffic source to the tracker and back in a couple of clicks.
Next, you need to create a source from the template from which you are going to send traffic. In our case, it is Facebook Ads:
- Go to the Sources section
- Click Create
- Select the desired source from the template
- If necessary, edit the parameters
- Click Save

Since we’re considering the Facebook example, it’s worth noting that the tracker has a Facebook Integration feature that pulls information about ad campaign expenses from Facebook Ads. You can read more about the setup here: https://docs.keitaro.io/ru/third-party-integrations/facebook.html.
Adding a domain to Keitaro
By default, the Keitaro tracker is available at http:// your_server's IP/admin and does not have a secure connection (SSL). The same address will be used when generating campaign links to which you will direct traffic. This link option is not suitable for normal work with known traffic sources.
Therefore, before you start creating your first campaign, you should add your domains to the tracker. This will enable you to generate campaign links of the following type: https://my_domen.net/identifikator.
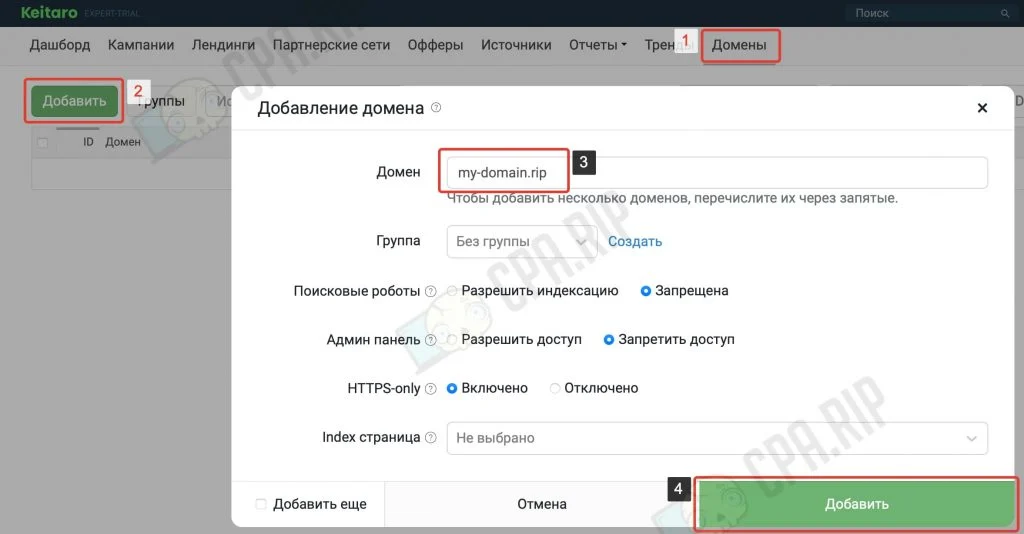
- Go to the Landing section
- Click Add
- In the Domains field enter your domain.
- Click Add
The domain must be bound to the tracker server. Detailed instructions on how to forward domains via Cloudflare and bind them to the Keitaro tracker: https://cpa.rip/en/services/domens-cloudflare-to-keitaro/
After binding domains, you need to wait for a DNS update (which may take up to 24 hours):

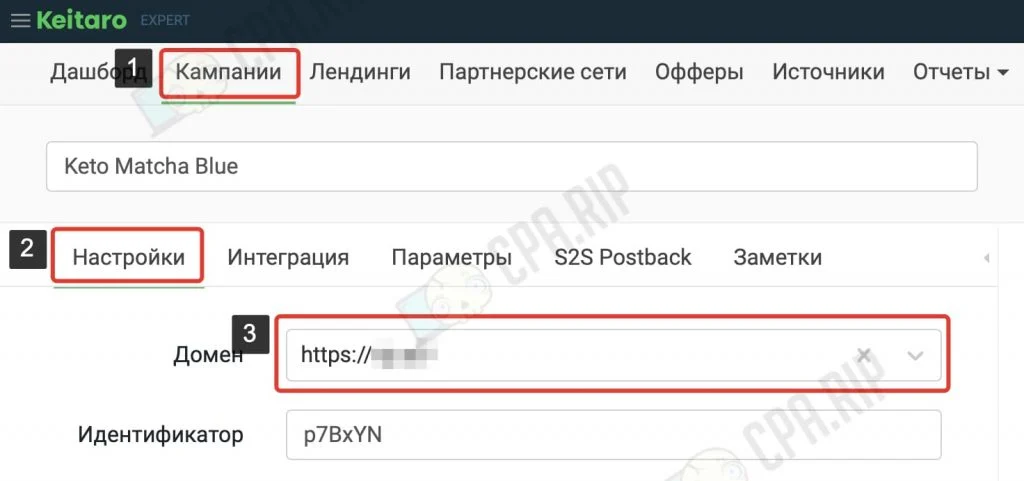
The added domains can be selected when creating a campaign and links will be generated like https://my_domen.net/identifikator (domain + random or manually set ID):
Park the domain to the campaign
If you want to get a link to a campaign only by domain without an identifier at the end, you need to bind it to a specific campaign in the domain settings:
- In the Domain section, select the previously added domain
- In the Index page field, select the required campaign
- Click Save
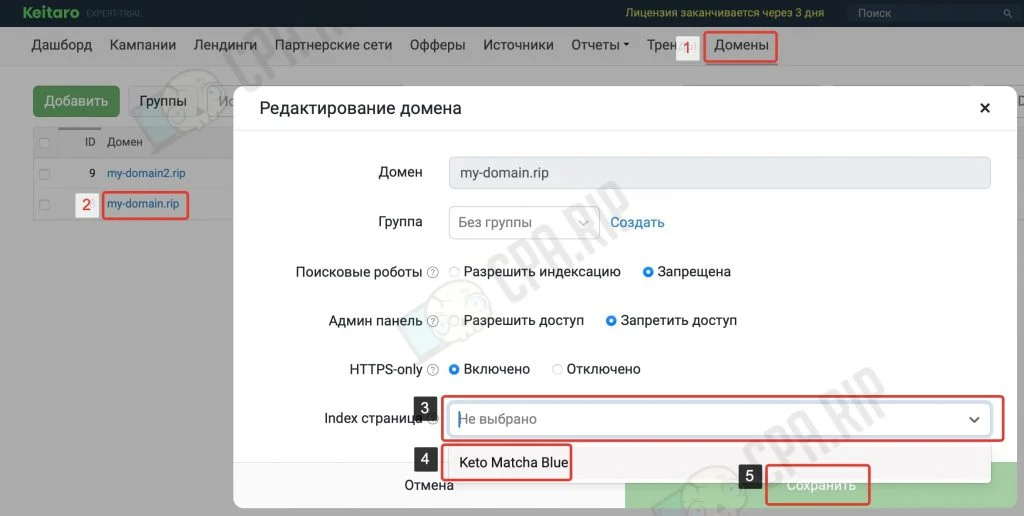
Now when you click on the domain https://my_domen.net/ the specified Keto Matcha Blue campaign will open.
Creating a campaign in the Keitaro tracker
After completing all the previous steps, you can start creating and setting up a campaign for driving traffic, such as Facebook Ads.
In this article, we will not consider the methods of traffic filtering for Facebook and other advertising networks. You can read more about the options for filtering traffic with the Keitaro tracker in our articles:
- Traffic filtering, traffic filtering via Keitaro v10 tracker with ISP bases
- Traffic filtering TikTok Ads with Keitaro filters
Now let’s see step by step how to create a campaign with simple filters to understand the principle of working with flows.
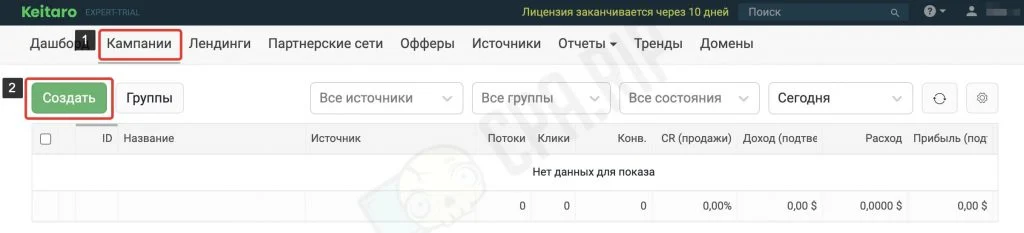
- Go to the Campaigns section
- Click Create
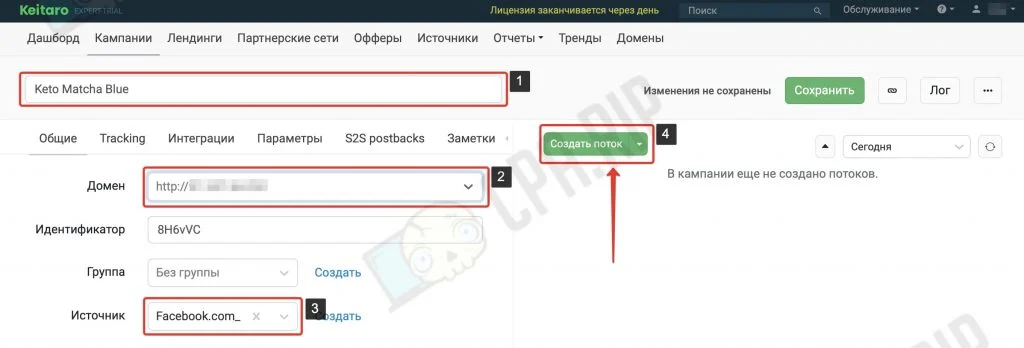
- Set a name for the campaign
- In the Domain list, select the desired domain that you have previously added to the tracker.
- In the Source list, select the traffic source previously created from the template. In our case it is Facebook. Let’s leave the rest of the settings as default for now.
- Click Create flow
You can use different flow structures in your campaign, as you prefer. We’ll take the following: Intercepting flow → Normal flow → Closing flow.
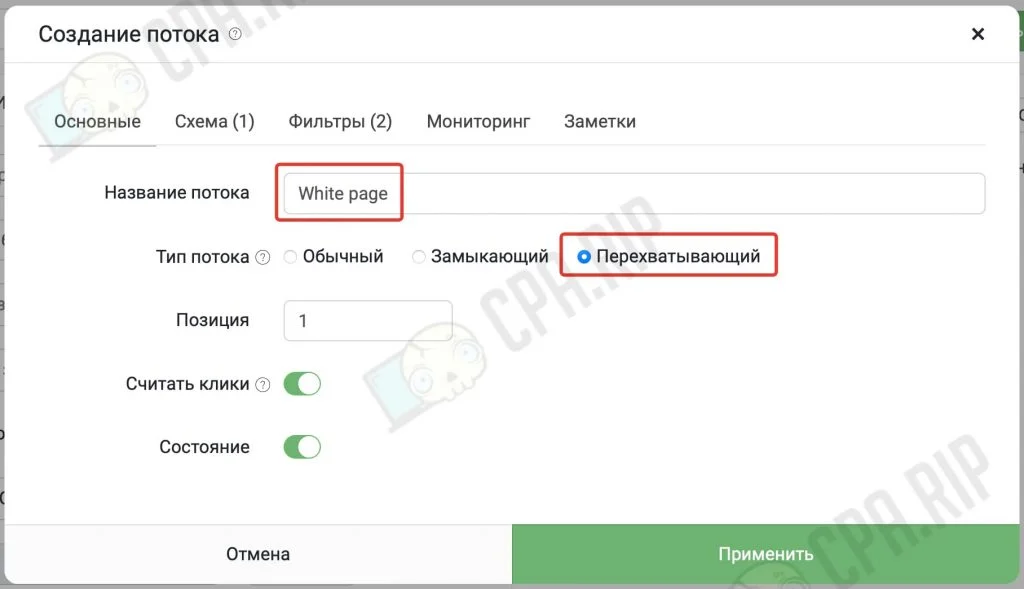
Intercepting flow
We will put the intercepting flow in the first position, it will work first and select clicks that should not reach our black page with an offer. These are bots and moderators of the advertising network.
- In the modal window, enter the name of the flow
- Assign the Intercept type to it
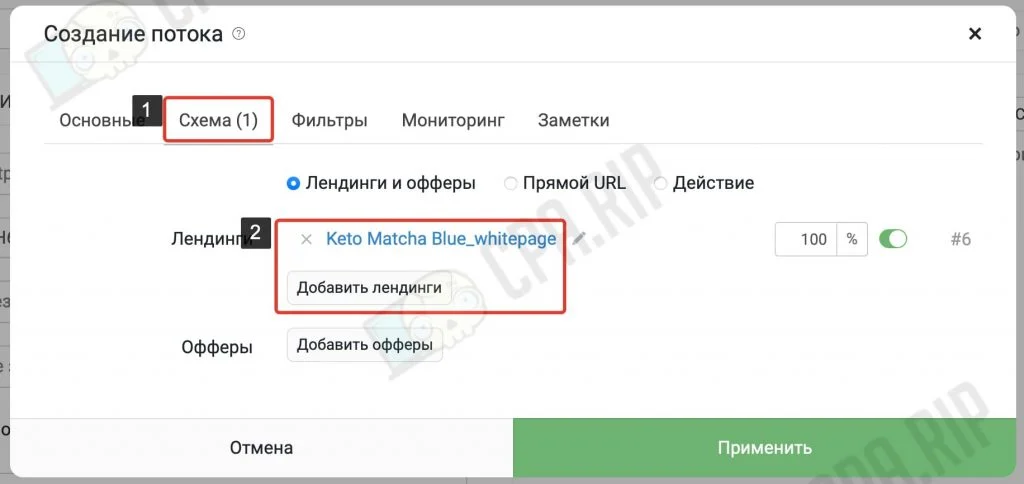
- Go to the Scheme tab
- Click Add Landing and select a previously added white page from the list.
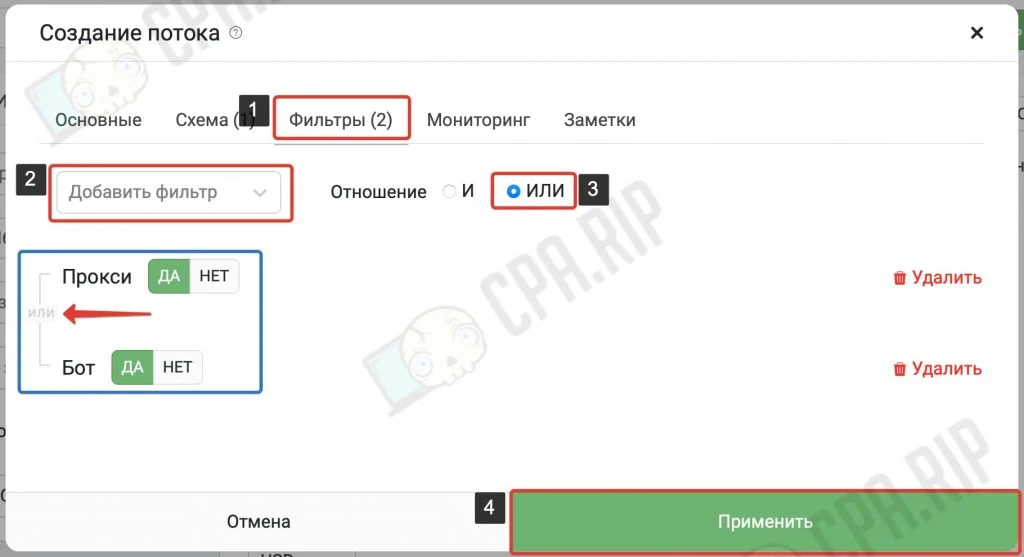
- Click the Filters tab
- In the Add Filter list, find and select the filters you want. We have selected Proxy and Bot. The switch should be set to YES.
- Make sure to select “OR” so that the flow works even if the click parameters only fit one filter.
- Click Apply
The first flow is ready, let’s move on to the second flow.
Regular flow
The normal flow will work next and will send to the black page all the clicks that do not fit the intercepting flow but fit the specified filters.
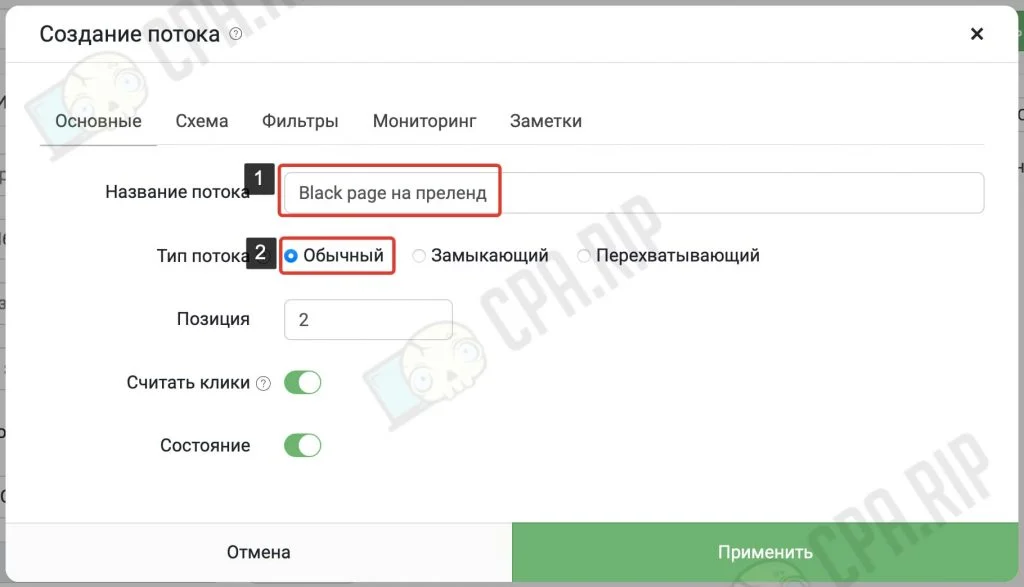
- Click Create Flow again
- In the modal window specify the name of the flow
- Leave the flow type as Regular
- Click the Scheme tab
- Click Add Landing and select the required landing page from the list.
You can do without a local landing page, which in this case acts as a pre-landing. Especially if the offer itself was added locally.
- Click Add Offer and select the desired offer added earlier
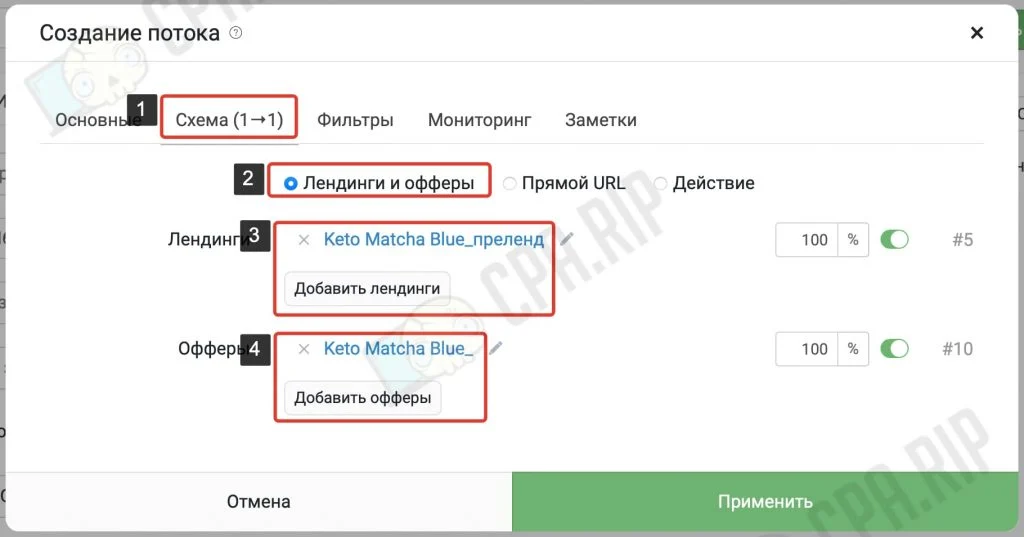
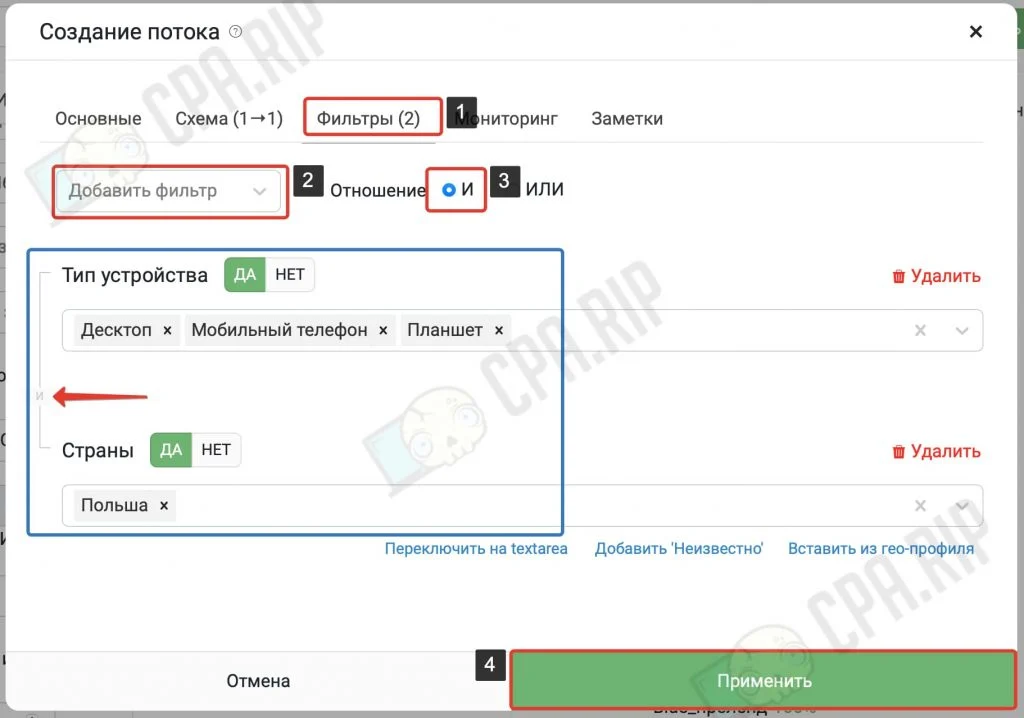
- Go to the Filters tab
- In the Add Filters list find and select the filters you want. We have selected Device Type and Country to specify the country and devices from which to direct traffic to the black page.
- Make sure to select “And” to ensure that the flow works for clicks that match all the filters you’ve selected.
Let’s move on to the closing flow.
Closing flow
The closing flow is needed to direct all other traffic that was not suitable for the previous flows.
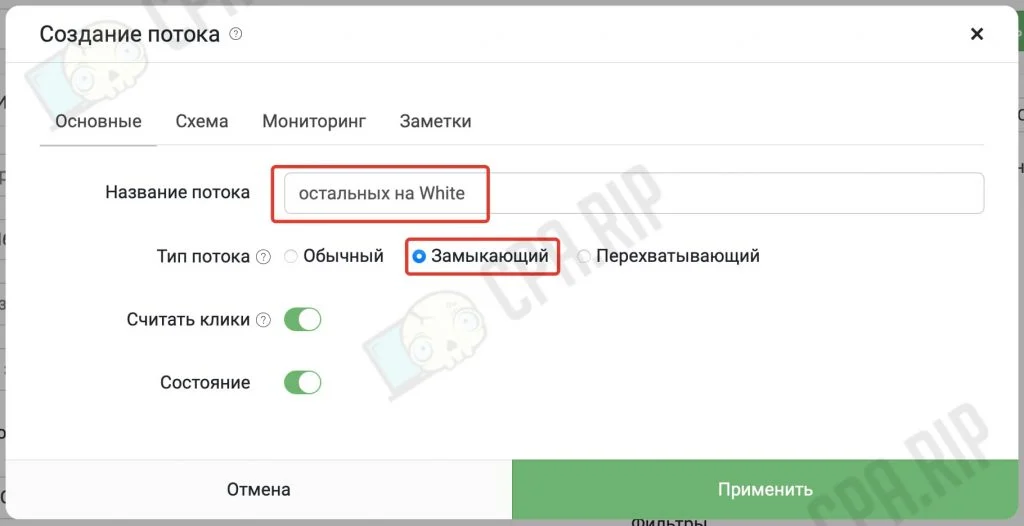
- Click on Create Flow again
- Specify a name for the flow
- Select Closing Flow Type
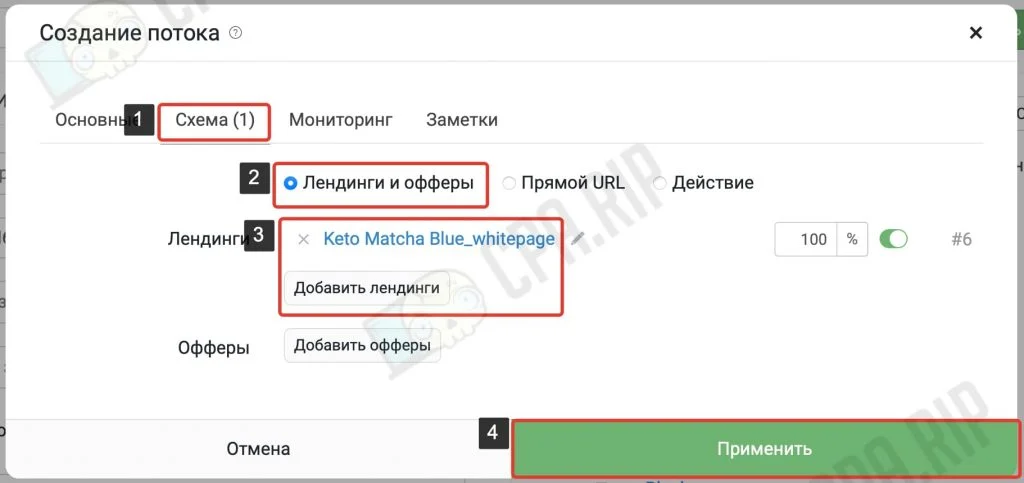
- Click the Scheme tab
- Click Add Landing and select the previously added white page from the list that opens.
- Click Apply
Campaign link
After all the campaign settings and creating the desired flows, make sure to click Save. The screenshot below shows how the finished campaign looks like with all the flows and filters:

- Click on the icon to copy the finished campaign link:

You can also disable the flow on the black page during moderation and then switch it back on afterward. This way bots and moderators won’t be able to get to it.

? Keitaro promo code for 22% off – CPARIP ?